
All in One Printer User Manual


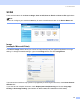

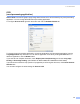
Table Of Contents
- SOFTWARE USER’S GUIDE
- Table of Contents
- Section I: Windows®
- 1 Printing
- Using the Brother printer driver
- Printing a document
- Duplex (two-sided) printing
- Simultaneous scanning, printing and faxing
- Printer operation key
- Status Monitor
- Printer driver settings (For Windows®)
- How to access the printer driver settings (For Windows®)
- Features in the Windows® printer driver
- Features in BR-Script3 (Post Script® 3™ language emulation) Printer compatible driver
- 2 Scanning
- Scanning a document using the TWAIN driver
- Scanning a document using the WIA driver (For Windows® XP/Windows Vista®)
- Using the Scan key (For USB or Parallel cable users)
- Using ScanSoft® PaperPort® SE with OCR
- 3 ControlCenter2
- 4 Network Scanning (For models with built-in network support)
- 5 Remote Setup (Not available for DCP models)
- 6 Brother PC-FAX Software (Not available for DCP models)
- PC-FAX sending
- Speed Dial setup
- Brother Address Book
- Setting up a member in the Address Book
- Setting up a group for broadcasting
- Editing member information
- Deleting a member or group
- Exporting the Address Book
- Importing to the Address Book
- Sending a file as a PC-FAX using the Facsimile style user interface
- Sending a file as a PC-FAX using the Simple style user interface
- PC-FAX receiving
- 7 Firewall settings (For Network users)
- 1 Printing
- Section II: Apple® Macintosh®
- 8 Printing and Faxing
- Setting up your USB-equipped Apple® Macintosh®
- Printer operation key
- Status Monitor
- Using the Brother Laser driver for Macintosh® (Mac OS® X)
- Using the Brother Laser driver for Macintosh® (Mac OS® 9.1 to 9.2)
- Using the BR-Script3 (Post Script® 3™ language emulation printer driver)
- Sending a fax (Not available for DCP models)
- 9 Scanning
- 10 ControlCenter2 (For Mac OS® 10.2.4. or greater)
- 11 Network Scanning (Not available for DCP-8060)
- 12 Remote Setup (Not available for DCP models)
- 8 Printing and Faxing
- Index
- brother USA/CAN

2. Scanning
56
ScanSoft
®
PaperPort
®
OCR lets you convert image text into text you can edit 2
ScanSoft
®
PaperPort
®
SE can quickly convert a text document image into text that you can edit with a word
processing application.
PaperPort
®
SE uses the optical character recognition application OCR, which comes with PaperPort
®
SE.
PaperPort
®
SE can use your preferred OCR application if it is already on your PC. You can convert the entire
item, or by using the Copy Text command, you can choose only a portion of the text to convert.
Dragging an item onto a word-processing link icon starts PaperPort
®
’s built-in OCR application, or you can
use your own OCR application.
You can import items from other applications 2
As well as scanning items, you can bring items into PaperPort
®
SE in a variety of ways and convert them to
PaperPort
®
SE (MAX) files in several different ways:
Print to the Desktop View from another application, such as Microsoft
®
Excel.
Import files saved in other file formats, such as Windows
®
Bitmap (BMP) or Tagged Image File Format
(TIFF).
You can export items into other formats 2
You can export or save PaperPort
®
SE items in several popular file formats, such as BMP, JPEG, TIFF, PDF
or self-viewing.
For example, to create a file for an Internet Web site, export it as a JPEG file. Web pages often use JPEG
files for displaying images.
Exporting an image file 2
a Click File, then Save As in the PaperPort
®
SE window.
The Save ‘XXXXX’ as dialog box is displayed.
b Choose the drive and folder where you want to store the file.
c Enter the new file name and choose the file.
d Click Save to save your file, or Cancel to return to PaperPort
®
SE without saving it.