
User Manual
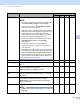
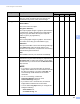
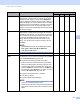
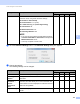
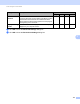

Table Of Contents
- User’s Guide ADS-2000e/ADS-2500We
- Brother Numbers
- User’s Guides and where do I find them?
- Getting Started
- Table of Contents
- 1 General Information
- Using the Documentation
- About This Machine
- Control Panel Overview (ADS-2000e)
- Control Panel Overview (ADS-2500We)
- General Setup (ADS-2000e)
- General Setup (ADS-2500We)
- Set the Backlight Brightness
- Set the Dim Timer for the Backlight
- Set the Home Screen
- Select Your Language
- Memory Storage
- Beep Volume
- Automatic Daylight Saving Time
- Sleep Mode
- Power Down Mode
- Multifeed Detection
- Reduced Noise Mode
- Setting Lock
- Set the Password
- Change the Password
- Turn Setting Lock On/Off
- User Restriction Functions
- 2 Document Specifications
- 3 Scan Preparation
- 4 Prepare Your Network
- 5 Scan Using Your Computer
- Change the ControlCenter4 User Interface (Windows®)
- Scan Using ControlCenter4 in Home Mode (Windows®)
- Scan Using ControlCenter4 in Advanced Mode (Windows®)
- Create a Custom Tab (ControlCenter4 Advanced Mode) (Windows®)
- Change Scan Settings (ControlCenter4) (Windows®)
- Scan Using ControlCenter2 (Macintosh)
- Register Your Favorite Scan Settings Using ControlCenter2 (Macintosh)
- Change Scan Settings (ControlCenter2) (Macintosh)
- Scan Using Nuance™ PaperPort™ 12SE or Other Windows® Applications
- Use Nuance PDF Converter Professional 8 (Windows®)
- Use NewSoft Presto! BizCard 6 (Windows®)
- Scan Using Presto! PageManager or TWAIN Applications (Macintosh)
- Scan Using Apple Image Capture (ICA Driver)
- Use NewSoft Presto! BizCard 6 (Macintosh)
- Scan Using Captiva® QuickScan™ Pro or ISIS® Applications (Windows®)
- 6 Scan Using the Control Panel
- Save Scanned Documents on Your Computer
- Save Scanned Documents on a USB Flash Drive
- Scan Documents to an FTP Server (ADS-2500We only)
- Scan Documents to a Shared Folder / Network Location (Windows®) (ADS-2500We only)
- Scan Using Web Services (Windows Vista® SP2 or Later, Windows® 7, Windows® 8 and Windows® 8.1) (ADS-2500We)
- Send Scanned Documents Directly to an Email Address (ADS-2500We only)
- Set Up the Address Book (ADS-2500We only)
- Upload Scanned Documents to the Web (ADS-2500We only)
- Change Scan to PC Settings (Windows®)
- Change Scan to PC Settings (Macintosh)
- Scanner Shortcuts (ADS-2500We only)
- 7 Managing the Machine from Your Computer
- 8 Routine Maintenance
- 9 Troubleshooting
- A Specifications
- B Appendix
- C Index
Scan Using the Control Panel
151
6
Brightness Adjust the setting (-50 to 50) to get the best image. The
default value of 0 represents an average and is usually
suitable for most images. You can set the Brightness
level by dragging the slider to the right or left to lighten or
darken the image. You can also enter a value in the box to
set the level. If the scanned image is too light, set a lower
Brightness level and scan the document again. If the
image is too dark, set a higher Brightness level and scan
the document again.
Yes Yes Yes Yes
Contrast Adjust the setting (-50 to 50) to get the best image. The
default value of 0 represents an average and is usually
suitable for most images. You can increase or decrease
the contrast level by moving the slider to the right or left.
An increase emphasizes dark and light areas of the
image, while a decrease reveals more details in grey
areas. You can also enter a value in the box to set the
Contrast.
NOTE
The Contrast setting is only available when setting
Scan Type to Auto, Gray (Error Diffusion),
True Gray or 24bit Color.
Yes Yes Yes Yes
Default Restore all settings to their factory default values. Yes Yes Yes Yes
Carrier Sheet
Mode
Scan the following documents using the Carrier Sheet.
For this mode, you can select any setting other than Auto
from the Document Size drop-down list.
Large-sized Documents (A3, B4 and Ledger)
Fold the document in half and insert it in the Carrier
Sheet for 2-sided (duplex) scanning, then both front
and back pages will be combined into a single page.
Select 2in1(A4) for an A3 document, 2in1(B5) for a
B4 document or 2 in 1(Letter) for a Ledger document
from the Document Size drop-down list.
Important documents (photos, contracts)
Thin paper (receipts)
Irregular-shaped paper (clippings)
NOTE
• Load only one Carrier Sheet at a time.
• Set the document in the center of the Carrier Sheet and
align the top of the document with the top of the Carrier
Sheet.
Yes Yes Yes Yes
Setting Description Applicable Feature
Image OCR E-mail File