
Instruction manual
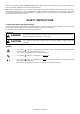


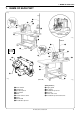
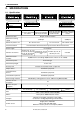
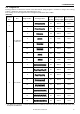

Table Of Contents
- Go to Instruction Manual Top Page
- Cover-Top
- SAFETY INSTRUCTIONS
- CONTENTS
- 1. NAME OF EACH PART
- 2. SPECIFICATIONS
- 3. INSTALLATION
- 3-1. Power table
- 3-2. Installing the control box
- 3-3. Installing the rubber cushions
- 3-4. Installing the oil pan
- 3-5. Installing the cushions
- 3-6. Installing the switching plate
- 3-7. Installing the machine head
- 3-8. Installing the head rest
- 3-9. Installing the liquid cooling tank, optional
- 3-10.Installing the operation panel
- 3-11.Connecting the ground wire
- 3-12.Connecting the cords
- 3-13.Installing the belt cover
- 3-14.Installing the foot switch
- 3-15.Installing the spool stand
- 3-16.Installing the eye guard
- 4. LUBRICATION
- 5. OPERATION
- 6. CHECKING THE SEWING PATTERN
- 7. CORRECT USE
- 8. SEWING
- 9. MAINTENANCE AND INSPECTION
- 10. STANDARD ADJUSTMENTS
- 10-1.Adjusting the needle bar height
- 10-2.Adjusting the needle bar lift amount
- 10-3.Adjusting the driver needle guard
- 10-4.Adjusting the needle clearance
- 10-5.Adjusting the shuttle race thread guide
- 10-6.Adjusting the thread take-up amount
- 10-7.Adjusting the movable knife
- 10-8.Adjusting the work clamp lift amount
- 10-9.Work clamp pressure adjustment (KE-432B)
- 10-10. Work clamp closing-distance adjustment (KE-432B)
- 10-11. Work clamp interchangeability (KE-433B)
- 10-12. Adjusting the needle up stop position
- 10-13. Adjusting the thread wiper
- 10-14. Checking the input sensor and DIP switch input
- 10-15. Checking the input voltage
- 10-16. Clearing all memory settings
- 10-17. Moving stitch patterns
- 11. USING THE COUNTERS
- 12. CHANGING FUNCTIONS USING THE DIP SWITCHES
- 13. CHANGING SPECIAL FUNCTIONS USING THE MEMORY SWITCHES
- 14. TABLE OF ERROR CODES
- 15. GAUGE PARTS LIST ACCORDING TO SUBCLASSES
- 16. TROUBLESHOOTING
- 17. OPTIONAL PARTS
- Cover-Last

i
KE-430B, 431B, 432B, 433B
Thank you very much for buying a BROTHER sewing machine. Before using your new machine, please read the safety instruc-
tions below and the explanations given in the instruction manual.
With industrial sewing machines, it is normal to carry out work while positioned directly in front of moving parts such as the
needle and thread take-up lever, and consequently there is always a danger of injury that can be caused by these parts. Follow
the instructions from training personnel and instructors regarding safe and correct operation before operating the machine so
that you will know how to use it correctly.
SAFETY INSTRUCTIONS
1. Safety indications and their meanings
This instruction manual and the indications and symbols that are used on the machine itself are provided in order to ensure safe
operation of this machine and to prevent accidents and injury to yourself or other people.
The meanings of these indications and symbols are given below.
Indications
The instructions which follow this term indicate situations where failure to follow the instruc-
tions could cause injury when using the machine or physical damage to equipment and sur-
roundings.
Symbols
................ This symbol ( ) indicates something that you should be careful of. The picture inside the triangle indi-
cates the nature of the caution that must be taken.
(For example, the symbol at left means “beware of injury”.)
................ This symbol ( ) indicates something that you
must not do.
................ This symbol ( ) indicates something that you
must do. The picture inside the circle indicates the nature
of the thing that must be done.
(For example, the symbol at left means “you must make the ground connection”.)
CAUTION
The instructions which follow this term indicate situations where failure to follow the instructions
will almost certainly result in death or severe injury.
DANGER