
Instruction manual
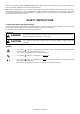


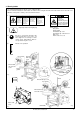
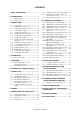
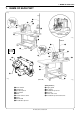

Table Of Contents
- Go to Instruction Manual Top Page
- Cover-Top
- SAFETY INSTRUCTIONS
- CONTENTS
- 1. NAME OF EACH PART
- 2. SPECIFICATIONS
- 3. INSTALLATION
- 3-1. Power table
- 3-2. Installing the control box
- 3-3. Installing the rubber cushions
- 3-4. Installing the oil pan
- 3-5. Installing the cushions
- 3-6. Installing the switching plate
- 3-7. Installing the machine head
- 3-8. Installing the head rest
- 3-9. Installing the liquid cooling tank, optional
- 3-10.Installing the operation panel
- 3-11.Connecting the ground wire
- 3-12.Connecting the cords
- 3-13.Installing the belt cover
- 3-14.Installing the foot switch
- 3-15.Installing the spool stand
- 3-16.Installing the eye guard
- 4. LUBRICATION
- 5. OPERATION
- 6. CHECKING THE SEWING PATTERN
- 7. CORRECT USE
- 8. SEWING
- 9. MAINTENANCE AND INSPECTION
- 10. STANDARD ADJUSTMENTS
- 10-1.Adjusting the needle bar height
- 10-2.Adjusting the needle bar lift amount
- 10-3.Adjusting the driver needle guard
- 10-4.Adjusting the needle clearance
- 10-5.Adjusting the shuttle race thread guide
- 10-6.Adjusting the thread take-up amount
- 10-7.Adjusting the movable knife
- 10-8.Adjusting the work clamp lift amount
- 10-9.Work clamp pressure adjustment (KE-432B)
- 10-10. Work clamp closing-distance adjustment (KE-432B)
- 10-11. Work clamp interchangeability (KE-433B)
- 10-12. Adjusting the needle up stop position
- 10-13. Adjusting the thread wiper
- 10-14. Checking the input sensor and DIP switch input
- 10-15. Checking the input voltage
- 10-16. Clearing all memory settings
- 10-17. Moving stitch patterns
- 11. USING THE COUNTERS
- 12. CHANGING FUNCTIONS USING THE DIP SWITCHES
- 13. CHANGING SPECIAL FUNCTIONS USING THE MEMORY SWITCHES
- 14. TABLE OF ERROR CODES
- 15. GAUGE PARTS LIST ACCORDING TO SUBCLASSES
- 16. TROUBLESHOOTING
- 17. OPTIONAL PARTS
- Cover-Last

KE-430B, 431B, 432B, 433B
iv
Safety devices
Eye guard
Finger guard
Thread take-up cover
Thread take-up solenoid cover
Belt cover
Frame side cover, etc.
2
Moving parts
may cause injury.
Operate with safety devices.
Turn off main switch before
threading, changing bobbin
and needle, cleaning etc.
4
Be sure to connect the ground. If the
ground connection is not secure, you
run a high risk of receiving a serious
electric shock, and problems with cor-
rect operation may also occur.
The following warning labels appear on the sewing machine.
Please follow the instructions on the labels at all times when using the machine. If the labels have been removed or are
difficult to read, please contact your nearest Brother dealer.
3. Warning labels
1
Hazardous voltage
will cause injury.
Turn off main
switch and wait 5
minutes before
opening this cover.
Un voltage non adapt
provoque des blessures.
Eteindrel’interrupteur et
attendre 5 minutes
avantd’ ouvrir le capot
Hochspannung
verletzungsgefahr!
Bitte schalten sie den
hauptschalter aus und
warten sie 5 minuten,
bevor sie diese
abdeckung ffnen.
Un voltaje inadecuado
puede provocar las
heridas.
Apagar el interruptor
principal y esperar 5
minutos antes de abrir
esta cubierta.
Eye guard
Thread take-
up solenoid
cover
Finger
guard
2
4
5
Direction of operation
Thread
take-up
cover
5
Belt cover
1
[KE-431B]
Thread take-up cover
Eye guard
Thread take-up
solenoid cover
Frame side
cover
Belt cover
1
4
2
5
Finger
guard
KE-432B
3
High temperature warning display
2
3
0042Q
0440Q
0043Q
0441Q
KE-430B
KE-432B
KE-433B