Software Guide Guía del software MW-100 Mobile Printer Impresora móvil l Before using this printer, be sure to read this User’s Guide. l We suggest that you keep this manual in a handy place for future reference. l Antes de usar esta impresora, asegúrese de leer esta “Guía del usuario”. l Aconsejamos mantener este manual a mano para futuras consultas.
! Microsoft® and Windows® are registered trademarks of Microsoft Corporation in the United States and other countries. ! Portion of graphics filter software are based in part on the work of Group 42,Inc. ! Portion of graphics filter software are based in part on the work of the Independent JPEG group. ! VS-FlexGrid Pro Copyright(C) 1999 VideoSoft Corporation. ! All other software and product names mentioned are trademarks or registered trademarks of their respective companies.
CONTENTS CONTENTS CONTENTS ........................................................... 1 Operating Environment ...................................... 2 Printing Data From a Computer Running Windows 4 Installing the software ............................................... 4 Printing ...................................................................... 9 Printing from other applications .............................. 10 Uninstalling the software .........................................
1 Operating Environment This mobile printer can print data from a computer running Windows® or a Pocket PC (PDA running Pocket PC). Computer running Windows® In order to use this printer, make sure that your system configuration meets the following requirements. " PC operating environment Processor Pentium 266 MHz or higher recommended ® ® Operating system Microsoft Windows 98, 98 SE, Me, 2000 Professional or XP Interface Compliant with USB Ver. 1.
Operating Environment • When installing the software, a computer running Windows® that can connect to the Pocket PC will be needed. To print data from a Pocket PC → Refer to page 13. • For information on Pocket PCs whose operation has already been verified, check our Web site at http://www.brother.com.
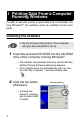
2 Printing Data From a Computer Running Windows In order to use this printer to print data from a computer running Windows®, the software must be installed on the computer. Installing the software ! Do not connect this printer to the computer until you are instructed to do so. 1 Insert the enclosed CD-ROM into the CD-ROM drive of the computer running Windows®. → The installer automatically starts up and the Brother Mobile Printing Software dialog box appears.
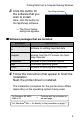
Printing Data From a Computer Running Windows 3 Click the button for SpotSnap software the software that you wish to install. Here, click the button for the SpotSnap software. → The Driver Setup dialog box appears.
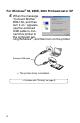
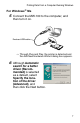
For Windows® 98, 98SE, 2000 Professional or XP 5 When the message “Connect Brother MW-100, and then turn it on.” appears, use the enclosed USB cable to connect this printer to the computer running Windows®, and then turn on the printer. Enclosed USB cable → The printer driver is installed. → Continue with “Printing” on page 9.
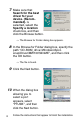
Printing Data From a Computer Running Windows For Windows® Me 5 Connect the MW-100 to the computer, and then turn it on. Enclosed USB cable → Through Plug and Play, the printer is detected and the Add New Hardware Wizard dialog box appears. 6 Although Automatic search for a better driver (Recommended) is selected as a default, select Specify the location of the driver (Advanced), and then click the Next button.
7 Make sure that Search for the best driver for your device. (Recommended). is selected, select the Specify a location check box, and then click the Browse button. → The Browse for Folder dialog box appears. 8 In the Browse for Folder dialog box, specify the path “CD-ROM_drive:\Windows\Spotsnap\Driver\MW100\WinME”, and then click the OK button. → The file is found. 9 Click the Next button. 10 When the dialog box allowing you to select a port appears, select “PTUSB:”, and then click the Next button.
Printing Data From a Computer Running Windows Printing This printer can be used to print in two different ways. DIRECTLY FROM PC SCREEN Printing from SpotSnap Operator Take a snapshot Import text or an image Copy text or an image DIRECTLY FROM WINDOWS SOFTWARE PACKAGES Printing from other applications, such as word-processing or spreadsheet applications Create the data in the application (Snapper) Check the text or image, and then edit it.
Printing from other applications If this printer is selected for printing, it can be used to print data from other applications, such as word-processing or spreadsheet applications. • This printer is not compatible with some applications. For details on compatible applications and for information on the newest printer driver, check our Web site at http://www.brother.com. Selecting the MW-100 as the printer and printing The procedure for Excel 2000 will be described as an example.
Printing Data From a Computer Running Windows Uninstalling the software If this printer will no longer be used on the computer, the SpotSnap software and the printer driver can be uninstalled. Uninstalling (removing) the SpotSnap software The procedure for Windows® 98 will be described as an example. 1 Click the Start button, select Settings, click Control Panel, and then double-click in Control Panel. → The Add/Remove Programs Properties dialog box appears.
Uninstalling (removing) the printer driver 1 Click the Start button, select Settings, and then click Printers. → The Printers dialog box appears. 2 Right-click . → A pop-up menu appears. 3 Select Delete. → The printer driver is deleted. • In order to use this printer from a computer, the software must be installed again.
Printing Data From a Pocket PC 3 Printing Data From a Pocket PC In order to use this printer to print data from a Pocket PC (PDA running Pocket PC), a computer running Windows® must be used to install the software onto the Pocket PC. • For details on ActiveSync® and on connecting the Pocket PC to a computer running Windows®, refer to the instruction manual for the Pocket PC.
Installing the software 1 Insert the enclosed CD-ROM into the CD-ROM drive of the computer running Windows®. → The installer automatically starts up and the Brother Mobile Printing Software dialog box appears. → If the installer does not automatically start, doubleclick “My Computer”, and then double-click 2 Click the second button (Pocket PC). → The PocketPC Setup dialog box appears. 3 Click the button for installing the Brother mobile printing software.
Printing Data From a Pocket PC 4 Click the button for the operating system that you are using. → The InstallShield Wizard starts. 5 Click either the Yes or No button. Follow the instructions that appear to finish the installation.
" Software packages that are installed Software Description Common mod- Basic components of the ules software Prints memos saved with Note Print Notes Prints schedules saved Schedule Print with Schedule Prints tasks and appointTask Print ments saved with Tasks Prints names, addresses Contact Print and telephone numbers saved with Contact images and text Clipboard Print Prints moved to the Clipboard Prints the currently disScreen played screen of the Capture Print Pocket PC Image File Prints saved image fi
Printing Data From a Pocket PC Printing This printer has eight different printing functions. 1 Check that , , , , , , and appear in the Programs folder. • The positions of the icons that appear may differ on your Pocket PC. " Refer to the pages indicated below for more details on the corresponding printing function.
Printing procedures First, we will describe the procedure for using the Note Print. This procedure contains the basic steps for printing. Note Print Memos saved with Notes can be printed. 1 Tap the Start button, tap Programs, and then tap . → A list of memos appears in the Note Print screen. 2 Tap the memo that Folder list you wish to print. Only one memo can be selected. → The selected memo is highlighted. • To display the memos in each previously categorized folder, tap the folder list.
Printing Data From a Pocket PC • If Print was tapped, printing will begin without the Print preview screen being displayed. 4 Position this printer and the Pocket PC so that their IrDA infrared ports are facing each other and within 7.9" (20 cm) apart. Within 7.9" (20 cm) apart • Make sure that this printer is turned on. 5 Tap the Print button. → After the Pocket PC detects this printer, printing begins.
• The printed layout may differ depending on the size of paper selected with Printer setting. • The Print preview screen allows you to view an image of the data as it will be printed. Text may be difficult to read.
Printing Data From a Pocket PC Advanced settings Precise print settings can be specified. " Printer settings 1 Tap Printer setting in the Print preview screen. → The Printer setting screen appears. 2 The following set- ok button tings can be specified. • Printer: MW-100 (this printer) • Port: IrDA (infrared port)/ FILE/USB • Paper size: A7/Cut labels (4 Labels)/Cut labels (2 Labels) The setting is adjusted according to the paper cassette that is loaded into the printer.
" Graphics-processing settings 1 Tap Graphics in the Print preview screen. → The Graphics processing screen appears. 2 The following settings can be specified. • Half-tone: Dithering/Error Diffusion/None • Image processing: Full-size printing/Fit to paper 3 Tap . → The graphics-processing settings are applied.
Printing Data From a Pocket PC " Text format settings The font and size of the printed text can be changed. 1 Tap Font in the Settings menu of the Note Print screen. → The Font setting screen appears. 2 The following text ok button settings can be specified. • Font name: Tahoma/Courier New/Frutiger Linotype/Bookdings • Size: Largest/Larger/Standard/Smaller/Smallest • Effects: Bold/Underline/Italic/ Strikethrough 3 Tap . → The text format settings are applied.
Schedule Print Schedules saved with Schedule can be printed. 1 Tap the Start button, tap Programs, and then tap . → A list of schedules appears in the Schedule Print screen. 2 Tap the box to the Category list left of the schedule that you wish to print. More than one schedule can be selected. → A check mark appears. • The period of time to be printed can be specified. (→ “Printing a specified date” on page 26) • To display the schedules in each previously specified category, tap the category list.
Printing Data From a Pocket PC " Template setting The layout in which data is printed can be specified. 1 Tap Template in the Settings menu of the Schedule Print screen. → The Template screen appears. 2 Select the template Template menu ok button that you wish to use. 3 Tap . → The selected template is applied.
" Printing a specified date The period of time to be printed can be specified. 1 Tap Date in the Settings menu of the Schedule Print screen. → The Date screen appears. 2 Change the date setting. • Start date/End date/ Inprogress • Date 3 Tap . → The schedules included in the specified time period are displayed in the Schedule Print screen.
Printing Data From a Pocket PC Task Print Tasks and appointments saved with Tasks can be printed. 1 Tap the Start button, tap Programs, and then tap . → A list of tasks appears in the Task Print screen. 2 Tap the box to the left of the task that you wish to print. More than one task can be selected. → A check mark appears. • The period of time to be printed can be specified. (→ “Printing a specified date” on page 26) • The layout in which data is printed can be specified.
Contact Print Names, address and telephone numbers saved with Contacts can be printed. 1 Tap the Start button, tap Programs, and then tap . → A list of contacts appears in the Contact Print screen. 2 Tap the box to the left of the contact that you wish to print. More than one name can be selected. → A check mark appears. ! The layout in which data is printed can be specified. (→ “Template setting” on page 25) The procedure continues in the same way as with the Note Print (→ page 18).
Printing Data From a Pocket PC Clipboard Print The images and text moved to the Clipboard can be printed. • The Clipboard is the name of the location where data that was cut or copied is stored. 1 Tap the Start button, tap Programs, and then tap . → The contents of the Clipboard appear in the Clipboard Print screen. The procedure continues in the same way as with the Note Print (→ page 18).
Screen Capture Print The currently displayed screen of the Pocket PC can be printed. 1 Tap the Start button, tap Programs, and then tap . → A toolbar appears in the upper-right corner of the screen. Toolbar 2 Display the screen that you wish to print. 3 Tap on the tool- bar. → The captured screen appears in the Print preview screen. The procedure continues in the same way as with the Note Print (→ page 18).
Printing Data From a Pocket PC " Screen capture settings The time until the data is imported and the size of the captured area can be specified. 1 Tap on the tool- bar. → The Screen capture print settings screen appears. 2 The following text set- ok button tings can be specified. • Capture delay time: 0 to 10 seconds Specifies the length of time until the image is imported after tapped. is • Capture range: Selection range (Use the stylus to select the desired area.
Image File Print Saved image files (in BMP, JPEG or PNG format) can be printed. 1 Tap the Start button, tap Programs, and then tap . → The Image File Print screen appears. 2 Select the file format of the image data to be searched for. Select from the five available file formats. • Image file (BMP, JPG or PNG) • Bitmap file • Jpeg file (JPG or JPEG) • Png file • All files 3 Tap the image file ok button that you wish to print. Only one file can be selected. → The selected file is highlighted. 4 Tap .
Printing Data From a Pocket PC E-mail Print Saved e-mails can be printed. 1 Tap the Start button, tap Programs, and then tap . → A list of e-mails appears in the Email Print screen. 2 Tap the e-mail that you wish to print. Only one e-mail can be selected. → The selected e-mail is highlighted. • The layout in which data is printed can be specified. (→ “Template setting” on page 25) The procedure continues in the same way as with the Note Print (→ page 18).
Uninstalling the software Uninstall (remove) the software using the Pocket PC functions. For details on uninstalling the software, refer to the instruction manual for the Pocket PC.
Printing Data From a Pocket PC PrintPocketCE for Brother What is this software? PrintPocketCE enables you to print out the following data from your PDA running Microsoft® Pocket PC/Pocket PC2002. • • • • Pocket Excel spreadsheets Pocket Word documents E-mail Pocket RTF (rich text format) & Plain text (txt) Installing the software 1 Insert the enclosed CD-ROM into the CD-ROM driver of the computer running Windows®.
4 Click the button for the operating system that you are using. → The installation program will run automatically. The computer connects with the PDA via ActiveSync and the installation is complete • For details on using Print Pocket CE for Brother, refer to the Help for Print Pocket CE for Brother.
Printing Data From a Palm Device 4 Printing Data From a Palm Device IrPRINT for Palm What is this software? IrPRINT enables you to print out the following data from your PDA running Palm® OS ver. 3.5 to ver. 4.1. • Documents To Go • Sheets To Go • PIM data (Address Book, Memo Pad, Date Book, To Do List, and Mail) Installing the software 1 Insert the enclosed CD-ROM into the CD-ROM driver of the computer running Windows®.
GUÍA DE USUARIO
! Microsoft® y Windows® son marcas comerciales registradas de Microsoft Corporation en Estados Unidos y otros países. ! Una porción del software de filtro de gráficos está basada parcialmente en el trabajo de Group 42,Inc. ! Una porción del software de filtro de gráficos está basada parcialmente en el trabajo del grupo Independent JPEG. ! VS-FlexGrid Pro Copyright(C) 1999 VideoSoft Corporation. ! PrintPocketCE para Brother MW-100 por FieldSoftware Products.
CONTENIDO CONTENIDO CONTENIDO ......................................................... 1 Entorno operativo ............................................... 2 Impresión de datos desde un PC con Windows 4 Instalación del software ............................................ 4 Impresión .................................................................. 9 Impresión desde otras aplicaciones ....................... 10 Impresión de datos desde un PDA de bolsillo 12 Instalación del software ......................
1 Entorno operativo Esta impresora móvil puede imprimir datos desde un PC con Windows® o un PC de bolsillo (PDA con Pocket PC). PC con Windows® Para poder utilizar esta impresora, asegúrese de que la configuración de su sistema cumple los siguientes requisitos. " Entorno operativo del PC Procesador Se recomienda un procesador Pentium 266 MHz o superior ® ® Sistema operativo Microsoft Windows 98, 98 SE, Me, 2000 Professional o XP Interfaz Compatible con USB Ver. 1.
Entorno operativo • Para instalar el software, será necesario un PC con Windows® que se pueda conectar al PC de bolsillo. Para imprimir datos desde un PC de bolsillo → Consulte página 12. • Para obtener información sobre PCs de bolsillo cuyo funcionamiento ya ha sido verificado, visite nuestro sitio web en http://www.brother.com.
2 Impresión de datos desde un PC con Windows Para poder imprimir datos con esta impresora desde un PC con Windows®, el software correspondiente debe estar instalado en el PC. Instalación del software ! No conecte la impresora al PC hasta que no reciba instrucciones al efecto. 1 Inserte el disco compacto adjunto en la unidad de CD-ROM del PC con Windows®. → El instalador se inicia automáticamente y aparece el cuadro de diálogo Brother Mobile Printing Software.
Impresión de datos desde un PC con Windows 3 Haga clic sobre el Software SpotSnap botón correspondiente al software que desee instalar. Aquí, haga clic sobre el botón del software SpotSnap. → Aparece el cuadro de diálogo para la Instalación del controlador.
Para Windows® 98, 98SE, 2000 Professional o XP 5 Cuando aparezca el mensaje “Connect Brother MW-100, and then turn it on.” (Conecte el Brother MW-100, y a continuación enciéndalo), utilice el cable USB adjunto para conectar la impresora al PC con Windows®, y a continuación encienda la impresora. → Se instala el controlador de la impresora.
Impresión de datos desde un PC con Windows Para Windows® Me 5 Conecte el MW-100 al PC, y conecte entonces su alimentación. Cable USB adjunto → La impresora se detecta mediante Plug and Play y aparece el cuadro de diálogo Add New Hardware Wizard. 6 Aunque esté seleccionado Automatic search for a better driver (Recommended) como opción predeterminada, seleccione Specify the location of the driver (Advanced), y entonces haga clic en el botón Siguiente.
7 Asegúrese de que la opción Search for the best driver for your device. (Recommended). esté seleccionada, seleccione la casilla de verificación Specify a location, y luego haga clic en el botón Browse. → Aparecerá el cuadro de diálogo de Examinar para encontrar carpeta. 8 En el cuadro de diálogo de Examinar para encontrar carpeta, especifique la ruta “Unidad_CDROM:\Windows\Spotsnap\Driver\MW100\WinME”, y haga clic en el botón Aceptar. → Se encuentra el archivo. 9 Haga clic en el botón Siguiente.
Impresión de datos desde un PC con Windows Impresión Esta impresora se puede utilizar para imprimir de dos maneras distintas. DIRECTAMENTE DESDE LA PANTALLA DEL PC DIRECTAMENTE DESDE PAQUETES DE SOFTWARE DE WINDOWS Impresión desde SpotSnap Operador Impresión desde otras aplicaciones, como procesadores de texto u hojas de cálculo Tomar una fotografía Importar texto o una imagen Copiar texto o una imagen Crear los datos en la aplicación (Snapper) Crear el texto o la imagen, y luego editarlos.
Impresión desde otras aplicaciones Esta impresora se puede utilizar para imprimir datos desde otras aplicaciones, como procesadores de texto u hojas de cálculo. • Esta impresora no es compatible con algunas aplicaciones. Para obtener detalles acerca de las aplicaciones compatibles e información sobre el controlador de impresora más reciente, visite nuestro sitio web en http://www.brother.com.
Impresión de datos desde un PC con Windows Desinstalación (eliminación) del controlador de impresora 1 Haga clic en el botón Inicio, seleccione Configuración, y luego haga clic en Impresoras. → Aparece el cuadro de diálogo Impresoras. 2 Haga clic con el botón derecho del ratón en . → Aparece un menú desplegable. 3 Seleccione Eliminar. → Se elimina el controlador de la impresora. • Para poder utilizar la impresora desde un PC, el software debe instalarse de nuevo.
3 Impresión de datos desde un PDA de bolsillo Para poder imprimir datos con esta impresora desde un PC de bolsillo (PDA con Pocket PC), se debe utilizar un PC con Windows® para instalar el software en el PC de bolsillo. • Para obtener detalles acerca de ActiveSync® y de la conexión del PC de bolsillo a un PC con Windows®, consulte el manual de instrucciones del PC de bolsillo. Instalación del software 1 Inserte el disco compacto adjunto en la unidad de CD-ROM del PC con Windows®.
Impresión de datos desde un PDA de bolsillo 3 Haga clic en el botón para instalar el software de impresión móvil Brother. → Aparece un cuadro de diálogo, que le permite seleccionar “Pocket PC” o bien “Pocket PC 2002”. 4 Haga clic sobre el botón correspondiente al sistema operativo que está usando. → Se inicia el InstallShield Wizard. 5 Haga clic en el botón Sí o No. Siga las instrucciones que aparecen para finalizar la instalación.
" Paquetes de software que están instalados Software Módulos comunes Descripción Componentes básicos del software Imprime memos Imprimir Notas guardados en Notas Imprimir Imprime calendarios Calendario guardados en Calendario Imprime tareas y citas Imprimir Tareas guardadas en Tareas Imprime nombres, direcciones Imprimir y números de teléfono Contactos guardados en Contactos Imprimir Imprime imágenes y textos Portapapeles movidos al Portapapeles Imprime la pantalla Imprimir mostrada en el PC de Pantalla b
Impresión de datos desde un PDA de bolsillo Impresión Esta impresora cuenta con ocho funciones de impresión diferentes. 1 Compruebe que , , , , y , , aparecen en la carpeta Programas. • Las posiciones de los iconos que aparecen pueden variar en su PC de bolsillo.
" Consulte las páginas indicadas a continuación para obtener más detalles acerca de la función de impresión correspondiente. Imprimir Notas → página 16 Imprimir Calendario → página 20 Imprimir Tareas → página 23 Imprimir Contactos → página 24 Imprimir Portapapeles → página 25 Imprimir Pantalla → página 25 Imprimir Imágenes → página 27 Imprimir E-mail → página 28 Procedimientos de impresión En primer lugar, describiremos el procedimiento para usar Imprimir Notas.
Impresión de datos desde un PDA de bolsillo 2 Pulse el memo que Lista de carpetas desee imprimir. Sólo se puede seleccionar un memo. → El memo seleccionado aparece resaltado. • Para visualizar los memos en cada una de las carpetas anteriormente categorizadas, pulse sobre la lista de carpetas. 3 Pulse Vista previa... en el menú Impresora. → Aparece la pantalla de previsualización de la impresión.
5 Pulse el botón Imprimir. → Una vez que el PC de bolsillo detecta esta impresora, da comienzo la impresión. • El diseño de impresión puede diferir según el tamaño de papel seleccionado en Ajustes. • La pantalla de previsualización de la impresión permite ver una imagen de los datos tal y como se imprimirá. Puede que el texto sea difícil de leer. Configuración avanzada Se pueden especificar configuraciones de impresión muy precisas.
Impresión de datos desde un PDA de bolsillo 2 Se pueden especificar las siguientes configuraciones. • Impresora: MW-100 (esta impresora) • Puerto: IrDA (puerto de infrarrojos)/FILE/USB • Tamaño del papel: A7/Etiquetas cortadas (4 etiquetas)/ Etiquetas cortadas (2 etiquetas) La configuración se ajusta con arreglo al paquete de papel que está cargado en la impresora. • Orientación: Vertical/Horizontal • Modo de impresión: Normal/Global • Número de copias: 1 a 50/Intercalar 3 Pulse .
3 Pulse . → Se aplican las configuraciones de procesamiento de gráficos. " Configuración de formato de texto La fuente y el tamaño del texto impreso se pueden cambiar. 1 Pulse Fuente en el menú de Configuración de la pantalla Imprimir Notas. → Aparece la pantalla Ajuste de fuente. 2 Se pueden especificar las siguientes configuraciones de texto.
Impresión de datos desde un PDA de bolsillo 2 Pulse la casilla situada a la izquierda del calendario que desee imprimir. Se puede seleccionar más de un calendario. → Aparece una marca. • Se puede especificar el periodo de tiempo que se desea imprimir. (→ “Impresión de una fecha especificada” en página 22) • Para visualizar los calendarios en cada una de las categorías anteriormente especificadas, pulse la lista de categorías. 3 Pulse Previsualizar en el menú de Impresoras.
" Impresión de una fecha especificada Se puede especificar el periodo de tiempo que se desea imprimir. 1 Pulse Fecha en el menú de Configuración de la pantalla Imprimir Calendario. → Aparece la pantalla Fecha. 2 Cambie la configuración de la fecha. • Fecha inicial/Fecha final/En progreso • Fecha 3 Pulse . → Los calendarios incluidos en el periodo de tiempo especificado se muestran en la pantalla Imprimir Calendario.
Impresión de datos desde un PDA de bolsillo Imprimir Tareas Las tareas y citas guardadas en Tareas se pueden imprimir. 1 Pulse el botón Inicio, pulse Programas, y luego pulse . → Una lista de tareas aparece en la pantalla Imprimir Tareas. 2 Pulse la casilla situada a la izquierda de la tarea que desee imprimir. Se puede seleccionar más de una tarea. → Aparece una marca. • Se puede especificar el periodo de tiempo que se desea imprimir.
Imprimir Contactos Nombres, direcciones y números de teléfono guardados en Contactos se pueden imprimir. 1 Pulse el botón Inicio, pulse Programas, y luego pulse . → Una lista de contactos aparece en la pantalla Imprimir Contactos. 2 Pulse la casilla situada a la izquierda del contacto que desee imprimir. Se puede seleccionar más de un nombre. → Aparece una marca. ! Se puede especificar el diseño utilizado para imprimir los datos.
Impresión de datos desde un PDA de bolsillo Imprimir Portapapeles Las imágenes y los textos movidos al Portapapeles se pueden imprimir. • Se llama Portapapeles al lugar donde se guardan los datos que han sido cortados o copiados. 1 Pulse el botón Inicio, pulse Programas, y luego pulse . → Los elementos contenidos en el Portapapeles aparecen en la pantalla Imprimir Portapapeles. El procedimiento prosigue de la misma manera que en Imprimir Notas (→ página 16).
2 Visualice la pantalla que desee imprimir. 3 Pulse en la barra de herramientas. → La pantalla captada aparece en la pantalla Vista previa impresión. El procedimiento prosigue de la misma manera que en Imprimir Notas (→ página 16). " Configuración de la impresión de pantalla Se pueden especificar el momento en el que los datos son importados y el tamaño del área capturada. 1 Pulse en la barra de herramientas. → Aparece la pantalla Impres. capt. pant..
Impresión de datos desde un PDA de bolsillo 2 Se pueden especificar las siguientes configuraciones de texto. • Tiempo de retardo de captura: 0 a 10 segundos Especifica el intervalo de tiempo que debe pasar hasta que la imagen es importada después de pulsar . • Margen de captura: Margen de selección (Utilice el estilete para seleccionar el área deseada.)/Cliente (Área en la figura de la derecha)/ indicada por Sobremesa (Pantalla entera) 3 Pulse . → Se aplican las configuraciones de captura de pantalla.
2 Seleccione el formato de archivo de los datos de imágenes que desee buscar. Seleccione entre los cinco formatos de archivo disponibles. • Archivo de imágenes (BMP, JPG o PNG) • Archivo de mapa de bits • Archivo Jpeg (JPG o JPEG) • Archivo Png • Todos los archivos 3 Pulse el archivo de imágenes que desee imprimir. Sólo se puede seleccionar un archivo. → El archivo seleccionado aparece resaltado. 4 Pulse . → Aparece la pantalla Vista previa impresión.
Impresión de datos desde un PDA de bolsillo 2 Pulse el mensaje de correo electrónico que desee imprimir. Sólo se puede seleccionar un mensaje de correo electrónico. → El correo electrónico seleccionado aparece resaltado.
PrintPocketCE para Brother MW-100 PrintPocketCE nos ofrece la posibilidad de imprimir los siguientes formatos de datos desde su PDA con Microsoft® Pocket PC/Pocket PC2002: • Hojas de cálculo de Pocket Excel • Documentos de Pocket Word • Mensajes de correo elctrónico (E-mail) • Formato de texto enriquecido (Pocket RTF) y Texto plano (txt). Instalación del software 1 Insertar el CD-ROM adjunto en el lector de CD-ROM del ordenador con sistema operativo Windows®.
Impresión de datos desde un PDA de bolsillo 4 Pulsar sobre el botón del sistema operativo instalado en su PDA. → Comienza la instalación. Siga el proceso y conteste a las preguntas cuando sea requerido. Una vez completada la instalación en su ordenador, ActiveSync conectará con su PDA para instalar PrintPocketCE. • Para ver los detalles sobre la utilización de Print Pocket CE para Brother, consulte la Ayuda de Print Pocket CE para Brother.
4 Impresión de datos desde un dispositivo Palm IrPRINT para Palm ¿Qué es este software? IrPRINT le permite imprimir los datos siguientes desde su PDA operando con Palm® OS ver. 3.5 to ver. 4.1. • Documentos To Go • Hojas To Go • Datos PIM (libreta de direcciones, bloc de notas, agenda, lista de tareas pendientes, y correo) Instalación del software 1 Inserte el CD-ROM suministrado en la unidad CD-ROM del PC que opera con Windows®.
Printed in Japan Impreso en Japón LB2212001