
User Manual
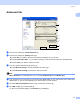
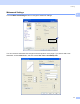

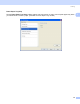
Table Of Contents
- SOFTWARE USER’S GUIDE
- Table of Contents
- Windows®
- 1 Printing
- 2 Scanning
- 3 ControlCenter3
- 4 Network Scanning (For models with built-in network support)
- 5 Remote Setup (Not available for DCP models, MFC-250C and MFC-290C)
- 6 Brother PC-FAX Software (MFC models only)
- 7 PhotoCapture Center™
- 8 Firewall settings (For Network users)
- Apple® Macintosh®
- 9 Printing and Faxing
- 10 Scanning
- 11 ControlCenter2
- 12 Network Scanning (For models with built-in network support)
- 13 Remote Setup & PhotoCapture Center™
- Index
- brother CHN-ENG

Printing
14
1
Advanced tab 1
a Choose your setting for Colour/Greyscale (1).
b Choose your setting for Scaling feature (2).
Choose Off if you want to print the document as it appears on your screen.
Choose Fit to Paper Size, or if you want to enlarge or reduce the document to fit the paper size.
Choose Free if you want to reduce the size.
c You can choose reverse printing options (3).
Check Mirror Printing to reverse the data from left to right.
Check Reverse Printing to reverse the data up to down.
Note
Mirror Printing is not available when you choose Transparencies as the Media Type.
d You can print a logo or text onto your document as a Watermark (4). You can choose one of the preset
Watermarks, or you can use a bitmap file or text file that you have created.
e Click the Other Print Options button to set more Printer functions (5).
f Click OK to apply your chosen settings.
To return to the default settings, click Default (6), then OK (7).
1
2
5
3
6
4
7