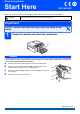
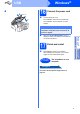
Quick Setup Guide Start Here MFC-490CW Before you can use the machine, read this Quick Setup Guide for the correct setup and installation. WARNING Warnings tell you what to do to prevent possible personal injury. Important DO NOT connect the USB cable yet (if you are using a USB cable). 1 Unpack the machine and check the components 2 WARNING a b c d Plastic bags are used in the packaging of your machine. To avoid danger of suffocation, please keep these bags away from babies and children.
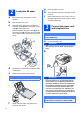
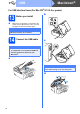
a b c 2 g h Load plain A4 paper Pull the paper tray completely out of the machine. i Close the paper tray cover. Slowly push the paper tray completely into the machine. While holding the paper tray in place, pull out the paper support until it clicks, and then unfold the paper support flap. Open the paper tray cover. 3 With both hands, gently press and slide the paper side guides a and then the paper length guide b to fit the paper size.
4 Install the ink cartridges WARNING f g h If ink gets in your eyes, wash them out with water at once, and if irritation occurs consult a doctor. a b Take care to match the colour of the lever with the cartridge colour. Install each ink cartridge in the direction of the arrow on the label. Gently push the ink cartridge until it clicks. After all the ink cartridges are installed close the ink cartridge cover. 5 Make sure that the power is turned on. Open the ink cartridge cover.
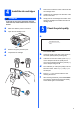
6 You can select the display language of your LCD messages a b Press Menu. Press a or b to select Initial Setup. Press OK. c 7 Choose Your Language Do you want to use the telephone features of your machine (if available) or an external telephone or external telephone answering device connected on the same line as the machine? Yes e No Are you using the voice message function of an external telephone answering device? Press a or b to select Local Language. No Press OK.
a b c 8 Press Menu. Press a or b to choose Initial Setup. Press OK. Press a or b to choose Date&Time. Press OK. d e f 9 Set the date and time Enter the last two digits of the year on the dial pad, and then press OK. Repeat for Month and Day, and Hours and Minutes in 24-hour format. Press Stop/Exit. Enter personal information (station ID) You should store your name and fax number to be printed on all fax pages that you send. a b c d e f Press Menu. Press a or b to choose Initial Setup. Press OK.
10 a b c d e Press Menu. Press a or b to choose Initial Setup. Press OK. Press a or b to choose Tone/Pulse. Press d or c to choose Pulse (or Tone). Press OK. Press Stop/Exit. 11 a b c d e 6 Set tone or pulse dialling mode Set the telephone line type Press Menu. Press a or b to choose Initial Setup. Press OK. Press a or b to choose Phone Line Set. Press d or c to choose Normal, PBX or ISDN. Press OK. Press Stop/Exit.
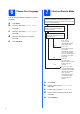
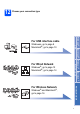
12 Choose your connection type Wireless Network For Wireless Network Macintosh® Windows®, go to page 12 Macintosh®, go to page 14 Windows® Wired Network For Wired Network Macintosh® USB Windows®, go to page 8 Macintosh®, go to page 10 Windows® For USB interface cable Windows® and Macintosh®, go to page 16 7
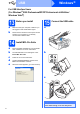
USB Windows® For USB Interface Users (For Windows® 2000 Professional/XP/XP Professional x64 Edition/ Windows Vista®) 13 a b Make sure that your computer is ON and you are logged on with Administrator rights. b c d e 15 Connect the USB cable a Disconnect the machine from the power socket and from your computer, if you already connected an interface cable. 14 a Before you install Install MFL-Pro Suite Put the supplied CD-ROM into your CD-ROM drive. Follow the on-screen instructions.
USB Windows® 16 d 1 2 3 a Connect the power cord Connect the power cord. The installation will continue automatically. The installation screens appear one after another. Important DO NOT cancel any of the screens during the installation. It may take a few seconds for all screens to appear. b Click Finish to restart your computer. After restarting the computer, you must be logged on with Administrator rights. Finish The installation is now complete.
USB Macintosh® For USB Interface Users (For Mac OS® X 10.2.4 or greater) 13 a Before you install b LAN USB Make sure your machine is connected to the power and your Macintosh® is ON. You must be logged on with Administrator rights. Important Make sure there are no memory cards or a USB Flash memory drive inserted. 14 Connect the USB cable c Important • DO NOT connect the machine to a USB port on a keyboard or a non-powered USB hub. • Connect the machine directly to your Macintosh®.
USB 15 a b c Macintosh® Install MFL-Pro Suite Put the supplied CD-ROM into your CD-ROM drive. Double-click the Start Here OSX icon to install. Choose Local Connection, and then click Next. Follow the on-screen instructions. Note Please wait, it will take a few seconds for the software to install. After the installation, click Restart to finish installing the software. e The Brother software will search for the Brother device. When this screen appears, click OK. f g h i For Mac OS ® X 10.2.4 to 10.
Wired Network Windows® For Wired Network Interface Users (For Windows® 2000 Professional/XP/XP Professional x64 Edition/ Windows Vista®) 13 a Before you install b LAN USB Make sure that your computer is ON and you are logged on with Administrator rights. Important Before installation, if you are using personal firewall software (other than Windows® Firewall), anti-spyware or antivirus applications, temporarily disable them. b Disconnect the machine from the power socket.
Wired Network 15 a Connect the power cord. 16 a b c d e Connect the power cord Install MFL-Pro Suite Windows® g When the On-Line Registration screen is displayed, make your selection and follow the on-screen instructions. 17 a Finish and restart Click Finish to restart your computer. After restarting the computer, you must be logged on with Administrator rights. Put the supplied CD-ROM into your CD-ROM drive. Follow the on-screen instructions. The CD-ROM main menu will appear.
Wired Network Macintosh® For Wired Network Interface Users (For Mac OS® X 10.2.4 or greater) 13 a Before you install b LAN USB Make sure your machine is connected to the power and your Macintosh® is ON. You must be logged on with Administrator rights. Important • Make sure there are no memory cards or a USB Flash memory drive inserted.
Wired Network 15 a b c Macintosh® Install MFL-Pro Suite Put the supplied CD-ROM into your CD-ROM drive. Double-click the Start Here OSX icon to install. Choose Wired Network Connection, and then click Next. Follow the on-screen instructions. Note Please wait, it will take a few seconds for the software to install. After the installation, click Restart to finish installing the software. d e The Brother software will search for the Brother device. When this screen appears, click OK. For Mac OS® X 10.
For Wireless Network Users For Wireless Network Interface Users 13 Before you begin Although the Brother MFC-490CW can be used in a both wired and wireless network, only one of the connection methods can be used at a time. Important If you have previously configured the wireless settings of the machine you must reset the network (LAN) settings before you can configure the wireless settings again. On your machine, press Menu. Press a or b to choose Network and press OK.
For Wireless Network Users 14 Confirm your network environment (Infrastructure Mode) The following instructions will offer two methods for installing your Brother machine in a wireless network environment. Both methods are for infrastructure mode, using a wireless router or access point that uses DHCP to assign IP addresses. Choose a configuration method and proceed to the page indicated.
For Wireless Network Users Connecting the Brother machine to the wireless network 15 a Configure the wireless settings (Typical Wireless Setup in infrastructure mode) f No Authentication or Encryption: Choose Open System, press OK then choose None for Encryption Type? and press OK. Then press 1 for Yes to apply your settings. Go to i. On your machine, press Menu. Press a or b to choose Network and press OK. Press a or b to choose WLAN and press OK. Press a or b to choose Setup Wizard and press OK.
For Wireless Network Users h Press a or b to choose TKIP or AES for Encryption Type? and press OK. Enter the WPA/WPA2-PSK password you wrote down in step 14 on page 17 using the dial pad to choose each letter or number. You can use the d and c keys to move the cursor left and right. For example, to enter the letter a, press the 2 key on the dial pad once. To enter the number 3, press the 3 key on the dial pad seven times. The letters appear in this order: lower case, upper case and then numbers.
Wireless Network Windows® Install the Drivers & Software (For Windows® 2000 Professional/XP/XP Professional x64 Edition/ Windows Vista®) 16 a Before you install MFL-Pro Suite Note • If the machine is configured for your network, choose the machine from the list, and then click Next. Make sure that your computer is ON and you are logged on with Administrator rights.
Wireless Network Macintosh® Install the Drivers & Software (For Mac OS® X 10.2.4 or greater) 16 a Before you install MFL-Pro Suite e Note • If your machine is not detected, go to step 14 on page 17 and setup the wireless connection again. Make sure your machine is connected to the power and your Macintosh ® is ON. You must be logged on with Administrator rights. • If you are using WEP and the LCD displayed 'Connected' but your machine is not found, make sure you entered the WEP key correctly.
Install Optional Applications 1 Install FaceFilter Studio supported by Reallusion, Inc 3 Windows® Install BookScan&Whiteboard Suite supported by Reallusion, Inc Important Important • The machine must be ON and connected to the computer. • The computer must be connected to the Internet. a b c a b c d e • The computer must be connected to the Internet. Open the main menu again by ejecting and then reinserting the CD-ROM or by doubleclicking the start.exe program from the root folder.
For Wireless Network Users Restore the network settings to factory default To restore all network settings of the internal Print/Scan server to factory default, please follow the steps below. a b c d e f g Make sure the machine is not operating, then disconnect all the cables from the machine (except the power cord). Press Menu. Press a or b to choose Network. Press OK. Press a or b to choose Factory Reset. Press OK. Press 1 to choose Yes. Press 1 to choose Yes.
Safety and Legal Choosing a location Put your machine on a flat, stable surface that is free of vibration and shocks, such as a desk. Put the machine near a telephone socket and a standard grounded electrical socket. Choose a location where the temperature remains between 10°C and 35°C. WARNING • DO NOT put the machine near heaters, air conditioners, refrigerators, medical equipment, chemicals or water.
Safety and Legal To use the machine safely Please keep these instructions for later reference and read them before attempting any maintenance. WARNING There are high voltage electrodes inside the machine. Before you clean the inside of the machine, make sure you have unplugged the telephone line cord first and then the power cord from the electrical socket. Doing this will prevent an electrical shock. DO NOT handle the plug with wet hands. Doing this might cause an electrical shock.
Safety and Legal If the machine becomes hot, releases smoke, or generates any strong smells, immediately unplug the machine from the electrical socket. Call your Brother dealer or Brother Customer Service. If metal objects, water or other liquids get inside the machine, immediately unplug the machine from the electrical socket. Call your Brother dealer or Brother Customer Service. Use caution when installing or modifying telephone lines.
Safety and Legal Important safety instructions 1 2 3 4 5 Read all of these instructions. Save them for later reference. Follow all warnings and instructions marked on the product. DO NOT use this product near water. DO NOT place this product on an unstable cart, stand, or table. The product may fall, causing serious damage to the product. 6 Slots and openings in the cabinet and the back or bottom are provided for ventilation.
Safety and Legal Regulations LAN connection CAUTION EC Declaration of Conformity under the R & TTE Directive DO NOT connect this product to a LAN connection that is subject to over-voltages. Radio interference This product complies with EN55022 (CISPR Publication 22) /Class B. When connecting the machine to a computer, ensure that you use a USB cable which does not exceed 2.0 m in length. EU Directive 2002/96/EC and EN50419 European Union Only This equipment is marked with the above recycling symbol.
Safety and Legal Legal limitations for copying It is an offence to make reproductions of certain items or documents with the intent to commit fraud. This memorandum is intended to be a guide rather than a complete list. We suggest you check with relevant legal authorities if in doubt about a particular item or document. The following are examples of documents which may not be copied: Money Bonds or other certificates of indebtedness Certificates of Deposit Armed Forces Service or Draft papers.
Trademarks The Brother logo is a registered trademark of Brother Industries, Ltd. Brother is a registered trademark of Brother Industries, Ltd. Multi-Function Link is a registered trademark of Brother International Corporation. Windows Vista is either a registered trademark or a trademark of Microsoft Corporation in the United States and other countries. Microsoft, Windows and Windows Server are registered trademarks of Microsoft Corporation in the United States and/or other countries.