
Printer/Fax/Scanner/Copier USER'S GUIDE MFC-5460CN, MFC-5860CN


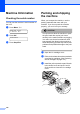

Table Of Contents
- USER’S GUIDE MFC-5460CN MFC-5860CN
- Brother numbers
- Ordering accessories and supplies
- Compilation and Publication Notice
- Table of Contents
- General
- 1 General Information
- 2 Loading documents and paper
- 3 General setup
- 4 Security features
- Fax
- 5 Sending a fax
- Entering Fax mode
- Broadcasting (Black & White only)
- Additional sending operations
- Sending faxes using multiple settings
- Contrast
- Changing Resolution
- Dual access (Black & White only)
- Real time transmission
- Overseas Mode
- Delayed Faxing (Black & White only)
- Delayed Batch Transmission (Black & White only)
- Checking and canceling waiting jobs
- Sending a fax manually
- Sending a fax at the end of a conversation
- Out of Memory message
- 6 Receiving a Fax
- 7 Telephone Services and External devices
- 8 Dialing and storing numbers
- 9 Remote fax options
- 10 Printing Reports
- 11 Polling
- 5 Sending a fax
- Copy
- Walk-up Photo Printing
- Software
- Appendixes
- A Safety and Legal
- Choosing a location
- To use the machine safely
- Important safety instructions
- Standard telephone and FCC Notices (These notices are in effect on models sold and used in the United States only.)
- Federal Communications Commission (FCC) Declaration of Conformity (USA only)
- Industry Canada Compliance Statement (Canada only)
- LAN connection
- Legal limitations for copying
- Trademarks
- B Troubleshooting and Routine Maintenance
- C Menu and Features
- D Specifications
- E Glossary
- F Index
- A Safety and Legal
- brother USA/CAN
118
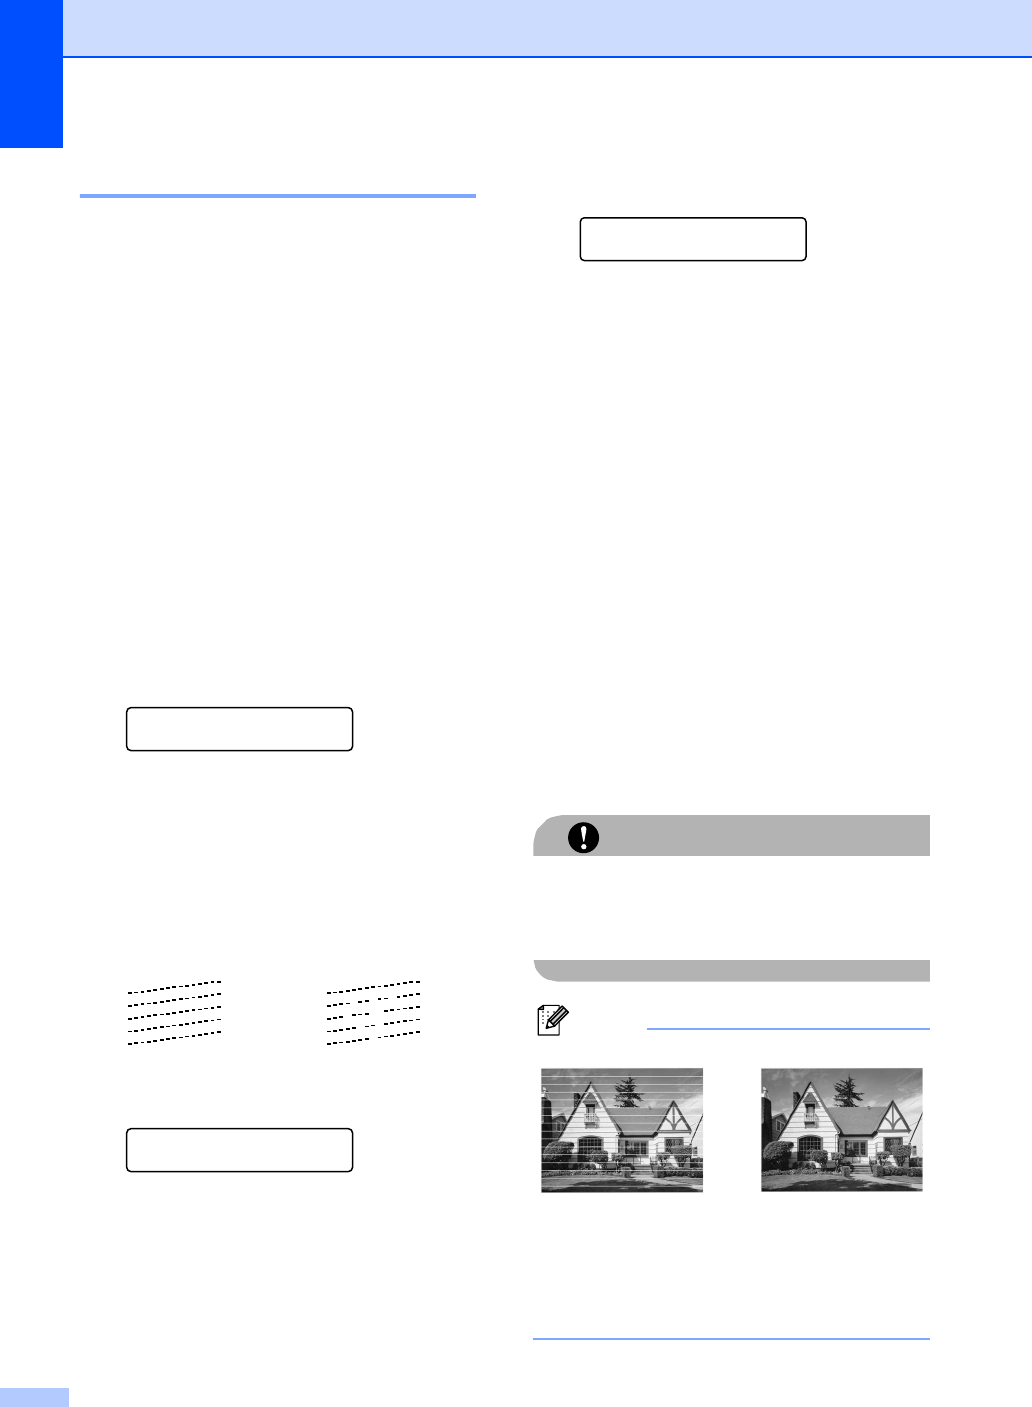
Checking the print quality B
If faded or streaked colors and text appear on
your output, some of the nozzles may be
clogged. You can check this by printing the
Print Quality Check Sheet and looking at the
nozzle check pattern.
a Press Ink.
b Press a or b to choose Test Print.
Press OK.
c Press a or b to choose
Print Quality.
Press OK.
d Press Color Start.
The machine begins printing the Print
Quality Check Sheet.
e Check the quality of the four color blocks
on the sheet.
Is Quality OK?
1.Yes 2.No
f Do one of the following:
If all lines are clear and visible, press
1 to choose Yes, and go to step j.
If you can see missing short lines as
shown below, press 2 to choose No.
g The LCD asks you if the print quality is
OK for black and three colors.
Black OK?
1.Yes 2.No
Press 1 (Yes) or 2 (No).
h The LCD asks you if you want to start
cleaning.
Start Cleaning?
1.Yes 2.No
Press 1 (Yes).
The machine starts cleaning the print
head.
i After cleaning is finished, press
Color Start.
The machine starts printing the Print
Quality Check Sheet again and then
returns to step e.
j Press Stop/Exit.
If you repeat this procedure at least five
times and the print quality is still poor,
replace the ink cartridge for the clogged
color.
After replacing the ink cartridge, check
the print quality. If the problem still
exists, repeat the cleaning and test print
procedures at least five times for the
new ink cartridge. If ink is still missing,
call Brother Customer Service. (See
Brother numbers on page i.)
CAUTION
DO NOT touch the print head. Touching the
print head may cause permanent damage
and may void the print head's warranty.
Note
OK Poor
i
When a print head
nozzle is clogged
the printed
sample looks like
this.
After the print
head nozzle is
cleaned, the
horizontal lines
are gone.