Quick Setup Guide Start Here MFC-5895CW Before you can use the machine, read this Quick Setup Guide for the correct setup and installation. WARNING Warnings tell you what to do to prevent possible personal injury. CAUTION Cautions specify procedures you must follow or avoid to prevent possible damage to the machine or other objects. Electrical Hazard icons alert you to possible electrical shock. IMPORTANT DO NOT connect the USB cable yet (if you are using a USB cable).
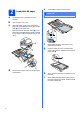
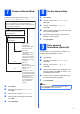
a b c 2 e Load plain A4 paper Check that the paper is flat in the tray. IMPORTANT Do not push the paper in too far. Pull the paper tray completely out of the machine. Open the paper tray cover. With both hands, gently press and slide the paper side guides a and then the paper length guide b to fit the paper size. Make sure that the triangular marks c on the paper side guides a and paper length guide b line up with the mark for the paper size you are using.
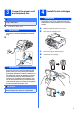
4 Connect the power cord and telephone line WARNING IMPORTANT DO NOT connect the USB cable yet (if you are using a USB cable). a Connect the power cord. WARNING b The machine must be fitted with an earthed plug. Install the ink cartridges If ink gets in your eyes, wash them out with water at once, and if irritation occurs consult a doctor. a b c d e Make sure that the power is turned on. Open the ink cartridge cover. Remove the green protective part. Unpack the ink cartridge.
f g h a Install each ink cartridge in the direction of the arrow on the label. Gently push the ink cartridge until it clicks. After all the ink cartridges are installed close the ink cartridge cover. 5 Check the print quality Set Paper and Press Start Press Colour Start. c d e f 4 Check the quality of the four colour blocks on the sheet. (black/yellow/cyan/magenta) If all lines are clear and visible, press 1 (Yes) on the dial pad to finish the quality check.
7 Choose a Receive Mode There are four possible receive modes: Fax Only, Fax/Tel, Manual and External TAD.
10 a b c d e Press Menu. Press a or b to choose Initial Setup. Press OK. Press a or b to choose Tone/Pulse. Press d or c to choose Pulse (or Tone). Press OK. Press Stop/Exit. 11 a b c d e 6 Set tone or pulse dialling mode Set the telephone line type Press Menu. Press a or b to choose Initial Setup. Press OK. Press a or b to choose Phone Line Set. Press d or c to choose Normal, PBX or ISDN. Press OK. Press Stop/Exit.
12 Choose your connection type Windows®, go to page 8 Macintosh, go to page 10 Windows®, go to page 12 Macintosh, go to page 14 Windows® Macintosh Wired Network For Wired Network Windows® Macintosh USB For USB interface cable Wireless Network For Wireless Network Windows® and Macintosh, go to page 16 7
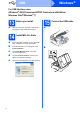
USB Windows® For USB interface users (Windows® 2000 Professional/XP/XP Professional x64 Edition/ Windows Vista®/Windows® 7) 13 a Make sure that your computer is ON and you are logged on with Administrator rights. 14 a b c d e 8 Before you install 15 Connect the USB cable a Install MFL-Pro Suite Put the supplied CD-ROM into your CD-ROM drive. Follow the on-screen instructions. The CD-ROM main menu will appear. Click Initial Installation. Click Install MFL-Pro Suite.
USB Windows® c 16 a b Finish and restart Click Finish to restart your computer. After restarting the computer, you must be logged on with Administrator rights. In the Check for Firmware Updates screen, choose the firmware update setting you want and click OK. Note IMPORTANT d Finish 1 The installation is now complete. Now go to 2 3 Proceed to Install Optional Applications on page 22. Note e The installation will continue automatically. The installation screens appear one after another.
USB Macintosh For USB interface users (Mac OS X 10.4.11, 10.5.x, 10.6.x) 13 a Before you install c Make sure your machine is connected to the power and your Macintosh is ON. You must be logged on with Administrator rights. 14 Connect the USB cable IMPORTANT IMPORTANT • DO NOT connect the machine to a USB port on a keyboard or a non-powered USB hub. • Connect the machine directly to your Macintosh. Make sure that the cable does not restrict the cover from closing, or an error may occur.
USB 15 a b c d f g Install MFL-Pro Suite Put the supplied CD-ROM into your CD-ROM drive. Double-click the Start Here OSX icon to install. Choose Local Connection, and then click Next. Follow the on-screen instructions. Please wait, it will take a few seconds for the software to install. After the installation, the Brother software will search for the Brother device. Choose the machine from the list, and then click OK. When this screen appears, click Next.
Wired Network Windows® For wired network interface users (Windows® 2000 Professional/XP/ XP Professional x64 Edition/ Windows Vista®/Windows® 7) 13 a Before you install c Make sure that your computer is ON and you are logged on with Administrator rights. IMPORTANT Disable all personal firewall software (other than Windows® Firewall), anti-spyware or antivirus applications for the duration of the installation.
Wired Network 15 a b c d e Install MFL-Pro Suite Put the supplied CD-ROM into your CD-ROM drive. Follow the on-screen instructions. The CD-ROM main menu will appear. Click Initial Installation. Click Install MFL-Pro Suite. Follow the on-screen instructions. Choose Wired Network Connection, and then click Next.
Wired Network Macintosh For wired network interface users (Mac OS X 10.4.11, 10.5.x, 10.6.x) 13 a Before you install c Make sure your machine is connected to the power and your Macintosh is ON. You must be logged on with Administrator rights.
Wired Network 15 a b c d e f Macintosh Install MFL-Pro Suite Put the supplied CD-ROM into your CD-ROM drive. Double-click the Start Here OSX icon to install. Choose Wired Network Connection, and then click Next. Follow the on-screen instructions. Please wait, it will take a few seconds for the software to install. After the installation, the Brother software will search for the Brother device. If the machine is configured for your network, choose the machine from the list, and then click OK.
For Wireless Network Users For wireless network interface users 13 Before you begin Although the Brother MFC-5895CW can be used in both a wired and wireless network, only one of the connection methods can be used at a time. IMPORTANT If you have previously configured the wireless settings of the machine you must reset the network (LAN) settings before you can configure the wireless settings again. On your machine, press Menu. Press a or b to choose Network and press OK.
For Wireless Network Users 14 Confirm your network environment (Infrastructure Mode) The following instructions will offer two methods for installing your Brother machine in a wireless network environment. Both methods are for infrastructure mode, using a wireless access point/router that uses DHCP to assign IP addresses. Choose a configuration method and proceed to the page indicated.
For Wireless Network Users Connecting the Brother machine to the wireless network 15 a Configure the wireless settings (typical Wireless Setup in infrastructure mode) On your machine, press Menu. Press a or b to choose Network and press OK. Press a or b to choose WLAN and press OK. Press a or b to choose Setup Wizard and press OK. When Network I/F switched to Wireless is displayed, press OK to accept. This will start the wireless setup wizard. To cancel, press Stop/Exit.
Wireless Network Windows® Install the drivers & software (Windows® 2000 Professional/XP/XP Professional x64 Edition/ Windows Vista®/Windows® 7) 16 a Before you install MFL-Pro Suite f For Windows® XP SP2 or greater/XP Professional x64 Edition/Windows Vista ®/ Windows® 7 users, when Firewall/AntiVirus detected screen appears, choose Change the Firewall port settings to enable network connection and continue with the installation. (Recommended) and click Next.
Wireless Network 18 a b Finish and restart Click Finish to restart your computer. After restarting the computer, you must be logged on with Administrator rights. In the Check for Firmware Updates screen, choose the firmware update setting you want and click OK. Note Internet access is required for the firmware update. Finish The installation is now complete. Now go to Proceed to Install Optional Applications on page 22.
Wireless Network Macintosh Install the drivers & software (Mac OS X 10.4.11, 10.5.x, 10.6.x) 16 a Make sure your machine is connected to the power and your Macintosh is ON. You must be logged on with Administrator rights. 17 a b c d e f Before you install Install MFL-Pro Suite Put the supplied CD-ROM into your CD-ROM drive. Double-click the Start Here OSX icon to install. Choose Wireless Network Connection, and then click Next.
Install Optional Applications 1 Install FaceFilter Studio supported by Reallusion, Inc 3 Windows® Install BookScan&Whiteboard Suite supported by Reallusion, Inc IMPORTANT • The machine must be ON and connected to the computer. • The computer must be connected to the Internet. a b c a b c d e Open the main menu again by ejecting and then reinserting the CD-ROM or by doubleclicking the start.exe program from the root folder. The CD-ROM main menu will appear.
For Network Users Repair network connection problems for Windows® users Network Connection Repair Tool You can use the Network Connection Repair Tool to fix the machine’s network settings to properly work on your network. How to use the Network Connection Repair Tool a b c d e Put the installation CD-ROM into your CD-ROM drive. Double-click the tools folder. Double-click the nettool folder. Double-click the BrotherNetTool.exe file. When this screen appears, follow the on-screen instructions.
For Network Users Restore the network settings to factory default To restore all network settings of the internal Print/Scan server to factory default, please follow the steps below. a b c d e f g Make sure the machine is not operating, then disconnect all the cables from the machine (except the power cord). Press Menu. Press a or b to choose Network. Press OK. Press a or b to choose Factory Reset. Press OK. Press 1 to choose Yes. Press 1 to choose Yes.
Safety and Legal Choosing a location Put your machine on a flat, stable surface that is free of vibration and shocks, such as a desk. Put the machine near a telephone socket and a standard grounded electrical socket. Choose a location where the temperature remains between 10C and 35C. WARNING • DO NOT put the machine near heaters, air conditioners, refrigerators, medical equipment, chemicals or water.
Safety and Legal To use the machine safely Please keep these instructions for later reference and read them before attempting any maintenance. WARNING There are high voltage electrodes inside the machine. Before you clean the inside of the machine, make sure you have unplugged the telephone line cord first and then the power cord from the electrical socket. Doing this will prevent an electrical shock. DO NOT handle the plug with wet hands. Doing this might cause an electrical shock.
Safety and Legal When moving the machine you must lift it from the base, by placing a hand at each side of the unit as shown in the illustration. DO NOT carry the machine by holding the scanner cover or the Jam Clear Cover. DO NOT use flammable substances, any type of spray, liquid or aerosol cleaners to clean the inside or outside of the machine. Doing this may cause a fire or electrical shock.
Safety and Legal Important safety instructions 1 2 3 4 5 6 7 8 9 10 11 12 13 14 Read all of these instructions. Save them for later reference. Follow all warnings and instructions marked on the product. DO NOT use this product near water. DO NOT place this product on an unstable cart, stand, or table. The product may fall, causing serious damage to the product. Slots and openings in the cabinet and the back or bottom are provided for ventilation.
Safety and Legal Regulations LAN connection CAUTION Declaration of Conformity (Europe only) Brother declares that this product is in compliance with the essential requirements of Directives 1999/5/EC and 2005/32/EC. The Declaration of Conformity (DoC) in the User’s Guides and/or Quick Setup Guides may be an earlier version. For the latest version please refer to our web site. Please go to http://solutions.brother.
Safety and Legal Legal limitations for copying It is an offence to make reproductions of certain items or documents with the intent to commit fraud. This memorandum is intended to be a guide rather than a complete list. We suggest you check with relevant legal authorities if in doubt about a particular item or document.
Trademarks The Brother logo is a registered trademark of Brother Industries, Ltd. Brother is a registered trademark of Brother Industries, Ltd. Windows Vista is either a registered trademark or trademark of Microsoft Corporation in the United States and/or other countries. Microsoft, Windows, Windows Server and Internet Explorer are registered trademarks of Microsoft Corporation in the United States and/or other countries. Apple, Macintosh and Mac OS are trademarks of Apple Inc.