
User Manual
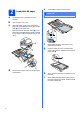
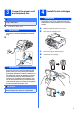
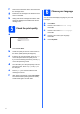
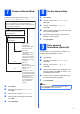


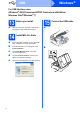


Table Of Contents
- Quick Setup Guide MFC-5895CW
- Start Here
- 1 Unpack the machine and check the components
- 2 Load plain A4 paper
- 3 Connect the power cord and telephone line
- 4 Install the ink cartridges
- 5 Check the print quality
- 6 Choose your language
- 7 Choose a Receive Mode
- 8 Set the date and time
- 9 Enter personal information (station ID)
- 10 Set tone or pulse dialling mode
- 11 Set the telephone line type
- 12 Choose your connection type
- For USB interface users (Windows® 2000 Professional/XP/XP Professional x64 Edition/ Windows Vista®/Windows® 7)
- For USB interface users (Mac OS X 10.4.11, 10.5.x, 10.6.x)
- For wired network interface users (Windows® 2000 Professional/XP/ XP Professional x64 Edition/ Windows Vista®/Windows® 7)
- For wired network interface users (Mac OS X 10.4.11, 10.5.x, 10.6.x)
- For wireless network interface users
- 13 Before you begin
- 14 Confirm your network environment (Infrastructure Mode)
- Connecting the Brother machine to the wireless network
- Install the drivers & software (Windows® 2000 Professional/XP/XP Professional x64 Edition/ Windows Vista®/Windows® 7)
- Install the drivers & software (Mac OS X 10.4.11, 10.5.x, 10.6.x)
- Install Optional Applications Windows®
- For Network Users
- Safety and Legal
- brother CEE-ENG
- Start Here

4
f Take care to match the colour of the lever with
the cartridge colour.
g Install each ink cartridge in the direction of the
arrow on the label.
h
Gently push the ink cartridge until it clicks. After
all the ink cartridges are installed close the ink
cartridge cover.
5
Check the print quality
a
.
Press Colour Start.
b Check the quality of the four colour blocks on
the sheet. (black/yellow/cyan/magenta)
c If all lines are clear and visible, press 1 (Yes)
on the dial pad to finish the quality check.
If you can see missing short lines, press 2 (No)
on the dial pad and go to d.
d The LCD asks you if the print quality is OK for
black and colour. Press 1 (Yes) or 2 (No) on
the dial pad.
e Press 1 (Yes), the machine will then start
cleaning the colours.
f After cleaning is finished, press Colour Start.
The machine starts printing the Print Quality
Check Sheet again. Go back to b.
6
Choose your language
You can select the display language of your LCD
messages.
a Press Menu.
b Press a or b to select Initial Setup.
Press OK.
c Press a or b to select Local Language.
Press OK.
d Press a or b to select your language.
Press OK.
e Press Stop/Exit.
Set Paper and Press
Start