Quick Setup Guide Start Here MFC-6490CW Before you can use the machine, read this Quick Setup Guide for the correct setup and installation. WARNING Warnings tell you what to do to prevent possible personal injury. Important DO NOT connect the USB cable yet (if you are using a USB cable).
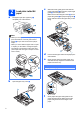
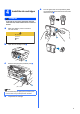
a 2 c Load plain Letter/A4 paper With both hands, gently press and slide the paper side guides a and then the paper length guide b to fit the paper size. Make sure that the triangular marks c on the paper side guides a and paper length guide b line up with the mark for the paper size you are using. Pull paper tray#1 (the upper tray) a completely out of the machine.
g Close the paper tray cover. Check that the paper is flat in the tray and below the maximum paper mark a. 1 h i Slowly push the paper tray completely into the machine. While holding the paper tray in place, pull out the paper support a until it clicks, and then unfold the paper support flap b. 2 1 Note For information about tray#2, see Loading paper in paper tray #2 in Chapter 2 of the User’s Guide.
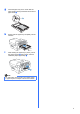
3 Connect the power cord and telephone line Important DO NOT connect the USB cable yet (if you are using a USB cable). a Note If you are sharing one telephone line with an external telephone, connect it as shown below. Before you connect the external telephone, remove the protective cap a from the EXT. jack on the machine. 1 Connect the power cord. 2 1 b Connect the telephone line cord.
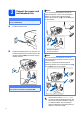
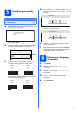
4 Install the ink cartridges e Turn the green knob on the protective yellow cap clockwise to release the vacuum seal, then remove the cap a. WARNING If ink gets in your eyes, wash them out with water at once, and if irritation occurs consult a doctor. a Make sure that the power is turned on. The LCD shows: No Cartridge Install Ink Black b c 1 Open the ink cartridge cover a. 1 Remove the light-green protective part a. 1 Note Do not throw away the light-green protective part.
f Take care to match the color of the lever a with the cartridge color b, as shown in the diagram below. 1 2 Important • DO NOT take out ink cartridges if you do not need to replace them. If you do so, it may reduce the ink quantity and the machine will not know the quantity of ink left in the cartridge. • DO NOT shake the ink cartridges. If ink stains your skin or clothing, wash with soap or detergent at once. • DO NOT repeatedly insert and remove the cartridges.
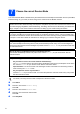
5 d Check the print quality The LCD asks you if the print quality is OK for black and color. Press 1 (Yes) or 2 (No) on the dial pad. Black OK? Important Yes No Make sure you put paper in the upper tray for the initial setup. a When the preparation process has finished, the LCD shows this message Press Press After pressing 1 (Yes) or 2 (No) for both black and color, the LCD shows: . Start Cleaning? Set Paper and Press Start Yes No e Press Color Start.
7 Choose the correct Receive Mode The correct Receive Mode is determined by the external devices and telephone subscriber services (Voice Mail, Distinctive Ring, etc.) you have (or will be using) on the same line as the Brother machine. Will you be using a Distinctive Ring number for receiving faxes? Brother uses the term "Distinctive Ring" but telephone companies may have other names for this service such as Custom Ringing, RingMaster, Personalized Ring, Teen Ring, Ident-A-Call, and Smart Ring.
8 Set the LCD contrast (If needed) d Date&Time Year:20 08 If you are having difficulty reading the LCD, try changing the contrast setting. a b c d e f MENU Input & Press (e.g. Enter 0 8 for 2008.) Press Menu. Press a or b to choose General Setup. Press OK. e Press a or b to choose LCD Settings. Press OK. Press d or c to choose Light, Med or Dark. Press OK. Press Stop/Exit. f c OK Enter the two digits for the day on the dial pad, and then press OK.
f Set your station ID Note If you make a mistake and want to start again, press Stop/Exit and go back to a. You should store your name and fax number to be printed on all fax pages that you send. a b Press Menu. Press a or b to choose Initial Setup. Press OK. c Press a or b to choose Station ID. Press OK. d Enter your fax number (up to 20 digits) on the dial pad, and then press OK. e Enter your name (up to 20 characters) using the dial pad, and then press OK.
Set tone or pulse dialing mode 12 Automatic Daylight Savings Time Your machine comes set for Tone dialing service. If you have Pulse dialing service (rotary), you need to change the dialing mode. You can set the machine to change automatically for daylight savings time. It will reset itself forward one hour in the Spring and backward one hour in the Fall. a b a b c d e Press Menu. Press a or b to choose Initial Setup. Press OK. Press a or b to choose Tone/Pulse.
13 Send in the Product Registration and Test Sheet (USA only) You can also register your product online using the On-Line Registration link from the installation CD-ROM or visit http://www.brother.com/registration/. a b c d 12 Fill out the Product Registration and Test Sheet. Put the sheet face up in the ADF (Automatic Document Feeder) or face down on the scanner glass. Make sure (Fax) is illuminated in Blue. Enter the toll-free fax number: 1-877-268-9575. e Press Black Start.
14 Choose your connection type Windows® Macintosh® Wireless Network For Wireless Network Macintosh® Windows®, go to page 21 Macintosh®, go to page 26 Wired Network For Wired Network USB Windows®, go to page 14 Macintosh®, go to page 18 Windows® For USB interface cable Windows® and Macintosh®, go to page 30 13
USB Windows® For USB Interface Users (For Windows® 2000 Professional/XP/ XP Professional x64 Edition/ Windows Vista®) 15 a Before you install Make sure that your computer is ON and you are logged on with Administrator rights. 16 a Important Install MFL-Pro Suite Put the supplied CD-ROM into your CD-ROM drive. If the model name screen appears, choose your machine. If the language screen appears, choose your language. • DO NOT connect the USB cable yet.
USB Note Windows® g Choose Local Connection, and then click Next. The installation continues. • If this screen appears, click OK and restart your computer. • If the installation does not continue automatically, open the main menu again by ejecting and then reinserting the CD-ROM or double-click the start.exe program from the root folder, and continue from b to install MFLPro Suite. h When this screen appears, go to the next step.
USB 17 Connect the USB cable Windows® c Carefully route the USB cable through the trench and out the back of the machine as shown below and connect the cable to your computer. Important • DO NOT connect the machine to a USB port on a keyboard or a non-powered USB hub. • Connect the machine directly to your computer. a Lift the scanner cover into the open position. Important Make sure that the cable does not restrict the cover from closing, or an error may occur.
USB 18 a Connect the power cord Connect the power cord. The installation will continue automatically. The installation screens appear one after another. Windows® 19 a Finish and restart Click Finish to restart your computer. After restarting the computer, you must be logged on with Administrator rights. Note For Windows Vista®, when this screen appears, click the check box and click Install to complete the installation correctly. Finish The installation is now complete.
USB Macintosh® For USB Interface Users (For Mac OS® X 10.2.4 or greater) 15 a Before you install b Make sure your machine is connected to the power and your Macintosh® is ON. You must be logged on with Administrator rights. Connect the USB cable to the USB socket marked with a symbol. You will find the USB socket inside the machine on the right as shown below. LAN USB Important • For Mac OS® X 10.2.0 to 10.2.3 users, upgrade to Mac OS® X 10.2.4 or greater.
USB d Gently close the scanner cover using the finger holds on both sides of it. Macintosh® c Choose Local Connection, and then click Next. Follow the on-screen instructions. Note Please wait, it will take a few seconds for the software to install. After the installation, click Restart to finish installing the software. WARNING e When this screen appears, click OK. Put the supplied CD-ROM into your CD-ROM drive. For Mac OS ® X 10.3.x or greater, the installation of MFL-Pro Suite is now complete.
USB h Choose XXX-XXXX (where XXX-XXXX is your model name), and then click Add. Macintosh® 18 Install Presto! PageManager When Presto! PageManager is installed OCR capability is added to Brother ControlCenter2. You can easily scan, share and organize photos and documents using Presto! PageManager. i a Click Print Center, then Quit Print Center. Double-click the Presto! PageManager icon and follow the on-screen instructions. For Mac OS® X 10.2.4 to 10.3.
Wired Network Windows® For Wired Network Interface Users (For Windows® 2000 Professional/XP/ XP Professional x64 Edition/ Windows Vista®) 15 a Before you install Make sure that your computer is ON and you are logged on with Administrator rights. 16 a Connect the network cable Lift the scanner cover into the open position. Important • If there are any programs running, close them. • Make sure there are no memory cards or a USB Flash memory drive inserted.
Wired Network c Carefully route the network cable through the trench and out the back of the machine. Then, connect the cable to your network. Windows® 17 a Connect the power cord Connect the power cord. Note If both USB and LAN cables are being used, guide both cables through the trench with one on top of the other. Important Make sure that the cable does not restrict the cover from closing, or an error may occur. d Gently close the scanner cover using the finger holds on both sides of it.
Wired Network 18 a Windows® Note Install MFL-Pro Suite • If this screen appears, click OK and restart your computer. Put the supplied CD-ROM into your CD-ROM drive. If the model name screen appears, choose your machine. If the language screen appears, choose your language. • If the installation does not continue automatically, open the main menu again by ejecting and then reinserting the CD-ROM or double-click the start.exe program from the root folder, and continue from b to install MFLPro Suite.
Wired Network g h Windows® Note Choose Wired Network Connection, and then click Next. • If the machine is configured for your network, choose the machine from the list, and then click Next. This window will not appear if there is only one machine connected on the network, it will be chosen automatically. For Windows ® XP SP2/Windows Vista ® users, when this screen appears, choose Change the Firewall port settings to enable network connection and continue with the installation.
Wired Network Note For Windows Vista®, when this screen appears, click the check box and click Install to complete the installation correctly. j When the On-Line Registration screen is displayed, make your selection and follow the on-screen instructions. Once you have completed the registration process, close your web browser to return to this window. Then click Next. Windows® 19 a Finish and restart Click Finish to restart your computer.
Wired Network Macintosh® For Wired Network Interface Users (For Mac OS® X 10.2.4 or greater) 15 a Before you install b Make sure your machine is connected to the power and your Macintosh® is ON. You must be logged on with Administrator rights. Connect the network cable to the LAN socket marked with a symbol. You will find the LAN socket inside the machine on the left as shown below. LAN USB Important • For Mac OS® X 10.2.0 to 10.2.3 users, upgrade to Mac OS® X 10.2.4 or greater.
Wired Network d Gently close the scanner cover using the finger holds on both sides of it. Macintosh® c Choose Wired Network Connection, and then click Next. Follow the on-screen instructions. Note WARNING Be careful not to trap your fingers under the scanner cover. Always use the finger holds provided on both sides of the scanner cover when opening and closing it. 17 d The Brother software will search for the Brother device. During this time the following screen will appear.
Wired Network Note Macintosh® f For Mac OS® X 10.2.4 to 10.2.8 users, click Add. • If the machine is configured for your network, choose the machine from the list, and then click OK. This window will not appear if there is only one machine connected on the network, it will be chosen automatically. Go to e. g Make the selection shown below. • If this screen appears click OK. Enter a name for your Macintosh® in Display Name up to 15 characters long and click OK. Go to e.
Wired Network 18 Macintosh® Install Presto! PageManager When Presto! PageManager is installed OCR capability is added to Brother ControlCenter2. You can easily scan, share and organize photos and documents using Presto! PageManager. a Double-click the Presto! PageManager icon and follow the on-screen instructions. For Mac OS ® X 10.2.4 to 10.3.8 users, when this screen appears, click Go to download the software from the Brother Solutions Center website. The installation is now complete.
For Wireless Network Users For Wireless Network Interface Users 15 Before you begin First you must configure the wireless network settings of your machine to communicate with your network access point (router). After the machine is configured to communicate with your access point (router) computers on your network will have access to the machine. To use the machine from these computers, you will need to install the drivers and software.
For Wireless Network Users 16 Confirm your network environment (Infrastructure Mode) The following instructions will offer two methods for installing your Brother machine in a wireless network environment. Both methods are for infrastructure mode, using a wireless router or access point that uses DHCP to assign IP addresses. Choose a configuration method and proceed to the page indicated.
For Wireless Network Users Connecting the Brother machine to the wireless network 17 a b Configure the wireless settings (Typical Wireless Setup in infrastructure mode) f On your machine, press Menu. Press a or b to choose Network and press OK. Press a or b to choose WLAN and press OK. Press a or b to choose Setup Wizard and press OK. When Network I/F switched to Wireless is displayed, press OK to accept. This will start the wireless setup wizard. To cancel, press Clear/Back.
For Wireless Network Users The letters appear in this order: lower case, upper case and then numbers. (For more information, see Entering Text for Wireless Settings on page 47.) i Press OK when you have entered all the characters, then press 1 for Yes to apply your settings. Go to i. Your machine will now try to connect to your wireless network using the information you have entered. If successful, Connected will appear briefly on the LCD.
For Wireless Network Users 17 a b c d Configure the wireless settings using the automatic wireless (onepush) method Confirm your wireless router or access point has the SecureEasySetup™, Wi-Fi Protected Setup™ or AOSS™ symbol as shown below. Place the Brother machine within range of a SecureEasySetup™, Wi-Fi Protected Setup™ or AOSS™ access point/router. The range may differ depending on your environment. Refer to the instructions provided with your access point/router.
For Wireless Network Users Wireless setup is now complete. To install MFL-Pro Suite, continue to step 18.
Wireless Network Windows® Install the Drivers & Software (For Windows® 2000 Professional/XP/XP Professional x64 Edition/ Windows Vista®) 18 a Before you install MFL-Pro Suite Make sure that your computer is ON and you are logged on with Administrator rights. 19 a Important Install MFL-Pro Suite Put the supplied CD-ROM into your CD-ROM drive. If the model name screen appears, choose your machine. If the language screen appears, choose your language.
Wireless Network Note g Windows® Choose Wireless Network Connection, and then click Next. • If this screen appears, click OK and restart your computer. • If the installation does not continue automatically, open the main menu again by ejecting and then reinserting the CD-ROM or double-click the start.exe program from the root folder, and continue from b to install MFLPro Suite. h Click on Checked and confirmed check box, and then click Next.
Wireless Network Note j The installation of the Brother drivers will automatically start. The installation screens appear one after another. • If the machine is configured for your network, choose the machine from the list, and then click Next. This window will not appear if there is only one machine connected on the network, it will be chosen automatically. Windows® Important DO NOT cancel any of the screens during the installation. It may take a few seconds for all screens to appear.
Wireless Network 20 a Windows® Finish and restart Click Finish to restart your computer. After restarting the computer, you must be logged on with Administrator rights. Note If an error message appears during the software installation, run the Installation Diagnostics located in Start/All Programs/Brother/ MFC-XXXX (where MFC-XXXX is your model name).
Wireless Network Macintosh® Install the Drivers & Software (For Mac OS® X 10.2.4 or greater) 18 a Before you install MFL-Pro Suite c Choose Wireless Network Connection, and then click Next. Make sure your machine is connected to the power and your Macintosh® is ON. You must be logged on with Administrator rights. Important • For Mac OS® X 10.2.0 to 10.2.3 users, upgrade to Mac OS® X 10.2.4 or greater. (For the latest information for Mac OS® X, visit http://solutions.brother.
Wireless Network For Mac OS ® X 10.3.x or greater, the installation of MFL-Pro Suite is now complete. Go to step 20 on page 42. Note • If the machine is configured for your network, choose the machine from the list, and then click OK. This window will not appear if there is only one machine connected on the network, it will be chosen automatically. Go to f. • If your machine is not detected, go to step 16 on page 31 and setup the wireless connection again.
Wireless Network 20 Install Presto! PageManager When Presto! PageManager is installed OCR capability is added to Brother ControlCenter2. You can easily scan, share and organize photos and documents using Presto! PageManager. a Double-click the Presto! PageManager icon and follow the on-screen instructions. For Mac OS ® X 10.2.4 to 10.3.8 users, when this screen appears, click Go to download the software from the Brother Solutions Center website.
Install Optional Applications 1 Install FaceFilter Studio supported by Reallusion, Inc FaceFilter Studio is an easy-to-use borderless photo printing application. FaceFilter Studio also lets you edit your photo data and add photo effects such as red eye reduction or skin tone enhancement. 2 • The computer must be connected to the Internet. a b a b c To run FaceFilter Studio, go to Start/All Programs/Reallusion/ FaceFilter Studio on your computer.
Install Optional Applications 3 Install BookScan&Whiteboard Suite supported by Reallusion, Inc You can install BookScan&Whiteboard Suite. The BookScan Enhancer software can correct your scanned book images automatically. The Whiteboard Enhancer software cleans up and enhances text and images from photos taken of your whiteboard. (Internet access required.) Important • The machine must be ON and connected to the computer. • The computer must be connected to the Internet.
For Network Users BRAdmin Light utility (For Windows® users) BRAdmin Light is a utility for initial setup of Brother network connected devices. It also can search for Brother products on your network, view the status and configure basic network settings, such as IP address. For more information on BRAdmin Light, visit us at http://solutions.brother.com/.
For Network Users BRAdmin Light utility (For Mac OS® X users) BRAdmin Light is a utility for initial setup of Brother network connected devices. It also can search for Brother products on your network, view the status and configure basic network settings, such as IP address from a computer running Mac OS® X 10.2.4 or greater. The BRAdmin Light software will be installed automatically when you install the printer driver.
For Wireless Network Users Restore the network settings to factory default To restore all network settings of the internal Print/Scan server to factory default, please follow the steps below. a Make sure the machine is not operating, then disconnect all the cables from the machine (except the power cord). b c Press Menu. Press a or b to choose Network. Press OK. d Press a or b to choose Factory Reset. Press OK. e f g Press 1 to choose Yes. Press 1 to choose Yes.
Consumables Replacement consumables When the time comes to replace ink cartridges, an error message will be indicated on the LCD. For more information about the ink cartridges for your machine, visit http://www.brother.com/original/ or contact your local Brother re-seller.