
Owner's Manual

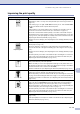
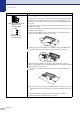


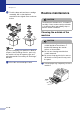
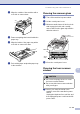
Table Of Contents
- USER’S GUIDE FAX-2820/FAX-2910/FAX-2920/MFC-7220/MFC-7225N
- Brother numbers
- Ordering accessories and supplies
- Safety precautions
- Quick Reference Guide
- Table of Contents
- 1 Introduction
- 2 Getting started
- Initial setup
- General Setup
- Setting the Mode Timer (FAX-2820, FAX-2910 and FAX-2920 only)
- Setting the Mode Timer (MFC-7220 and MFC-7225N only)
- Setting the Paper Type
- Setting the Paper Size
- Setting the Ring Volume
- Setting the Beeper Volume
- Setting the Speaker Volume
- Setting the Handset Volume
- Choosing the Handset Volume (For Volume Amplify)
- Setting Volume Amplify
- Turning on Automatic Daylight Savings Time
- Toner Save
- Sleep Time
- Setting the LCD Contrast
- Security
- TX Lock (FAX-2820, FAX-2910 and MFC-7220 only)
- Memory Security (FAX-2920 and MFC-7225N only)
- Setting Lock
- 3 Setup Send
- 4 Setup Receive
- 5 Quick-Dial numbers and dialing options
- 6 Remote Fax Options
- 7 Printing reports
- 8 Making copies
- 9 Software and Network Features (MFC-7220 and MFC-7225N only)
- 10 Important information
- Standard telephone and FCC Notices These notices are in effect on models sold and used in the United States only.
- Federal Communications Commission (FCC) Declaration of Conformity (USA only)
- Industry Canada Compliance Statement (Canada only)
- Disconnect device
- LAN connection (MFC-7225N only)
- Laser safety
- FDA regulations
- Important safety instructions
- Trademarks
- 11 Troubleshooting and routine maintenance
- Appendix A
- Appendix B
- Glossary
- Specifications
- Product description
- General
- Print media
- Copy
- Fax
- Scanner (MFC-7220 and MFC-7225N only)
- Printer (not available for FAX-2910)
- Interfaces (not available for FAX-2910)
- Download the optional software from the Brother Web Site (FAX-2820 and FAX-2920 users only)
- Computer requirements (not available for FAX-2910)
- Consumable items
- Network (LAN) (MFC-7225N only)
- Index
- Remote Retrieval Access card
- brother USA/CAN

Troubleshooting and routine maintenance
11 - 14
11
Scanning Difficulties (MFC-7220 and MFC-7225N only)
TWAIN errors appear while
scanning.
Make sure the Brother TWAIN driver is selected as the primary source. In
PaperPort
®
, click Scan in the File menu and select the Brother TWAIN driver.
Software Difficulties (MFC-7220 and MFC-7225N only)
Cannot install software or print. Run the Repair MFL-Pro Suite program on the CD-ROM. This program will repair
and reinstall the software.
Cannot perform ‘2 in 1’ or ‘4 in 1’
printing.
Check that the paper size setting in the application and in the printer driver are the
same.
Machine does not print from Adobe
Illustrator
Try to reduce the print resolution. (See Advanced tab in Software User’s Guide on
the CD-ROM.)
When using ATM fonts, some
characters are missing or some
characters are printed in their
place.
If you are using Windows
®
98/98SE/Me, select ‘Printer Settings’ from the ‘Start’
menu. Select the properties of the ‘Brother MFC-7220 or MFC-7225N’. Click
‘Spool Setting’ on the ‘Details’ tab. Select ‘RAW’ from ‘Spool Data Format.’
‘Unable to write to LPT1’ or ‘LPT1
already in use’ Error Message
appears. (MFC-7220 and
MFC-7225N only)
1.Make sure the machine is on (plugged into the AC power outlet and the power
switch turned on) and that it is connected directly to the computer using the
IEEE-1284 bi-directional parallel cable. The cable must not go through another
peripheral device (such as a Zip Drive, External CD-ROM Drive, or Switch box).
2.Make sure the machine is not displaying an error message on the LCD Display.
3.Make sure no other device drivers, which also communicate through the parallel
port, are running automatically when you boot up the computer (such as, drivers
for Zip Drives, External CD-ROM Drive, etc.) Suggested areas to check: (Load=,
Run=command lines in the win.ini file or the Setup Group)
4.Check with your computer manufacturer to confirm that the computer’s parallel
port settings in the BIOS are set to support a bi-directional machine; i.e. (Parallel
Port Mode – ECP)
‘MFC is Busy’ Error Message
appears.
Paper Handling Difficulties
The machine does not feed paper.
The LCD shows No Paper Fed or
Paper Jam.
If there is no paper, load a new stack of paper into the paper tray. If there is paper
in the paper tray, make sure it is straight. If the paper is curled, you should
straighten it. Sometimes it is helpful to remove the paper, turn the stack over and
put it back into the paper tray. Reduce the amount of paper in the paper tray, and
then try again. Check that the manual feed mode is not selected in the printer
driver.
If the LCD shows Paper Jam and you still have a problem, see Paper jams on
page 11-7.
The machine does not feed paper
from the manual feed slot.
Reinsert the paper firmly, load one sheet at a time. Make sure that manual feed
mode is selected in the printer driver.
How can I load envelopes? You can load envelopes from the manual feed slot. Your application software must
be set up to print the envelope size you are using. This is usually done in the Page
Setup or Document Setup menu of your software. Please refer to the manual
provided with your software application.
What paper can I use? You can use plain paper, recycled paper, envelopes, transparencies and labels
that are made for laser machines. (For information on paper you can use, see
About paper on page 1-8.)
How can I clear paper jams? See Paper jams on page 11-7.
DIFFICULTY SUGGESTIONS