
User Manual
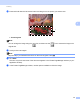

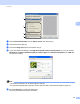
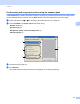


Table Of Contents
- SOFTWARE USER’S GUIDE
- Table of Contents
- Machine operation keys
- 1 Using the control panel
- Using printer keys
- Job Cancel
- Secure Key (For MFC-7460DN and MFC-7860DW)
- Printer Emulation Support (For MFC-7860DW)
- Printing the Internal Font List (For MFC-7860DW)
- Printing the Print Configuration List (For MFC-7860DW)
- Test Print (For MFC-7860DW)
- Duplex Print (For MFC-7860DW)
- Restoring default printer settings (For MFC-7860DW)
- Using the scan keys
- Using printer keys
- 1 Using the control panel
- Windows®
- 2 Printing
- Using the Brother printer driver
- Printing a document
- Duplex printing
- Simultaneous scanning, printing and faxing
- Printer driver settings
- Accessing the printer driver settings
- Features in the Windows® printer driver
- Basic tab
- Advanced tab
- Print Profiles tab
- Editing a print profile
- Support
- Tray Settings
- Status Monitor
- Features in the BR-Script 3 printer driver (For MFC-7860DW) (PostScript® 3™ language emulation)
- Status Monitor
- 3 Scanning
- 4 ControlCenter4
- 5 Remote Setup (MFC models only)
- 6 Brother PC-FAX Software (MFC models only)
- 7 Firewall settings (For Network users)
- 2 Printing
- Apple Macintosh
- 8 Printing and Faxing
- 9 Scanning
- 10 ControlCenter2
- 11 Remote Setup
- Using The Scan key
- Index
- brother TWN-ENG

Scanning
50
3
Pre-Scanning and cropping a portion using the scanner glass 3
The Preview button is used to preview an image for cropping any unwanted portions from the image. When
you are satisfied with the preview, click the Scan button in the Scan dialog box to scan the image.
a Follow the steps from a to e of Scanning a document into the PC on page 48.
b Choose Flatbed in the Paper source drop-down list (1).
Paper source (1)
Picture type (2)
Adjust the quality of the scanned picture (3)
Scanning area (4)
c Choose the picture type (2).
d Click Preview.
The whole image is scanned into the PC and appears in the scanning area (4).
1
2
4
3