
User Manual


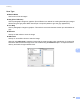
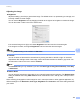
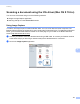

Table Of Contents
- SOFTWARE USER’S GUIDE
- Table of Contents
- Machine operation keys
- 1 Using the control panel
- Using printer keys
- Job Cancel
- Secure Key (For MFC-7460DN and MFC-7860DW)
- Printer Emulation Support (For DCP-7070DW and MFC-7860DW)
- Printing the Internal Font List (For DCP-7070DW and MFC-7860DW)
- Printing the Print Configuration List (For DCP-7070DW and MFC-7860DW)
- Test Print (For DCP-7070DW and MFC-7860DW)
- Duplex Print (For DCP-7070DW and MFC-7860DW)
- Restoring default printer settings (For DCP-7070DW and MFC-7860DW)
- Using the scan keys
- Using printer keys
- 1 Using the control panel
- Windows®
- 2 Printing
- Using the Brother printer driver
- Printing a document
- Duplex printing
- Simultaneous scanning, printing and faxing
- Printer driver settings
- Accessing the printer driver settings
- Features in the Windows® printer driver
- Basic tab
- Advanced tab
- Print Profiles tab
- Editing a print profile
- Support
- Tray Settings
- Status Monitor
- Features in the BR-Script 3 printer driver (For MFC-7860DW) (PostScript® 3™ language emulation)
- Status Monitor
- 3 Scanning
- Scanning a document using the TWAIN driver
- Scanning a document using the WIA driver (Windows® XP/Windows Vista®/Windows® 7)
- Scanning a document using the WIA driver (Windows Photo Gallery and Windows Fax and Scan)
- Using ScanSoft™ PaperPort™ 12SE with OCR by NUANCE™
- 4 ControlCenter4
- 5 Remote Setup (MFC models only)
- 6 Brother PC-FAX Software (MFC models only)
- 7 Firewall settings (For Network users)
- 2 Printing
- Apple Macintosh
- 8 Printing and Faxing
- 9 Scanning
- 10 ControlCenter2
- 11 Remote Setup
- Using The Scan key
- 12 Scanning (For USB cable users)
- 13 Network Scanning
- Index

Scanning
160
9
Adjusting the Image 9
Brightness
Adjust the setting (-50 to 50) to get the best image. The default value is 0, representing an average, and
is usually suitable for most images.
You can set the Brightness level by dragging the slider to the right or left to lighten or darken the image.
You can also enter a value in the box to set the level.
If the scanned image is too light, set a lower Brightness level and scan the document again.
If the image is too dark, set a higher Brightness level and scan the document again.
Note
The Brightness setting is not available for 256 Color.
Contrast
You can increase or decrease the contrast level by moving the slider to the left or right. An increase
emphasizes dark and light areas of the image, while a decrease reveals more detail in grey areas. You
can also enter a value in the box to set the Contrast.
Note
The Contrast setting is only available if you have set Scan Type to Gray (Error Diffusion), True Gray
or 24bit Color.
Reduce Noise
You can improve and enhance the quality of your scanned images with this selection. The Reduce Noise
setting is available when using 24bit Color and scan resolutions of 300 300 dpi, 400 400 dpi or 600
600 dpi.
When scanning photographs or other images for use in a word processor or other graphics application, try
different settings for the Resolution, Scan Type, Brightness and Contrast to see which setting best suits
your needs.