
User Manual
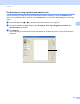
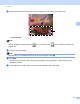

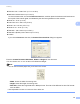


Table Of Contents
- SOFTWARE USER’S GUIDE
- Table of Contents
- Machine operation keys
- 1 Using the control panel
- Using printer keys
- Job Cancel
- Secure Key (For MFC-7460DN and MFC-7860DW)
- Printer Emulation Support (For DCP-7070DW and MFC-7860DW)
- Printing the Internal Font List (For DCP-7070DW and MFC-7860DW)
- Printing the Print Configuration List (For DCP-7070DW and MFC-7860DW)
- Test Print (For DCP-7070DW and MFC-7860DW)
- Duplex Print (For DCP-7070DW and MFC-7860DW)
- Restoring default printer settings (For DCP-7070DW and MFC-7860DW)
- Using the scan keys
- Using printer keys
- 1 Using the control panel
- Windows®
- 2 Printing
- Using the Brother printer driver
- Printing a document
- Duplex printing
- Simultaneous scanning, printing and faxing
- Printer driver settings
- Accessing the printer driver settings
- Features in the Windows® printer driver
- Basic tab
- Advanced tab
- Print Profiles tab
- Editing a print profile
- Support
- Tray Settings
- Status Monitor
- Features in the BR-Script 3 printer driver (For MFC-7860DW) (PostScript® 3™ language emulation)
- Status Monitor
- 3 Scanning
- Scanning a document using the TWAIN driver
- Scanning a document using the WIA driver (Windows® XP/Windows Vista®/Windows® 7)
- Scanning a document using the WIA driver (Windows Photo Gallery and Windows Fax and Scan)
- Using ScanSoft™ PaperPort™ 12SE with OCR by NUANCE™
- 4 ControlCenter4
- 5 Remote Setup (MFC models only)
- 6 Brother PC-FAX Software (MFC models only)
- 7 Firewall settings (For Network users)
- 2 Printing
- Apple Macintosh
- 8 Printing and Faxing
- 9 Scanning
- 10 ControlCenter2
- 11 Remote Setup
- Using The Scan key
- 12 Scanning (For USB cable users)
- 13 Network Scanning
- Index

Scanning
52
3
e Press and hold down the left mouse button and drag it over the portion you want to scan.
f If you need advanced settings, click Adjust the quality of the scanned picture (3). You can choose
Brightness, Contrast, Resolution (DPI) and Picture type from Advanced Properties. Click OK after
you choose a setting.
g Click the Scan button in the Scan dialog box.
The machine starts scanning the document.
This time only the chosen area of the document appears in the PaperPort™ 12SE window (or your
application window).