
Network User's Guide
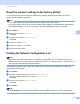
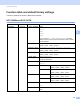
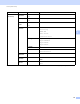


Table Of Contents
- NETWORK USER’S GUIDE
- Table of Contents
- 1 Introduction
- 2 Changing your machine’s network settings
- 3 Configuring your machine for a wireless network (For HL-2280DW, DCP-7055W, DCP-7057W, DCP-7070DW and MFC-7860DW)
- Overview
- Step by step chart for wireless network configuration
- Confirm your network environment
- Confirm your wireless network setup method
- Configuration using the machine’s control panel Setup Wizard to configure your machine for a wireless network (Recommended)
- Configuration using WPS or AOSS™ from the control panel menu to configure your machine for a wireless network (Push Button Configuration) (Infrastructure mode only)
- Configuration using the Brother installer application on the CD-ROM to configure your machine for a wireless network
- Configuration using the PIN Method of Wi-Fi Protected Setup to configure your machine for a wireless network (Infrastructure mode only)
- Configuring your machine for a wireless network (For Infrastructure mode and Ad-hoc mode)
- Using the Setup Wizard from the control panel
- Using WPS or AOSS™ from the control panel menu to configure your machine for a wireless network (Push Button Configuration)
- Configuring your machine when the SSID is not broadcast
- Using the Brother installer application on the CD-ROM to configure your machine for a wireless network
- Using the PIN Method of Wi-Fi Protected Setup
- 4 Wireless configuration using the Brother installer application (For HL-2280DW, DCP-7055W, DCP-7057W, DCP-7070DW and MFC-7860DW)
- 5 Control panel setup
- Network menu
- TCP/IP
- Ethernet (wired network only)
- Status (For DCP-7065DN, MFC-7360N, MFC-7365DN, MFC-7460DN and MFC-7860DN)/Wired Status (For HL-2280DW, DCP-7070DW and MFC-7860DW)
- Setup Wizard (wireless network only)
- WPS or AOSS™ (wireless network only)
- WPS w/PIN Code (wireless network only)
- WLAN Status (wireless network only)
- MAC Address
- Set to Default (For HL-2280DW, DCP-7070DW and MFC-7860DW)
- Wired Enable (For HL-2280DW, DCP-7070DW and MFC-7860DW)
- WLAN Enable (For HL-2280DW, DCP-7055W, DCP-7057W, DCP-7070DW and MFC-7860DW)
- E-mail / IFAX (For MFC-7365DN, MFC-7460DN, MFC-7860DN and MFC-7860DW (if you download IFAX))
- How to set a new default for Scan to E-mail (E-mail server) (MFC-7365DN, MFC-7460DN, MFC-7860DN and MFC-7860DW (if you download IFAX))
- Scan to FTP (For MFC-7365DN, MFC-7460DN, MFC-7860DN and MFC-7860DW)
- Fax to Server (For MFC-7365DN, MFC-7460DN, MFC-7860DN and MFC-7860DW: available as a download)
- Time Zone
- Reset the network settings to the factory default
- Printing the Network Configuration List
- Printing the WLAN report (For HL-2280DW, DCP-7055W, DCP-7057W, DCP-7070DW and MFC-7860DW)
- Function table and default factory settings
- Network menu
- 6 Web Based Management
- 7 Internet fax (For MFC-7365DN, MFC-7460DN, MFC-7860DN and MFC-7860DW: available as a download)
- 8 Security features
- 9 Troubleshooting
- Appendix A
- Index

Control panel setup
37
5
Printing the WLAN report (For HL-2280DW, DCP-7055W,
DCP-7057W, DCP-7070DW and MFC-7860DW) 5
The WLAN Report prints your machine’s wireless status report. If the wireless connection failed, check the
error code on the printed report and refer to Troubleshooting in the Quick Setup Guide.
a Press Menu.
b (For MFC models) Press a or b to choose Print Reports.
(For DCP models) Press a or b to choose Machine Info..
Press OK.
c Press a or b to choose WLAN Report.
Press OK.
d Press Start.