
Quick Setup Guide
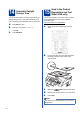
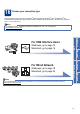
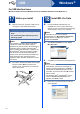

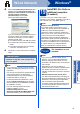
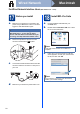
Table Of Contents
- Quick Setup Guide MFC-7360N/MFC-7365DN/MFC-7460DN
- Start Here
- 1 Unpack the machine and check the components
- 2 Remove the packing material from the machine
- 3 Load paper in the paper tray
- 4 Connect the power cord and telephone line
- 5 Choose your language (if needed)
- 6 Choose the correct Receive Mode
- 7 Set the LCD contrast (if needed)
- 8 Set the date and time
- 9 Set your Station ID
- 10 Fax Transmission Report
- 11 Set tone or pulse dialing mode (Canada only)
- 12 Set the telephone line compatibility
- 13 Dial Prefix
- 14 Automatic Daylight Savings Time
- 15 Send in the Product Registration and Test Sheet (USA only)
- 16 Choose your connection type
- For USB Interface Users (Windows® 2000 Professional/XP/XP Professional x64 Edition/Windows Vista®/Windows® 7)
- For USB Interface Users (Mac OS X 10.4.11 - 10.6.x)
- For Wired Network Interface Users (Windows® 2000 Professional/XP/XP Professional x64 Edition/Windows Vista®/Windows® 7)
- For Wired Network Interface Users (Mac OS X 10.4.11 - 10.6.x)
- For Network Users
- Other Information
- Consumables
- brother USA/CAN
- Start Here

12
14
Automatic Daylight
Savings Time
You can set the machine to change automatically for
daylight savings time. It will reset itself forward one
hour in the Spring and backward one hour in the Fall.
a Press Menu, 0, 2, 2.
b Press a or b to choose On (or Off).
Press OK.
c Press Stop/Exit.
15
Send in the Product
Registration and Test
Sheet (USA only)
You can also register your product online using the
On-Line Registration link from the installation
CD-ROM or visit
http://www.brother.com/registration/
.
a Fill out the Product Registration and Test
Sheet.
b Put the sheet face up in the ADF (Automatic
Document Feeder) or face down on the
scanner glass.
c Make sure (FAX) is illuminated in Blue.
d Enter the toll-free fax number: 1-877-268-9575.
e Press Start.
Note
You will receive a confirmation fax of your Product
Registration.