
Quick Setup Guide
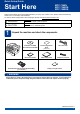
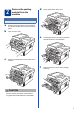
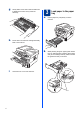
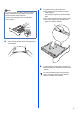
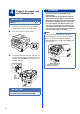
Table Of Contents
- Quick Setup Guide MFC-7360N/MFC-7365DN/MFC-7460DN
- Start Here
- 1 Unpack the machine and check the components
- 2 Remove the packing material from the machine
- 3 Load paper in the paper tray
- 4 Connect the power cord and telephone line
- 5 Choose your language (if needed)
- 6 Choose the correct Receive Mode
- 7 Set the LCD contrast (if needed)
- 8 Set the date and time
- 9 Set your Station ID
- 10 Fax Transmission Report
- 11 Set tone or pulse dialing mode (Canada only)
- 12 Set the telephone line compatibility
- 13 Dial Prefix
- 14 Automatic Daylight Savings Time
- 15 Send in the Product Registration and Test Sheet (USA only)
- 16 Choose your connection type
- For USB Interface Users (Windows® 2000 Professional/XP/XP Professional x64 Edition/Windows Vista®/Windows® 7)
- For USB Interface Users (Mac OS X 10.4.11 - 10.6.x)
- For Wired Network Interface Users (Windows® 2000 Professional/XP/XP Professional x64 Edition/Windows Vista®/Windows® 7)
- For Wired Network Interface Users (Mac OS X 10.4.11 - 10.6.x)
- For Network Users
- Other Information
- Consumables
- brother USA/CAN
- Start Here

4
g Gently shake it from side to side several times
to distribute the toner evenly inside the
assembly.
h Put the drum unit and toner cartridge assembly
back in the machine.
i Close the front cover of the machine.
3
Load paper in the paper
tray
a Pull the paper tray completely out of the
machine.
b While pressing the green paper-guide release
lever a, slide the paper guides to fit the paper
size you are loading in the tray. Make sure that
the guides are firmly in the slots.
1