Multi-Protocol On-board Print/Scan Server NETWORK USER’S GUIDE MFC-7225N MFC-7820N Please read this manual thoroughly before using this device on your network. You can print or view this manual from the CD-ROM at any time, please keep the CD-ROM in a convenient place for quick and easy reference at all times. The Brother Solutions Center (http://solutions.brother.com) is your one stop resource for all your printing needs.
Definitions of warnings, cautions, and notes We use the following icon throughout this User’s Guide: Notes tell you how you should respond to a situation that may arise or give tips about how the operation works with other features. Trademarks Brother and the Brother logo are registered trademarks and BRAdmin Professional is a trademark of Brother Industries, Ltd. UNIX is a registered trademark of The Open Group. Apple, Macintosh, Quick Draw and LaserWriter are registered trademarks of Apple Computer, Inc.
IMPORTANT NOTE: For technical and operational assistance, you must call the country where you purchased the machine.Calls must be made from within that country. In USA 1-800-276-7746 In Canada 1-877-BROTHER In Europe Visit http://www.brother.com for contact information on your local Brother office.
In USA only 1-800-521-2846 Service center locator (USA) For the location of a Brother authorized service center, call 1-800-284-4357. Service center locations (Canada) For the location of a Brother authorized service center, call 1-877-BROTHER. Internet addresses Brother Global Web Site: http://www.brother.com For Frequently Asked Questions (FAQs), Product Support and Technical Questions, and Driver Updates and Utilities: http://solutions.brother.
Table of contents 1 Introduction ................................................................................................................1-1 Overview............................................................................................................................................ 1-1 Types of network connection ............................................................................................................. 1-2 Network connection example .......................................
3 Front Panel Setup ......................................................................................................3-1 LAN Main Setup Menu....................................................................................................................... 3-1 Setup TCP/IP............................................................................................................................... 3-1 BOOT Method ......................................................................................
Web Based Management ..........................................................................................7-1 How to use a Web Browser to manage your Device ......................................................................... 7-1 Overview...................................................................................................................................... 7-1 How to connect to your machine using a Browser ......................................................................
1 Introduction Overview The Brother print/scan server allows your Brother machine to be shared on a 10/100MB Ethernet Network and provides printing services for Windows® 98/98SE/Me, Windows NT® 4.0, Windows® 2000/XP supporting the TCP/IP protocols and Mac OS® 9.1-9.2 / Mac OS X® 10.2.4 or greater supporting TCP/IP. To use the Brother machine through a network, you need to configure the print/scan server, and set up the computers you use.
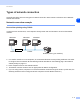
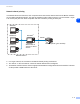
Introduction Types of network connection Generally speaking, there are two types of network connection: Peer-to-Peer environment and a Network Shared environment. Network connection example Peer-to-Peer printing using TCP/IP In a Peer-to-Peer environment, each computer directly sends and receives data to and from the Brother machine.
Introduction Network shared printing In a Network Shared environment, each computer sends and receives data to and from the Brother machine via a centrally controlled computer. This type of computer is often called a “Server” or a “Print Server”. Its job is to access print jobs from other computers and then control the printing of these jobs.
Introduction Protocols TCP/IP protocols and functionalities 1 Protocols are the standardized sets of rules for transmitting data on a network. Protocols allow the users to gain access to network-connected resources. The print/scan server used on this Brother product supports the TCP/IP (Transmission Control Protocol/Internet Protocol) protocol. TCP/IP is the most popular set of protocols used for communication such as Internet and E-mail.
Introduction SMTP client Simple Mail Transfer Protocol (SMTP) client is used to send e-mails via Internet or Intranet. IPP 1 Internet Printing Protocol (IPP Version 1.0) allows you to print documents directly to any accessible printer via the internet. mDNS mDNS allows the Brother print/scan server to automatically configure itself to work in a Mac OS® X Simple Network Configured system. (Mac OS® X 10.2.4 or greater).
2 Configuring your network printer Overview You need to configure the TCP/IP information to your Brother network printer before you use it on your network. In this chapter, you will learn what TCP/IP configuration items you need and how you configure your network printer using these TCP/IP configuration items. Note You can configure them using the machine’s control panel settings. For the details, please see Front Panel Setup in Chapter 3.
Configuring your network printer For more information on DHCP, BOOTP and RARP, see Using DHCP to configure the IP address on page A-1, Using BOOTP to configure the IP address on page A-2 and Using RARP to configure the IP address on page A-2. If you do not have a DHCP/BOOTP/RARP server, the Automatic Private IP Addressing (APIPA) protocol will automatically assign an IP address from the range 169.254.1.0 to 169.254.254.255.
Configuring your network printer Setting the IP address and subnet mask Using the BRAdmin Professional utility and the TCP/IP protocol to configure your network printer (for Windows® only) BRAdmin Professional utility The BRAdmin Professional utility is designed to allow you to manage your network connected Brother machines in a TCP/IP environment.
Configuring your network printer Note • If the print/scan server is set to its factory default settings without using a DHCP/BOOTP/RARP server, the device will appear as APIPA in the BRAdmin Professional utility screen. • You can find the node name and Ethernet address (Node Address above) by printing out the Network Configuration Page. See Printing the Network Configuration Page on page 3-7 for information on how to print the Network Configuration Page on your print/scan server.
Configuring your network printer Using the HTTP (web browser) and the TCP/IP protocol to change the print/scan server settings A standard web browser (we recommend Microsoft Internet Explorer® version 6.0 or later, or Netscape Navigator® version 7.1 or later) can be used to change your print/scan server settings using the HTTP (Hyper Text Transfer Protocol). To use a web browser, you must have assigned an IP address to the print/scan server. 1 Type http://printer_ip_address/ into your browser.
3 Front Panel Setup LAN Main Setup Menu 3 You can connect your machine into the network to use the Network Printer and Network Scanner. To use all the network functions, you can set up your machine using the control panel LAN menu. The LAN menu selections allow you to set up the Brother machine for your network configuration. Press Menu/Set, then press the appropriate number, 5 for LAN for example. Proceed to the menu selection you wish to configure.
Front Panel Setup RARP mode Brother print/scan server IP address can be configured using the Reverse ARP (RARP) facility on your host computer. This is done by editing the /etc/ethers file (if this file does not exist, you can create it) with an entry similar to the following: 00:80:77:31:01:07 3 BRN_310107 Where the first entry is the Ethernet address of the print/scan server and the second entry is the name of the print/scan server (the name must be the same as the one you put in the /etc/hosts file).
Front Panel Setup Certain BOOTP host software implementations will not respond to BOOTP requests if you have not included a download filename in the configuration file; if this is the case, simply create a null file on the host and specify the name of this file and its path in the configuration file. As with rarp, the print/scan server will load its IP address from the BOOTP server when the printer is powered on.
Front Panel Setup Subnet Mask This field displays the current subnet mask used by the machine. If you are not using DHCP or BOOTP to obtain the subnet mask, enter the desired subnet mask. Check with your network manager for the subnet mask to use. 1 Press Menu/Set, 5, 1, 3. 2 Select 1 to change. Enter the Subnet Mask address. 3 Press Menu/Set. 4 Press Stop/Exit. 3 Gateway This field displays the current gateway or router address used by the machine.
Front Panel Setup WINS Config This selection controls how the machine obtains the IP address for the WINS server. 1 Press Menu/Set, 5, 1, 6. 2 Press ▲ or ▼ to select Auto or Static. 3 Press Menu/Set. 4 Press Stop/Exit. 3 Auto Automatically uses a DHCP request to determine the IP addresses for the primary and secondary WINS servers. You must set the BOOT Method to Auto for this feature to work. Static Uses a specified IP address for the primary and secondary WINS servers.
Front Panel Setup DNS Server 1 Press Menu/Set, 5, 1, 8. 2 Press ▲ or ▼ to select Primary or Secondary. 3 Press Menu/Set. 4 Enter the DNS Server address. 5 Press Menu/Set. 6 Press Stop/Exit. 3 Primary DNS Server IP Address This field specifies the IP address of the primary DNS (Domain Name Service) server. Secondary DNS Server IP Address This field specifies the IP address of the secondary DNS server. It is used as a backup to the Primary DNS server address.
Front Panel Setup Setup Misc. Ethernet Ethernet link mode. Auto allows the print/scan server to operate in 100BaseTX full or half duplex, or in 10BaseT full or half duplex mode by auto negotiation. 3 100BaseTX Full Duplex (100B-FD) or Half Duplex (100B-HD) and 10BaseT Full Duplex (10B-FD) or Half Duplex (10B-HD) fix the print/scan server link mode. This change is valid after the print/scan server has been reset (default is Auto).
Front Panel Setup Restoring the network settings to factory default If you wish to reset the print/scan server back to its default factory settings (resetting all information such as the password and IP address information), please follow these steps: 1 Make sure the machine is not operating, then disconnect all the cables from the machine (except power cable). 2 Press Menu/Set, 5, 0. 3 Press 1 to select Reset. 4 Press 1 to select Yes.
4 Network printing from Windows®: basic TCP/IP Peer-to-Peer printing Overview If you are a Windows® user and want to print using the TCP/IP protocol in a Peer-to-Peer environment, please follow the instructions in this chapter. This chapter explains how to install the network software and the printer driver which you will need to be able to print using your network printer. Note • You must configure the IP address on your machine before you proceed with this chapter.
7 Click Next. 8 The Add Standard TCP/IP Printer Port Wizard will now appear. Click Next. 9 Enter the IP address, or the print/scan server name you wish to configure. The Wizard will automatically enter the Port name information for you. 10 Click Next. 11 Windows® 2000/XP will now contact the printer that you specified. If you did not specify the correct IP address or name then you will receive an error message. 12 Click Finish to complete the Wizard.
For Windows NT® 4.0 users Windows NT® 4.0 users can send print job using Brother Peer-to-Peer Print software provided on the Brother CD-ROM supplied with the machine. Installing the TCP/IP protocol If you did not install the TCP/IP protocol during the installation of your Windows NT®4.0 system (either workstation or server) follow these steps. If you have already installed the TCP/IP protocol, proceed to the next section, Installing the Brother Peer-to-Peer software on page 4-3.
8 You must now enter the actual IP address of the print/scan server and the print/scan server name. If you have edited the hosts file on your computer or are using Domain Name System, you can also enter the DNS name of the print/scan server. As the print/scan server supports TCP/IP and NetBIOS names, you can also enter the NetBIOS name of the print/scan server. The NetBIOS name can be seen in the network configuration page.
Adding a second Brother LPR port You do not need to re-run the install program to add a new Brother LPR port. Instead, go to the Start button, select Settings, and open the Printers window. Click the icon of the printer that you wish to configure, select File from the menu bar, and then Properties. Click the Ports tab and then the Add Port button. In the Printer Ports dialog, highlight Brother LPR Port. Click the New Port button and enter the port name. The default port name is BLP1.
8 You must now enter the actual IP address of the print/scan server and the print/scan server name. If you have edited the hosts file on your computer or are using Domain Name System, you can also enter the DNS name of the print/scan server. As the print/scan server supports TCP/IP and NetBIOS names, you can also enter the NetBIOS name of the print/scan server. The NetBIOS name can be seen in the network configuration page.
Adding a second Brother LPR port You do not re-run the install program to add a new Brother LPR port. Instead, go to the Start button, select Settings, and open the Printers window. Click the icon of the printer that you wish to configure, select File from the menu bar, and then Properties. Click the Details tab and then the Add Port button. In the Add Port dialog, select the Other radio button and then highlight Brother LPR port. Click OK and enter the port name. The default port name is BLP1.
5 Internet printing for Windows® Overview 5 Windows® 2000/XP users can print using TCP/IP using the standard Network Printing software and IPP protocol software built into any Windows® 2000/XP installation. Note • You must configure the IP address on your machine before you proceed with this chapter. If you haven’t done yet, see Chapter 2 first. • Verify the host computer and print/scan server are either on the same subnet, or that the router is properly configured to pass data between the two devices.
Internet printing for Windows® Note If you have edited the hosts file on your computer or are using Domain Name System, you can also enter the DNS name of the print/scan server. As the print/scan server supports TCP/IP and NetBIOS names, you can also enter the NetBIOS name of the print/scan server. The NetBIOS name can be seen in the network configuration page.
Internet printing for Windows® Specifying a different URL Please note that there are several possible entries that you can enter for the URL field. 5 http://printer_ip_address:631/ipp This is the default URL and we recommend that you use this URL. Please note the Get More Info option will not display any printer data. http://printer_ip_address:631/ipp/port1 This is for HP® Jetdirect® compatibility. Please note the Get More Info option will not display any printer data.
6 Network printing from Macintosh® Overview This chapter explains how to configure the PostScript driver on a Network. For more information on how to configure the default Quick Draw driver on a Network. see the Quick Setup Guide included with the machine. How to select the print server (TCP/IP) (Mac OS® 9.1 - 9.2) 1 Open the Applications (Mac OS® 9) folder. 2 Open the Utilities folder. 3 Open the Desktop Printer Utility icon. 4 Select the Printer (LPR) option and click OK.
Network printing from Macintosh® 6 At this point we must select the correct PPD file for the machine and also configure the correct LPR information. Click Change in the PostScript Printer Description (PPD) File section and select the appropriate PPD file for your model. 7 Now select the Change button below the LPR Printer Selection text. 8 You must then enter the IP address and service name details of the machine.
Network printing from Macintosh® How to select the print server (TCP/IP) (Mac OS® X 10.2.4 or greater) 1 Turn the power of the machine ON. 2 Open the Applications folder. 3 Open the Utilities folder. 4 Open the Printer Setup Utility Icon. (Mac OS® X 10.2.x users, open the Print Center icon.) 5 Click Add. 6 Select IP Printing. 7 Enter the TCP/IP address of the printer into the Printer Address box. 6 The network configuration page will allow you to confirm the TCP/IP address.
Network printing from Macintosh® Changing the configuration using a web browser From a Macintosh®, the easiest way to change the printer or print/scan server parameters is to use a web browser. Simply connect to the printer using the format: http://ip_address where ip_address is the address of the printer. See Using the HTTP (web browser) and the TCP/IP protocol to change the print/scan server settings on page 2-5. Other sources of information 1 Visit http://solutions.brother.
7 Web Based Management How to use a Web Browser to manage your Device 7 Overview A standard Web Browser (we recommend Microsoft Internet Explorer® version 6.0 or later, or Netscape Navigator® version 7.1 or later) can be used to manage your machine using the HTTP (Hyper Text Transfer Protocol). You can get the following information from a printer on your network using a web browser: ■ ■ ■ ■ ■ Printer status information. Change Fax configuration items, such as General Setup.
8 Troubleshooting Overview This chapter describes procedures for troubleshooting problems you may encounter with a Brother print/scan server, it is divided into the following sections: ■ ■ ■ ■ General problems Network print software installation problems Printing problems Protocol-specific troubleshooting General problems CD-ROM is inserted, but does not start automatically If your computer does not support Autorun, the menu will not start automatically after inserting the CD-ROM.
Troubleshooting 2 Check to see if there is any LED activity. Brother print/scan servers have two LEDs on the back panel of the machine. The upper side LED shows Link status. The lower side LED shows Activity (Receive/Transmit) status. No light: If both LEDs are off, then the print/scan server is not connected to the network. 8 Link LED is green: The Link LED will be green if the print/scan server is connected to a Ethernet network.
Troubleshooting (5) Make the following selection. Make sure that your print/scan server appears. If it is visible, then the connection is good. Otherwise, go to Step 5. 8 5 If you have tried 1 to 4 above and it does not work, then reset the print/scan server back to the default factory settings and try from the initial setup again. For information how to reset to the default factory settings, see Restoring the network settings to factory default on page 3-8.
Troubleshooting 3 Verify that the print/scan server is on your network as follows: For Windows® (1) Try pinging the print/scan server from the host operating system command prompt with the command: 8 ping ipaddress Where ipaddress is the print/scan server IP address (note that in some instances it can take up to two minutes for the print/scan server to load its IP address after setting the IP address). (2) If a successful response is received, then proceed to Windows® 98/98SE/Me and Windows NT®4.
Troubleshooting 8 4 If you have tried 1 to 4 above and it does not work, then reset the print/scan server back to the default factory settings and try from the initial setup again. For information how to reset to the default factory settings, see Restoring the network settings to factory default on page 3-8 Error during printing If you try to print while other users are printing large amounts of data (e.g.
Troubleshooting Windows® 2000/XP IPP troubleshooting Want to use a different Port number other than 631. If you are using Port 631 for IPP printing, you may find that your firewall may not let the print data through. If this is the case, use a different port number (port 80), or configure your Firewall to allow Port 631 data through. To send a print job using IPP to a printer using Port 80 (the standard HTTP port) enter the following when configuring your Windows® 2000/XP system.
Troubleshooting Web browser troubleshooting (TCP/IP) 1 2 If you can not connect to the print/scan server using your web browser it may be worth checking the Proxy Settings of your browser. Look in the Exceptions setting and if necessary, type in the IP address of the print/scan server. This will stop your PC from trying to connect to your ISP or proxy server every time you wish to look at the printer server. Make sure that you are using the proper web browser, we recommend Netscape Navigator® version 7.
A Appendix A Using services A service is a resource that can be accessed by computers that wish to print to the Brother print/scan server. The Brother print/scan server provides the following predefined services (do a SHOW SERVICE command in the Brother print/scan server remote console to see a list of available services): Enter HELP at the command prompt for a list of supported commands.
Appendix A Using BOOTP to configure the IP address BOOTP is an alternative to rarp that has the advantage of allowing configuration of the subnet mask and gateway. In order to use BOOTP to configure the IP address make sure that BOOTP is installed and running on your host computer (it should appear in the /etc/services file on your host as a real service; type man bootpd or refer to your system documentation for information). BOOTP is usually started up via the /etc/inetd.
Appendix A If the rarp daemon is not already running, start it (depending on the system the command can be rarpd, rarpd -a, in.rarpd -a or something else; type man rarpd or refer to your system documentation for additional information).
Appendix A UNIX®/Linux systems Typically, UNIX® and Linux systems require the colon ":" character between each digit of the Ethernet address. A arp -s 192.168.1.2 00:80:77:31:01:07 Note You must be on the same Ethernet segment (that is, there cannot be a router between the print/scan server and operating system) to use the arp -s command. If there is a router, you may use BOOTP or other methods described in this chapter to enter the IP address.
Appendix A the subnet mask to use). For example: Local> SET IP SUBNET 255.255.255.0 If you do not have any subnets, use one of the following default subnet masks: A 255.0.0.0 for class A networks 255.255.0.0 for class B networks 255.255.255.0 for class C networks The leftmost group of digits in your IP address can identify the type of network you have. The value of this group ranges from 1 through 127 for Class A networks (e.g., 13.27.7.1), 128 through 191 for Class B networks (e.g.,128.10.1.
Appendix A Print/Scan Server specifications Operating system support Windows® 98/98SE/Me, Windows NT® 4.0, Windows® 2000/XP Mac OS® 9.1 to 9.2, Mac OS® X 10.2.4 or greater Protocol support TCP/IP Network type 10/100BASE-TX Ethernet network Network printing Windows® 98/98SE/Me Peer-to-Peer printing Windows NT® 4.0 and Windows® 2000/XP TCP/IP printing Macintosh® printing (Mac OS® 9.1-9.2 and Mac OS® 10.2.
Appendix A Function Table and Default Factory Settings LEVEL ONE 5.LAN LEVEL TWO 1.Setup TCP/IP 2. Setup Misc. LEVEL THREE OPTIONS OPTIONS FACTORY SETTING A 1.BOOT Method Auto/ Static/ RARP/ BOOTP/ DHCP Auto 2.IP Address [000-255].[000-255].[000-255].[000-255] [169].[254].[001-254]. [000-255] 3.Subnet Mask [000-255].[000-255].[000-255].[000-255] 255.255.0.0 4.Gateway [000-255].[000-255].[000-255].[000-255] 000.000.000.000 5.
I Index A L APIPA ....................................... 1-4, 3-6, A-3 ARP .........................................................A-3 LAN menu ............................................... 3-1 LED (Print Server) ................................... 8-2 LPR/LPD ................................................. 1-4 B BINARY_P1 ............................................A-1 BOOTP ..................................... 1-4, 3-2, A-2 BRAdmin Professional ..................... 2-3, 2-4 BRN_xxxxxx_P1 ...
Index T TCP/IP .............................................. 1-4, 3-1 TCP/IP Printing ....................................... 4-1 TELNET .......................................... 1-5, A-4 TEXT_P1 .................................................A-1 Trademarks ............................................... -0 I W Web Based Management ........................ 7-1 Web BRAdmin .........................................A-5 Web Browser .............................2-5, 6-4, 7-1 Web Server ...................