
User`s guide

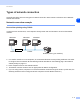
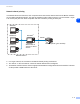
Table Of Contents
- Network USER’S GUIDE
- Table of contents
- 1.Introduction
- 2.Configuring your network printer
- 3.Front Panel Setup
- 4.Network printing from Windows®: basic TCP/IP Peer-to-Peer printing
- 5.Internet printing for Windows®
- 6.Network printing from Macintosh®
- 7.Web Based Management
- 8.Troubleshooting
- Appendix A
- Using services
- Other ways to set the IP address (for advanced users and administrators)
- Using DHCP to configure the IP address
- Using BOOTP to configure the IP address
- Using RARP to configure the IP address
- Using APIPA to configure the IP address
- Using ARP to configure the IP address
- Using the TELNET console to configure the IP address
- Using the Brother Web BRAdmin server software for IIS* to configure the IP address
- Print/Scan Server specifications
- Function Table and Default Factory Settings
- Index

Introduction
1 - 3
1
Network shared printing
In a Network Shared environment, each computer sends and receives data to and from the Brother machine
via a centrally controlled computer. This type of computer is often called a “Server” or a “Print Server”. Its job
is to access print jobs from other computers and then control the printing of these jobs.
■ In a larger network, we recommend a Network Shared printing environment.
■ The “Server” or the “Print Server” needs the TCP/IP Print Protocol configured.
■ The Brother machine needs to have an appropriate IP address configuration unless the machine is shared
via the parallel or USB interface at the server.
Network printer (your machine)
Windows
®
Windows
®
TCP/IP
Windows
®
Windows
®
Network Shared
Also known as
“Server” or “Print
Server”