
Software User's Guide
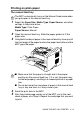
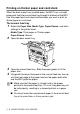
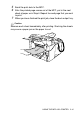
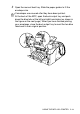
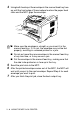
Table Of Contents
- SOFTWARE USER'S GUIDE MFC-8220
- Table of contents
- 1 Using the MFC as a printer
- 2 Printer driver settings
- 3 How to scan using Windows®
- Scanning an original document
- Scanning an original document (For Windows® XP only)
- Using the Scan key (For USB or Parallel interface cable users)
- Using ScanSoft® PaperPort® and TextBridge® OCR
- 4 Using the Brother Control Center
- 5 Using the Windows®-Based Brother Control Center
- Brother Control Center
- Brother Control Center features
- Hardware Section: Changing the Scan to button configuration
- Software Section
- Scan to File
- Scan to E-mail
- Scan to OCR (Word Processing program)
- Scan to Graphics application (example: Microsoft Paint)
- Fax setting (PC-Fax using the Brother Fax Driver)
- Custom: User-defined buttons
- 6 Using MFC Remote Setup
- 7 Using Brother PC-FAX software
- PC-FAX sending
- Speed-Dial setup
- The Address Book
- Setting up a Member in the Address Book
- Setting up a Group for Broadcasting
- Editing Member information
- Deleting a Member or Group
- Exporting the Address Book
- Importing to the Address Book
- Setting up a Cover Page
- You can enter information in each field
- Sending a file as a PC-FAX using the Facsimile style
- Sending a file as a PC-FAX using the Simple style
- Setting up PC-FAX receiving (Windows® 95/98/98SE/Me/2000 Professional and Windows NT® WS 4.0 only)
- Receiving a fax into the PC (Windows® XP only)
- 8 Using your MFC with a Macintosh®
- Setting up your USB-equipped Apple® Macintosh®
- Using the Brother printer driver with your Apple® Macintosh® (Mac OS® 8.6-9.2)
- Using the Brother Printer Driver with Your Apple® Macintosh® (Mac OS® X)
- Using the PS driver with your Apple® Macintosh®
- Sending a fax from your Macintosh® application
- Using the Brother TWAIN scanner driver with your Macintosh®
- Using Presto!® PageManager®
- MFC Remote Setup (Mac OS® X)
- 9 Network Scanning
- 10 Brother Network PC-FAX software
- Index
- brother US/Canada

USING THE MFC AS A PRINTER 1 - 4
Printing on plain paper
The manual feed tray
1
Select the Paper Size, Media Type, Paper Source, and other
settings in the printer driver.
Media Type: Plain Paper
Paper Source: Manual
2
Open the manual feed tray. Slide the paper guides to fit the
paper size.
3
Using both hands put paper in the manual feed tray face up until
the front edge of the paper touches the paper feed roller and the
MFC grips the paper.
4
Send the print data to the MFC.
5
After the printed page comes out of the MFC, put in the next
sheet of paper as in Step 3. Repeat for each page that you want
to print.
The MFC automatically turns on the Manual Feed mode when
you put paper in the manual feed tray.
■
Make sure that the paper is straight and in the proper
position on the manual feed tray. If it is not, the paper may
not be fed properly, resulting in a skewed printout or a paper
jam.
■
Do not put more than one piece of paper in the manual feed
tray at any one time, or it may cause a jam.