
All in One Printer - All-in-One Printer User Manual

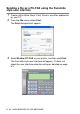


Table Of Contents
- SOFTWARE USER’S GUIDE
- Table of contents
- 1 Using the machine as a printer
- 2 Printer driver settings (Windows® Only)
- 3 How to scan using Windows®
- Scanning a document (For Windows® XP only)
- Scanning a document
- Using the scan key (For USB or Parallel interface cable users)
- Using ScanSoft® PaperPort® 9.0SE and OmniPage® OCR
- 4 Using ControlCenter2.0 (For Windows®)
- 5 Using MFC Remote Setup (For Windows®) (For MFC-8440 and MFC-8840D only)
- 6 Using Brother PC-FAX software (For Windows®) (For MFC-8440 and MFC-8840D only)
- PC-FAX sending
- Speed-Dial setup
- Brother Address Book
- Setting up a Member in the Address Book
- Setting up a Group for Broadcasting
- Editing Member information
- Deleting a Member or Group
- Exporting the Address Book
- Importing to the Address Book
- Setting up a Cover Page
- Entering Cover Page Information
- Sending a file as a PC-FAX using the Facsimile style user interface
- Sending a file as a PC-FAX using the Simple style user interface
- Setting up PC-FAX receiving
- 7 Using your machine with a Macintosh®
- Setting up your USB-equipped Apple® Macintosh®
- Using the Brother printer driver with your Apple® Macintosh® (Mac OS® 8.6 - 9.2)
- Using the Brother Printer Driver with Your Apple® Macintosh® (Mac OS® X)
- Using the PS driver with your Apple® Macintosh®
- Sending a fax from your Macintosh® application (For MFC-8440 and MFC-8840D only)
- Using the Brother TWAIN scanner driver with your Macintosh®
- Using Presto!® PageManager®
- Using ControlCenter2.0 (For Mac OS® X 10.2.1 or greater)
- MFC Remote Setup (Mac OS® X) (For MFC-8440 and MFC-8840D only)
- 8 Network Scanning (Windows® 98/98SE/Me/2000 Professional and XP only)
- 9 Brother Network PC-FAX software (For MFC-8440 and MFC-8840D only)
- Index
- brother UK/IRE/SAF/PAN NORDIC

6 - 18 USING BROTHER PC-FAX SOFTWARE
3
Select Brother PC-FAX as your printer, and then click Print.
The Simple style user interface will appear; if it does not check
the user interface selection setting as detailed on page 6-3.
4
In the To: field, type the fax number of the recipient. You can
also use the Address Book to select destination fax numbers by
clicking the To: button. If you made a mistake entering a
number, click the Clear button to delete all the entries.
5
To send a Cover Page and note, click the Cover Page On check
box.
6
When you are ready to send your fax, click the Send icon.
7
If you want to cancel the fax, click the Cancel icon.
You can also click the icon to create or edit a cover page.