
User Manual
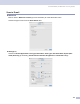
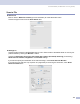


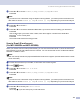
Table Of Contents
- SOFTWARE USER’S GUIDE
- Table of Contents
- Section I: Windows®
- 1 Printing
- Using the Brother printer driver
- Printing a document
- Duplex (two-sided) printing
- Simultaneous scanning, printing and faxing
- Printer operation key
- Status Monitor
- Printer driver settings (For Windows®)
- How to access the printer driver settings (For Windows®)
- Features in the Windows® printer driver
- Features in BR-Script3 (Post Script® 3™ language emulation) Printer compatible driver
- 2 Scanning
- Scanning a document using the TWAIN driver
- Scanning a document using the WIA driver (For Windows® XP only)
- Using the Scan key (For USB or Parallel cable users)
- Using ScanSoft® PaperPort® SE with OCR
- 3 ControlCenter2
- 4 Network Scanning (For models with built-in network support)
- 5 Remote Setup (Not available for DCP models)
- 6 Brother PC-FAX Software (Not available for DCP models)
- PC-FAX sending
- Speed Dial setup
- Brother Address Book
- Setting up a member in the Address Book
- Setting up a group for broadcasting
- Editing member information
- Deleting a member or group
- Exporting the Address Book
- Importing to the Address Book
- Sending a file as a PC-FAX using the Facsimile style user interface
- Sending a file as a PC-FAX using the Simple style user interface
- PC-FAX receiving
- 1 Printing
- Section II: Apple® Macintosh®
- 7 Printing and Faxing
- Setting up your USB-equipped Apple® Macintosh®
- Printer operation key
- Status Monitor
- Using the Brother Laser driver for Macintosh® (Mac OS® X)
- Using the Brother Laser driver for Macintosh® (Mac OS® 9.1 to 9.2)
- Using the BR-Script3 (Post Script® 3™ language emulation printer driver)
- Sending a fax (Not available for DCP models)
- 8 Scanning
- 9 ControlCenter2 (For Mac OS® 10.2.4. or greater)
- 10 Network Scanning (Not available for DCP- 8060)
- 11 Remote Setup (Not available for DCP models)
- 7 Printing and Faxing
- Index
- brother ARL/ASA/NZ

9. ControlCenter2 (For Mac OS
®
10.2.4. or greater)
156
Scan to File 9
General tab
Enter a name in Name for Custom (up to 30 characters) to create the button name.
Choose the type of scan from the Scan Action field.
Settings tab
Choose the file format from the File Type pop-up menu. Save the file to the default folder or choose your
preferred folder by clicking the Browse... button.
Choose the Resolution, Scan Type, Document Size, Duplex (two-sided) Scanning (if necessary),
Show Scanner Interface, Brightness and Contrast settings.
If you want to specify the destination of the scanned image, check Show Save As Window.
If you want to scan and then crop a portion of a page after pre-scanning the document, check Show
Scanner Interface box.