
User Manual
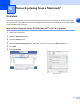

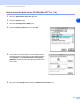
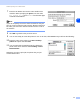
Table Of Contents
- Network USER’S GUIDE
- Table of contents
- 1 Introduction
- 2 Configuring your network printer
- Overview
- IP addresses, subnet masks and gateways
- Setting the IP address and subnet mask
- Changing the print server settings
- 3 Control Panel Setup
- LAN Main Setup Menu
- Setup TCP/IP
- Ethernet
- Setup I-Fax (MFC-8860DN only)
- Setup Mail RX (MFC-8860DN only)
- Setup Mail TX (MFC-8860DN only)
- Setup Relay (MFC-8860DN only)
- Scan to E-mail (E-mail server) (MFC-8860DN only)
- Scan to FTP
- Fax to Server (MFC-8860DN only)
- Time Zone (MFC-8860DN only)
- Restoring the network settings to factory default
- Printing the Network Configuration List
- LAN Main Setup Menu
- 4 Network printing from Windows® basic TCP/IP Peer-to-Peer printing
- 5 Internet printing for Windows®
- Overview
- Quick Tips
- Brother Internet Print General Information
- Brother Internet Print: Configuring the Brother Print Server
- Brother Internet Print: Using the BRAdmin Professional utility to Configure the Print Server
- Brother Internet Print: Using a Web Browser to Configure the Print Server
- Brother Internet Print: Installing the BIP software on Windows® 98/Me/2000/XP and Windows NT® 4.0
- Adding a Second Brother Internet Port
- Windows® 2000/XP IPP printing
- Specifying a different URL
- Other sources of information
- Overview
- 6 Network printing from a Macintosh®
- 7 Web Based Management
- 8 LDAP Operation (MFC-8860DN only)
- 9 Internet FAX (MFC-8860DN only)
- Overview
- Getting Connected
- Control Panel Key Functions
- Sending an Internet Fax
- Manually Entering Text
- Receiving E-mail or Internet Fax
- Receiving an Internet Fax to a PC
- Forwarding Received E-mail and Fax Messages
- Relay Broadcasting
- TX Verification Mail
- Setup Mail (TX)
- Setup Mail (RX)
- Error mail
- Important information on Internet Fax
- Overview
- 10 Troubleshooting
- Appendix A
- Using services
- Other ways to set the IP address (for advanced users and Administrators)
- Using DHCP to configure the IP address
- Using BOOTP to configure the IP address
- Using RARP to configure the IP address
- Using APIPA to configure the IP address
- Using ARP to configure the IP address
- Using the TELNET console to configure the IP address
- Using the Brother Web BRAdmin server software for IIS* to configure the IP address
- Installation when using a Network Print Queue or Share (printer driver only)
- Multi-function Print Server specifications
- Function Table and Default Factory Settings
- Entering Text
- Index

Network printing from a Macintosh®
48
6
Changing the print server settings
Changing the configuration using a web browser
Simply connect to the printer using the format: http://ipaddress where ipaddress is the address of the
printer.
See Using a HTTP (web browser) to change the print/scan settings on page 11.
Changing the configuration using the Remote Setup
From a Macintosh
®
, it is also possible to change the printer or print server parameters using the Remote
Setup application.
See Using the Remote Setup to change the print server settings (for Windows® and Mac OS® X 10.2.4 or
greater) (Not available for DCP-8065DN) on page 11.
Using the BRAdmin Light utility to change the print server settings
(for Mac OS
®
X 10.2.4 or greater)
Brother BRAdmin Light utility is a Java application that is designed for Mac OS X 10.2.4 or greater
environment. BRAdmin Light allows you to change network settings on Brother network ready machine.
Note
• Please use the BRAdmin Light utility version that was supplied on the CD-ROM with your Brother
product. You can also download the latest Brother BRAdmin LIght utility version from
http://solutions.brother.com
. This utility is only available for Macintosh
®
users.
• Node name: Node name appears in current BRAdmin Light. The default Node name is "BRN_xxxxxx"
("xxxxxx" is the last six digits of Ethernet address.).
• The default password for Brother print servers is “access”.
1
Start the BRAdmin Light utility (from Mac OS
®
X 10.2.4 or greater), by double clicking the Macintosh
HD icon on your desk top and clicking Library / Printers / Brother / Utilities. And then, double click the
BRAdminLight.jar file.
2
Select the print server which you want to change the settings.
3
Select Configure Print Server from the Control menu.
4
Enter a password. The default Password is “access”. You can now change the print server settings.