Quick Setup Guide Start Here MFC-8510DN MFC-8520DN Please read the Product Safety Guide first, then read this Quick Setup Guide for the correct setup and installation procedure. To view the Quick Setup Guide in other languages, please visit http://solutions.brother.com/. Note Not all models are available in all countries.
WARNING WARNING indicates a potentially hazardous situation which, if not avoided, could result in death or serious injuries. CAUTION CAUTION indicates a potentially hazardous situation which, if not avoided, may result in minor or moderate injuries. WARNING • Plastic bags are used in the packing of your machine. To avoid danger of suffocation, keep these plastic bags away from babies and children. Plastic bags are not toys.
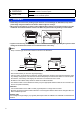
2 Remove the packing material from the machine d Take out the drum unit and toner cartridge assembly. Important DO NOT connect the AC power cord yet. a b c Remove the packing tape from the outside of the machine and the film covering the scanner glass. Open the MP tray a, and remove the packing tape b from the MP tray support, then close the MP tray. e Press the front cover release button and open the front cover. Remove the silica gel pack a.
a b 3 Load paper in the paper tray d Pull the paper tray completely out of the machine. While pressing the green paper-guide release lever a, slide the paper guides to fit the paper size you are loading in the tray. Make sure that the guides are firmly in the slots. e f c 4 Fan the stack of paper well to avoid paper jams and misfeeds. Put the paper in the tray and make sure: The paper is below the maximum paper mark (bbb) a. Over filling the paper tray will cause paper jams.
a b 4 5 Replace the control panel cover (if needed) Open the document cover. Choose your language and attach the control panel cover to the machine. Connect the power cord and telephone line Important DO NOT connect the interface cable yet. a b Connect the AC power cord to the machine and then plug it into an electrical socket. Turn the machine's power switch on. Note If the control panel cover is not fitted correctly, the key operations will not work. c Connect the telephone line cord.
WARNING The machine must be grounded using an earthed plug. Since the machine is grounded through the electrical socket, you can protect yourself from potentially hazardous electrical conditions on the telephone network by keeping the power cord connected to your machine when you connect it to a telephone line. Similarly, you can protect yourself when you want to move your machine by disconnecting the telephone line first and then the power cord.
6 You must set your country so that the machine works correctly on local telecommunication lines in each country. a b 7 Set your country Choose a Receive Mode There are four possible receive modes: Fax Only, Fax/Tel, Manual and External TAD.
Set the LCD contrast (if needed) d 02.Date&Time XX/03/2012 If you are having difficulty reading the LCD, try changing the contrast setting. a b —OR— Press d to decrease the contrast. c Enter & OK Key (e.g. Enter 2, 5 for 25th.) e Press OK. Time:15:25 Set the date and time Enter & OK Key (e.g. Enter 1, 5, 2, 5 for 15:25.) The machine displays the date and time, and if you set up the station ID, the date and time will be added to each fax you send. Press Menu, 0, 2, 1.
d Use the dial pad to enter your name (up to 20 characters), and then press OK. 03.Station ID Fax:XXXXXXXXXXX Tel:XXXXXXXXXXX Name:_ Enter & OK Key Note • See the following chart for entering your name. • If you need to enter a character that is on the same key as the last character, press c to move the cursor to the right. • If you entered a character incorrectly and want to change it, press d or c to move the cursor to the incorrect character, then press Clear.
14 Set the telephone line type If you are connecting the machine to a line that features a PABX (PBX) or ISDN to send and receive faxes, it is also necessary to change the phone line type accordingly by completing the following steps. a b Press Menu, 0, 6. Press a or b to choose Normal, ISDN or PBX. Press OK. c Do one of the following: If you choose ISDN or Normal, go to step f. If you choose PBX, go to step c.
17 Choose your connection type These installation instructions are for Windows® XP Home/Windows® XP Professional, Windows® XP Professional x64 Edition, Windows Vista®, Windows® 7, and Mac OS X (versions 10.5.8, 10.6.x and 10.7.x). Note • For Windows Server® 2003/2003 x64 Edition/2008/2008 R2 and Linux®, visit your model page at http://solutions.brother.com/. • You can visit us at http://solutions.brother.
USB Windows® For USB Interface Users (Windows® XP/XP Professional x64 Edition/Windows Vista®/ Windows® 7) 18 a Before you install Make sure that your computer is ON and you are logged on with Administrator rights. 19 a Important • If there are any programs running, close them. • The screens may differ depending on your operating system. Note The installer CD-ROM includes Nuance™ PaperPort™ 12SE.
USB d Follow the on-screen instructions until this screen appears. Windows® 20 a Finish and restart Click Finish to restart your computer. After restarting the computer, you must log on with Administrator rights. Note e Connect the USB cable to the USB port marked with the symbol on your machine and then connect the cable to your computer.
USB Macintosh For USB Interface Users (Mac OS X 10.5.8 - 10.7.x) 18 a Before you install Make sure your machine is connected to the power and your Macintosh is ON. You must be logged on with Administrator rights. Important 19 a b For users of Mac OS X 10.5.7 or lower, upgrade to Mac OS X 10.5.8 - 10.7.x. (For the latest drivers and information for the Mac OS X you are using, visit http://solutions.brother.com/.) Install MFL-Pro Suite Put the installer CD-ROM into your CD-ROM drive.
USB 20 Macintosh Download and install Presto! PageManager When Presto! PageManager is installed OCR capability is added to Brother ControlCenter2. You can easily scan, share and organize photos and documents using Presto! PageManager. a On the Brother Support screen, click Presto! PageManager and follow the on-screen instructions. Macintosh 15 Windows® The installation is now complete.
Wired Network Windows® For Wired Network Interface Users (Windows® XP/XP Professional x64 Edition/Windows Vista®/ Windows® 7) 18 a Before you install c Connect the network interface cable to the Ethernet port and then connect it to a free port on your hub. Make sure that your computer is ON and you are logged on with Administrator rights. Important • If there are any programs running, close them. • The screens may differ depending on your operating system.
Wired Network c Windows® Choose Wired Network Connection (Ethernet) and then click Next. Note • If prompted, choose your machine from the list, and then click Next. Note If you want to install the PS driver (BR-Script3 printer driver), choose Custom Install and then follow the on-screen instructions. d • If your machine is not found over the network, confirm your settings by following the on-screen instructions.
Wired Network 21 Install MFL-Pro Suite on additional computers (if needed) If you want to use your machine with multiple computers on the network, install MFL-Pro Suite on each computer. Go to step 19 on page 16. Note Network license (Windows®) This product includes a PC license for up to 5 users. This license supports the installation of the MFL-Pro Suite including Nuance™ PaperPort™ 12SE on up to 5 PCs on the network.
Wired Network Macintosh For Wired Network Interface Users (Mac OS X 10.5.8 - 10.7.x) 18 a Before you install Make sure your machine is connected to the power and your Macintosh is ON. You must be logged on with Administrator rights. Important 19 a b For users of Mac OS X 10.5.7 or lower, upgrade to Mac OS X 10.5.8 - 10.7.x. (For the latest drivers and information for the Mac OS X you are using, visit http://solutions.brother.com/.
Wired Network Note • You can find your machine’s MAC Address (Ethernet Address) and IP Address by printing out the Network Configuration Report. See Print the Network Configuration Report on page 21. • If this screen appears click OK. 1) Enter a name for your Macintosh in Display Name (up to 15 characters long). Macintosh 20 Download and install Presto! PageManager When Presto! PageManager is installed OCR capability is added to Brother ControlCenter2.
For Network Users Web Based Management (web browser) Print the Network Configuration Report The Brother print server is equipped with a web server that allows you to monitor its status or change some of its configuration settings, using HTTP (Hyper Text Transfer Protocol). You can print the Network Configuration Report to confirm the current network settings. Note We recommend Windows® Internet Explorer® 7.0/8.0 or Firefox® 3.6 for Windows® and Safari 4.0/5.0 for Macintosh.
Other Information Brother CreativeCenter Get inspired. If you're using Windows®, double-click the Brother CreativeCenter icon on your desktop to access our FREE web site with many ideas and resources for personal and professional use. Mac users can access Brother CreativeCenter at this web address: http://www.brother.
Options and Consumables Options The machine has the following optional accessories. You can expand the capabilities of the machine by adding these items. For more information about the optional Lower Tray Unit and compatible SO-DIMM Memory, visit us at http://solutions.brother.com/. For installing the SO-DIMM Memory, see Installing extra memory in the Advanced User's Guide. Lower Tray Unit LT-5400 The lower paper tray unit can hold up to 500 sheets of paper.
Trademarks The Brother logo is a registered trademark of Brother Industries, Ltd. Brother is a registered trademark of Brother Industries, Ltd. Microsoft, Windows, Windows Server and Internet Explorer are either registered trademarks or trademarks of Microsoft Corporation in the United States and/or other countries. Windows Vista is either a registered trademark or trademark of Microsoft Corporation in the United States and/or other countries. Apple, Macintosh, Safari and Mac OS are trademarks of Apple Inc.