
All in One Printer User Manual


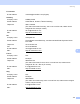

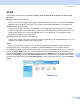
Table Of Contents
- SOFTWARE USER’S GUIDE DCP-8080DN DCP-8085DN MFC-8480DN MFC-8680DN MFC-8690DW MFC-8890DW
- Table of Contents
- Section I: Windows®
- Printing
- Using the Brother printer driver
- Printing a document
- Duplex printing
- Simultaneous scanning, printing and faxing
- Printer operation keys
- Status Monitor
- Printer driver settings
- Features in the Windows® printer driver
- Basic tab
- Advanced tab
- Accessories tab
- Support
- Features in the BR-Script3 (PostScript® 3™ language emulation) printer driver
- Scanning
- Scanning a document using the TWAIN driver
- Scanning a document using the WIA driver (Windows® XP/Windows Vista®)
- Scanning a document using the WIA driver (Windows Photo Gallery and Windows Fax and Scan)
- Using the Scan key (For USB or Parallel cable users)
- Using ScanSoft™ PaperPort™ 11SE with OCR by NUANCE™
- ControlCenter3
- Network Scanning (For models with built-in network)
- Before using Network Scanning
- Using the Scan key
- Scan to E-mail (PC)
- Scan to E-mail (E-mail Server) (MFC-8690DW and MFC-8890DW only)
- Scan to Image
- Scan to OCR
- Scan to File
- Scan to FTP
- Scan to Network
- How to set a new default for the file size (For Scan to E-mail (E-mail server), Scan to FTP and Scan to Network)
- How to set a new default for the Duplex Scan mode (For Scan to E-mail (E-mail server) only)
- Remote Setup (MFC models only)
- Brother PC-FAX Software (MFC models only)
- Firewall settings (For Network users)
- Printing
- Section II Apple Macintosh
- Printing and Faxing
- Printer operation keys
- Status Monitor
- Features in the printer driver (Macintosh)
- Removing the Printer driver for Macintosh
- Using the BR-Script3 Driver (Post Script® 3™ language emulation printer driver)
- Features in the BR-Script3 (PostScript® 3™ language emulation) printer driver
- Sending a fax (MFC models only)
- Scanning
- ControlCenter2
- Network Scanning
- Before using Network Scanning
- Using the Scan key
- Scan to E-mail (PC)
- Scan to E-mail (E-mail server, MFC-8690DW and MFC-8890DW only)
- Scan to Image
- Scan to OCR
- Scan to File
- Scan to FTP
- Scan to Network
- How to set a new default for the file size (For Scan to E-mail (E-mail server), Scan to FTP, Scan to Network)
- How to set a new default for the Duplex Scan mode (For Scan to E-mail (E-mail server) only)
- Remote Setup (MFC models only)
- Printing and Faxing
- Index
- brother USA

ControlCenter2
182
10
SCAN 10
There are four scan buttons for the Scan To Image, Scan To OCR, Scan To E-mail and Scan To File
applications.
Image (Default: Apple Preview)
Lets you scan a page directly into any graphic viewer/editor application. You can choose the destination
application, such as Adobe
®
Photoshop
®
or any kind of image editing application on your Macintosh.
OCR (Default: Apple TextEdit)
Lets you scan a page or document, automatically run the OCR application and put text (not a graphic
image) into a word processing application. You can choose the target word processing application, such
as Microsoft
®
Word or any word processing application on your Macintosh. You must have Presto!
PageManager installed on your Macintosh.
E-mail (Default: your default E-mail software)
Lets you scan a page or document directly into an E-mail application as a standard attachment. You can
choose the file type and resolution for the attachment.
File
Lets you scan directly to a disk file. You can change the file type and destination folder, as needed.
ControlCenter2 gives you the ability to configure the hardware Scan key on your machine and the
ControlCenter2 Software button for each scan feature. To configure the hardware Scan key on your machine
choose the Device Button (click each of the ControlCenter buttons while holding down the Ctrl key and
choose Device Button) in the configuration menu for each of the SCAN buttons. To configure the Software
button in ControlCenter2, choose the Software Button tab (click each of the ControlCenter buttons while
holding down the Ctrl key and choose Software Button) in the configuration menu for each of the SCAN
buttons.