
All in One Printer User Manual
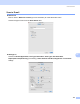
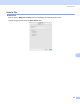
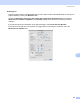
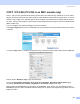
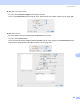


Table Of Contents
- SOFTWARE USER’S GUIDE DCP-8080DN DCP-8085DN MFC-8480DN MFC-8680DN MFC-8690DW MFC-8890DW
- Table of Contents
- Section I: Windows®
- Printing
- Using the Brother printer driver
- Printing a document
- Duplex printing
- Simultaneous scanning, printing and faxing
- Printer operation keys
- Status Monitor
- Printer driver settings
- Features in the Windows® printer driver
- Basic tab
- Advanced tab
- Accessories tab
- Support
- Features in the BR-Script3 (PostScript® 3™ language emulation) printer driver
- Scanning
- Scanning a document using the TWAIN driver
- Scanning a document using the WIA driver (Windows® XP/Windows Vista®)
- Scanning a document using the WIA driver (Windows Photo Gallery and Windows Fax and Scan)
- Using the Scan key (For USB or Parallel cable users)
- Using ScanSoft™ PaperPort™ 11SE with OCR by NUANCE™
- ControlCenter3
- Network Scanning (For models with built-in network)
- Before using Network Scanning
- Using the Scan key
- Scan to E-mail (PC)
- Scan to E-mail (E-mail Server) (MFC-8690DW and MFC-8890DW only)
- Scan to Image
- Scan to OCR
- Scan to File
- Scan to FTP
- Scan to Network
- How to set a new default for the file size (For Scan to E-mail (E-mail server), Scan to FTP and Scan to Network)
- How to set a new default for the Duplex Scan mode (For Scan to E-mail (E-mail server) only)
- Remote Setup (MFC models only)
- Brother PC-FAX Software (MFC models only)
- Firewall settings (For Network users)
- Printing
- Section II Apple Macintosh
- Printing and Faxing
- Printer operation keys
- Status Monitor
- Features in the printer driver (Macintosh)
- Removing the Printer driver for Macintosh
- Using the BR-Script3 Driver (Post Script® 3™ language emulation printer driver)
- Features in the BR-Script3 (PostScript® 3™ language emulation) printer driver
- Sending a fax (MFC models only)
- Scanning
- ControlCenter2
- Network Scanning
- Before using Network Scanning
- Using the Scan key
- Scan to E-mail (PC)
- Scan to E-mail (E-mail server, MFC-8690DW and MFC-8890DW only)
- Scan to Image
- Scan to OCR
- Scan to File
- Scan to FTP
- Scan to Network
- How to set a new default for the file size (For Scan to E-mail (E-mail server), Scan to FTP, Scan to Network)
- How to set a new default for the Duplex Scan mode (For Scan to E-mail (E-mail server) only)
- Remote Setup (MFC models only)
- Printing and Faxing
- Index
- brother USA

201
11
11
If you want to scan from the machine on a network, you must choose the networked machine in the
Device Selector application located in Macintosh HD/Library/Printers/Brother/Utilities/DeviceSelector or
from the Model pop-up menu in the main screen of ControlCenter2. If you already installed the MFL-Pro Suite
Software following the network installation steps in the Quick Setup Guide then this selection should already
be made.
To use the machine as a network scanner, the machine must be configured with a TCP/IP address. You can
set or change the address settings from the control panel. (See Control Panel Setup in the Network User’s
Guide.)
Note
For network scanning, a maximum 25 of clients can be connected to one machine on a network. For
example, if 30 clients try to connect at a time, 5 clients will not be shown on the LCD.
Before using Network Scanning 11
Configuring network scanning 11
a From Library, choose Printers, Brother, Utilities and DeviceSelector, and then double-click
Device Selector.
The Device Selector window appears. This window can also be opened from ControlCenter2.
For more information, see Using ControlCenter2 on page 180.
b Specify your machine by IP address or mDNS service Name. To change the IP address, enter the new
IP address. You can also choose a machine from the list of the available machines. Click Browse to
show the list.
c Click OK.
Network Scanning 11