
All in One Printer User Manual
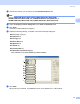
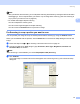
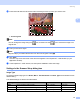

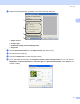
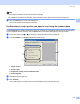
Table Of Contents
- SOFTWARE USER’S GUIDE DCP-8080DN DCP-8085DN MFC-8480DN MFC-8680DN MFC-8690DW MFC-8890DW
- Table of Contents
- Section I: Windows®
- Printing
- Using the Brother printer driver
- Printing a document
- Duplex printing
- Simultaneous scanning, printing and faxing
- Printer operation keys
- Status Monitor
- Printer driver settings
- Features in the Windows® printer driver
- Basic tab
- Advanced tab
- Accessories tab
- Support
- Features in the BR-Script3 (PostScript® 3™ language emulation) printer driver
- Scanning
- Scanning a document using the TWAIN driver
- Scanning a document using the WIA driver (Windows® XP/Windows Vista®)
- Scanning a document using the WIA driver (Windows Photo Gallery and Windows Fax and Scan)
- Using the Scan key (For USB or Parallel cable users)
- Using ScanSoft™ PaperPort™ 11SE with OCR by NUANCE™
- ControlCenter3
- Network Scanning (For models with built-in network)
- Before using Network Scanning
- Using the Scan key
- Scan to E-mail (PC)
- Scan to E-mail (E-mail Server) (MFC-8690DW and MFC-8890DW only)
- Scan to Image
- Scan to OCR
- Scan to File
- Scan to FTP
- Scan to Network
- How to set a new default for the file size (For Scan to E-mail (E-mail server), Scan to FTP and Scan to Network)
- How to set a new default for the Duplex Scan mode (For Scan to E-mail (E-mail server) only)
- Remote Setup (MFC models only)
- Brother PC-FAX Software (MFC models only)
- Firewall settings (For Network users)
- Printing
- Section II Apple Macintosh
- Printing and Faxing
- Printer operation keys
- Status Monitor
- Features in the printer driver (Macintosh)
- Removing the Printer driver for Macintosh
- Using the BR-Script3 Driver (Post Script® 3™ language emulation printer driver)
- Features in the BR-Script3 (PostScript® 3™ language emulation) printer driver
- Sending a fax (MFC models only)
- Scanning
- ControlCenter2
- Network Scanning
- Before using Network Scanning
- Using the Scan key
- Scan to E-mail (PC)
- Scan to E-mail (E-mail server, MFC-8690DW and MFC-8890DW only)
- Scan to Image
- Scan to OCR
- Scan to File
- Scan to FTP
- Scan to Network
- How to set a new default for the file size (For Scan to E-mail (E-mail server), Scan to FTP, Scan to Network)
- How to set a new default for the Duplex Scan mode (For Scan to E-mail (E-mail server) only)
- Remote Setup (MFC models only)
- Printing and Faxing
- Index
- brother USA

Scanning
35
2
Note
• After you select a document size, you can adjust the scanning area further by clicking the left mouse button
and dragging it. This is required when you want to crop an image when scanning. (See Pre-Scanning to
crop a portion you want to scan on page 35)
• For models that support duplex scanning
You cannot adjust the scanning area.
You cannot use legal size paper for duplex scanning.
You cannot use the PreScan button to preview an image.
Pre-Scanning to crop a portion you want to scan 2
You can preview your image and crop unwanted portions before scanning by using the PreScan button.
When you are satisfied with the preview, click the Start button in the Scanner Setup dialog box to scan the
image.
a Follow the steps from a to g of Scanning a document into the PC on page 33.
b Choose the settings for Scan (Image Type), Resolution, Scan Type, Brightness, Contrast and
Document Size, as needed.
Note
Pre-Scanning is not available if you choose Duplex(two-sided) Scanning.
c Click PreScan.
The whole image is scanned into the PC and appears in the Scanning Area (1) of the Scanner Setup
dialog box.
1