
All in One Printer User Manual
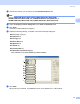
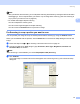
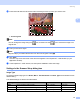

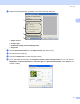
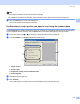
Table Of Contents
- SOFTWARE USER’S GUIDE DCP-8080DN DCP-8085DN MFC-8480DN MFC-8680DN MFC-8690DW MFC-8890DW
- Table of Contents
- Section I: Windows®
- Printing
- Using the Brother printer driver
- Printing a document
- Duplex printing
- Simultaneous scanning, printing and faxing
- Printer operation keys
- Status Monitor
- Printer driver settings
- Features in the Windows® printer driver
- Basic tab
- Advanced tab
- Accessories tab
- Support
- Features in the BR-Script3 (PostScript® 3™ language emulation) printer driver
- Scanning
- Scanning a document using the TWAIN driver
- Scanning a document using the WIA driver (Windows® XP/Windows Vista®)
- Scanning a document using the WIA driver (Windows Photo Gallery and Windows Fax and Scan)
- Using the Scan key (For USB or Parallel cable users)
- Using ScanSoft™ PaperPort™ 11SE with OCR by NUANCE™
- ControlCenter3
- Network Scanning (For models with built-in network)
- Before using Network Scanning
- Using the Scan key
- Scan to E-mail (PC)
- Scan to E-mail (E-mail Server) (MFC-8690DW and MFC-8890DW only)
- Scan to Image
- Scan to OCR
- Scan to File
- Scan to FTP
- Scan to Network
- How to set a new default for the file size (For Scan to E-mail (E-mail server), Scan to FTP and Scan to Network)
- How to set a new default for the Duplex Scan mode (For Scan to E-mail (E-mail server) only)
- Remote Setup (MFC models only)
- Brother PC-FAX Software (MFC models only)
- Firewall settings (For Network users)
- Printing
- Section II Apple Macintosh
- Printing and Faxing
- Printer operation keys
- Status Monitor
- Features in the printer driver (Macintosh)
- Removing the Printer driver for Macintosh
- Using the BR-Script3 Driver (Post Script® 3™ language emulation printer driver)
- Features in the BR-Script3 (PostScript® 3™ language emulation) printer driver
- Sending a fax (MFC models only)
- Scanning
- ControlCenter2
- Network Scanning
- Before using Network Scanning
- Using the Scan key
- Scan to E-mail (PC)
- Scan to E-mail (E-mail server, MFC-8690DW and MFC-8890DW only)
- Scan to Image
- Scan to OCR
- Scan to File
- Scan to FTP
- Scan to Network
- How to set a new default for the file size (For Scan to E-mail (E-mail server), Scan to FTP, Scan to Network)
- How to set a new default for the Duplex Scan mode (For Scan to E-mail (E-mail server) only)
- Remote Setup (MFC models only)
- Printing and Faxing
- Index
- brother USA

Scanning
40
2
Scanning a document using the WIA driver
(Windows
®
XP/Windows Vista
®
) 2
WIA compliant 2
For Windows
®
XP/Windows Vista
®
you can choose Windows
®
Image Acquisition (WIA) for scanning images
from the machine. You can scan images directly into the PaperPort™ 11SE viewer that Brother included with
your machine or you can scan images directly into any other application that supports WIA or TWAIN
scanning.
Note
•Windows
®
2000/XP do not support Duplex Scan in the WIA driver.
• Duplex Scan is not available for legal size paper.
Scanning a document into the PC 2
There are two ways in which you can scan a whole page. You can either use the ADF (automatic document
feeder) or the scanner glass.
If you want to scan and then crop a portion of a page after pre-scanning the document, you need to use the
scanner glass. (See Pre-Scanning to crop a portion you want to scan using the scanner glass on page 42.)
a Load your document.
b Start the ScanSoft™ PaperPort™ 11SE software that was installed during the MFL-Pro Suite installation
to scan a document.
Note
The instructions for scanning in this Guide are for when you use ScanSoft™ PaperPort™ 11SE. The
scanning steps may vary when using other software applications.
c Click File, then Scan or Get Photo.... You can also click the Scan or Get Photo button.
The Scan or Get Photo panel appears on the left side of the screen.
d Click Select button.
e Choose the scanner you are using from the Available Scanners list.
Note
Choose WIA:Brother MFC-XXXX (WIA:Brother DCP-XXXX), WIA:Brother MFC-XXXX LPT
(WIA:Brother DCP-XXXX LPT) or WIA:Brother MFC-XXXX LAN (WIA:Brother DCP-XXXX LAN).
f Check the Display scanner dialog box on the Scan or Get Photo panel.
g Click Scan.
The Scanner Setup dialog box appears.