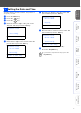
Setting Up the Machine Windows® USB Step 1 Windows® Parallel Setting Up the Machine Step 2 Windows NT® 4.0 Parallel Windows® Network USB Network For the latest drivers and to find the best solution for your problem or question, access the Brother Solutions Center directly from the driver or go to http://solutions.brother.com Keep this “Quick Setup Guide” , User’s Guide and supplied CD-ROM in a convenient place for quick and easy reference at all times.
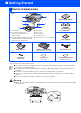
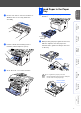
■ Getting Started Carton Components 8 M FC 1 7 Quic k Se tup G uide 2 3 6 5 4 1. Control Panel 2. Fac e-down Output T ray Support Flap with Ex tens ion (Support Flap) 3. (For MF C-8420) Manual Feed Tray (Fo r M FC -8 82 0 D a nd M FC -88 2 0D N ) M u lti-pu rpo se T ra y (M P Tra y) ADF Support 4. 5. 6. 7. 8.
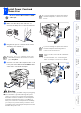
Control Panel MFC-8420, MFC-8820D and MFC-8820DN have similar control panel keys. 1 5 2 1. 2. 3. 4. One Touc h k eys Shift F ax and telephone k eys M ode k eys 3 5. 6. 7. 8. 6 7 8 9 10 4 11 12 Print k eys Status LED (Light-Emitting Diode) 5-L in e L iq u id C rys ta l D is p la y (L C D ) N avigation k eys 9. Copy k eys (T emporary Settings ) 10. Dial Pad 11. Stop/Exit 12. Start F or the details of the control panel, s ee " Control panel overv iew" in C hapter 1 of the U ser’s Guide.
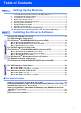
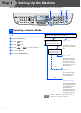
Table of Contents S tep 1 Setting Up the Machine 1. 2. 3. 4. 5. 6. 7. 8. 9. 1 0. S tep 2 Inst all t he Aut oma tic Doc um ent Fe ed (AD F) Support ...................................4 Inst all t he Drum Unit Ass em bly .......................................................................4 Loa d Pa per in t he Pa per Tray ..........................................................................5 Re lea se t he Sc ann er Lock ..............................................................................
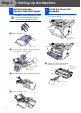
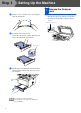
Step 1 1 Setting Up the Machine Install the Automatic Document Feed (ADF) Support Do NO T conne ct t he inte rf ac e ca ble. Co nnec ting t he inte rf ac e c able is done whe n in sta lling the d riv er. 1 2 1 Install the Drum Unit Assembly O pe n the fro nt cove r by pr essin g the fr on t cove r re lea se b utton . O pe n the A DF cove r. Front Cover Release Button ADF Cover 2 Front Cover Inse rt th e ta bs o f ADF su pp or t i nto th e h ole s of the A DF on e sid e a t a time .
Rock it fr om sid e to sid e seve ra l tim es to distri bu te th e ton er e ven ly insid e the asse mbly. 1 Pu ll the p ap er tra y comp le te ly ou t o f the mach in e. 2 While pre ssin g the pa pe r guid e re lease l ever, sl ide the a dju ster s to fi t the pa pe r size . Check th at th e gui des are firm ly in the slo ts on the tray. 4 Pu sh th e dru m u nit assemb ly in to th e Windows NT® 4.0 Parallel machin e (u ntil it sna ps into pl ace).
Step 1 Setting Up the Machine 4 3 Fan th e stack o f p ap er we ll to avo id p ap er ja ms an d misfee ds. 1 Release the Scanner Lock P ush the leve r up to un lock the sca nn er . (Th e gr ay scan ne r lo ck le ver i s lo cate d at the b ack le ft un de r sid e of the d ocu me nt cove r.) Scanner Lock Lever 4 P ut pa pe r in the p ap er tr ay. Ch eck th at the p ap er i s fla t in th e tra y a nd be lo w th e ma ximu m pa pe r mar k. Up to here.
Do not c onnec t the P ara lle l or US B c able y et. Make sure th at the p owe r switch is o ff. Con ne ct the A C p ow er cor d to th e mach ine . 2 Plu g the AC p owe r cor d in to an A C ou tl et. Tur n th e p owe r switch o n. If you are s haring one phone line with an ex ternal telephone, c onnect it as s hown below .
Step 1 Setting Up the Machine MFC-8420, MFC-8820D and MFC-8820DN have similar control panel keys. Set Dial pad Stop/Exit Menu 6 Selecting a Receive Mode Choos e the R eceive mode whic h bes t suits your needs. 1 2 3 4 5 6 Yes P ress the M enu key. P ress ke y. P ress ke y.
1 2 3 4 6 Pr ess th e Me nu key. Pr ess th e ke y. Pr ess th e ke y. En te r the two dig its fo r the d ay on th e d ial pa d, an d the n pr ess the S et ke y. 02.Date/Time 03/XX/2003 Day:01_ En ter the last tw o di gits of th e ye ar o n the dia l pa d, an d the n p ress the S e t key. Windows® USB T he M FC dis plays the date and time, and prints it on ev ery fax y ou s end. Setting Up the Machine 7 Setting the Date and Time Enter & Set Key 02.Date/Time (e.g . E nte r 0, 1.
Step 1 Setting Up the Machine MFC-8420, MFC-8820D and MFC-8820DN have similar control panel keys. Set Dial pad Stop/Exit Menu 8 Setting Your Station ID You s hould s tore your name and fax number to be printed on all fax pages that you send. 1 2 3 4 6 P ress the M enu key. P ress the key. P ress the key. Use the dia l pa d to e nter yo ur n am e (u p to 20 cha racte rs), an d the n pr ess the S et key. 03.
Pr ess th e Me nu key. Pr ess th e ke y. Pr ess th e ke y. 1 Fill out th e Product Registration and Test Sh eet. 2 Pla ce the she et fa ce up in the Au toma ti c Docu men t F eed er . Se lect you r la ng ua ge ( ENG L IS H or FREN CH) by u sing or , an d th en pre ss th e S et ke y. Windows® USB 1 2 3 4 Sending in the Product 10 Registration and Test Sheet (USA Only) Setting Up the Machine Selecting Your 9 Language (Canada Only) ▲ ▼ English French * Windows® Parallel 05.
Step 2 Installing the Driver & Software Supplied CD-ROM (MFL-Pro Suite) You can find a v ariety of inform ation on the CD -ROM . Install Softwar e You c an ins tall printer, PC-F AX Send/Rec eive, sc anner driv ers and the various utility item s, including ® ® PaperPort and T extBridge OC R. On -Line Registration Yo u w ill b e p o in te d to t h e B ro t h e r P ro d u ct R e g ist ra tio n W e b P a g e fo r q u ic k re gis tra t io n o f yo u r M F C .
Step 2 Installing the Driver & Software Setting Up the Machine Follow the instructions on this page for your operating system and interface cable. Windows® USB USB In terface Cable Users.................................. Go to page 14 (For Windows® 98/98SE/Me/2000 Professional/XP) Windows® Parallel Parallel In terface Cable Users............................. Go to page 25 (For Windows® 95/98/98SE/Me/2000 Professional/XP) Windows NT® 4.0 Parallel Windows NT® Workstation Version 4.0 Users...
Step 2 Installing the Driver & Software For USB Interface Cable Users (For Windows® 98/98SE/Me/2000 Professional/XP) Make sure that you have completed the instructions from Step 1 “Setting Up the Machine” on pages 4 - 11. 1 S witch o ff an d un plu g th e MFC fr om the AC ou tlet a nd disco nn ect it from you r com pu te r, if yo u a lre ad y co nn ected a n in terfa ce cab le. 2 Tur n o n you r comp ute r.
Setting Up the Machine Step 2 Wh en th e P ap er Po rt ® 8.0 SE Se tup win do w is disp laye d, click Nex t . A Whe n the S can So ft ® Reg istratio n scre en is disp laye d, ma ke you r sele ction an d follo w th e o n-scr ee n in str uction s. 8 After r ea din g a nd a ccep ti ng th e Sca nS oft ® Lice nse A g ree me nt, e nte r you r use r info rma ti on a nd click Nex t. B Click Finis h to comp le te instal latio n. 9 Se lect Typic al an d click Ne xt .
Step 2 Installing the Driver & Software For USB Interface Cable Users (For Windows® 98/98SE/Me/2000 Professional/XP) D Wh en th e B roth er S oftwar e Li cen se A gre em en t win do w ap pe ar s, click Y es . Win do ws ® 98 /9 8S E /M e User s ➝ G o to pa ge 17 Win do ws ® 20 00 P ro fe ssio na l Users ➝ G o to pa ge 19 E S ele ct Loca l Interf ac e, a nd the n cli ck Nex t . F S ele ct S ta ndard, an d the n click Nex t .
Setting Up the Machine Step 2 For Windows ® 98/98SE/Me Users Only It will take a few seco nd s fo r th e instal latio n scree n to a pp ea r. The i nstal latio n of the B ro the r dri vers wil l au to ma ti cally star t. Fol low the instru ction s on th e scre en . H Se lect BRUS B: US B P rint er Port , a nd th en click Nex t. I Acce pt the d efa ult P rin te r na me by sele cting Ye s , an d the n click Ne xt . J Se lect Y es (re com m ende d), a nd the n cli ck Finis h.
Step 2 Installing the Driver & Software For USB Interface Cable Users (For Windows® 98/98SE/Me/2000 Professional/XP) L The REA DME .WRI fi le wil l be d ispl aye d. P lea se re ad th is fi le for tro ub lesh oo ting in fo rma tion an d the n close th e file to con tinu e in sta lla tion . M Click Finish to re sta rt you r comp ute r. N A fte r th e co mpu te r re starts, cl ick Y e s to ha ve the Con tr ol Ce nte r loa d e ach time Win do ws ® is sta rted .
Setting Up the Machine For Windows ® 2000 Professional Users Only Make sure that you followed the instructions in 1 to F on pages 14 - 16. I The R EA DME .W RI fil e will b e d ispla yed . Ple ase rea d thi s file fo r tro ub lesh oo ti ng info rma ti on a nd th en cl ose th e file to con ti nu e insta lla tio n. J Click Finis h to resta rt yo ur co mp uter . K After th e comp ute r re sta rts, cli ck Y es to ha ve the Co ntr ol Ce nter l oa d ea ch time Win do ws ® i s star te d.
Step 2 Installing the Driver & Software For USB Interface Cable Users (For Windows® 98/98SE/Me/2000 Professional/XP) N S ele ct USB XX X fr om the pu ll do wn win dow for the Pr inte r Po rt S e lectio n an d the n click Ne xt . O Click o n Hav e Dis k. P B rowse th e CD- RO M an d hig hl igh t yo ur la ng ua ge fo lde r an d click O pen . Hig hli gh t the W 2K fol de r an d click O pen. High lig ht the A ddprt fo ld er a nd cli ck O pen. Q Click O pen .
Setting Up the Machine Make sure X:\E NG \W 2K\Addprt is disp laye d in the win do w a nd click O K (X:\ is th e d rive l etter o f yo ur CD- ROM ). V Se lect Ye s a nd N ex t to pri nt a test pa ge . S Hig hlig ht the m od el you ar e insta llin g fro m th e li st of ma chin es a nd cli ck Ne xt. W Whe n thi s scr ee n ap pe ar s, click Finish. X If the Dig ita l S ign atu re No t Fou nd dia log bo x ap pe ars, click Ye s . Y If the te st p ag e pr inte d, cl ick OK .
Step 2 Installing the Driver & Software For USB Interface Cable Users (For Windows® 98/98SE/Me/2000 Professional/XP) For Windows ® XP Users Only Make sure that you followed the instructions in 1 to F on pages 14 - 16. G Wh en th is scree n a pp ea rs, co nn ect th e US B in te rface cab le to yo ur P C, a nd th en con ne ct i t to the M FC. Tur n o n the MF C b y plu gg ing in the po wer cor d. Turn th e p owe r switch o n. H The REA DME .WRI fi le wil l be d ispl aye d.
Setting Up the Machine L N Br owse th e CD-R OM a nd h ig hli gh t yo ur lan gu ag e fol de r an d click Op en. High lig ht th e WX P fo lde r an d click O pen . Hig hli gh t th e Addprt fo lde r an d click O pen . O Click O pen. P Make sure X:\E NG \W XP \Addprt is disp laye d in th e win do w a nd click O K (X:\ is th e d rive l etter o f you r CD- ROM ). Un- che ck the Autom at ica lly de te ct a nd ins ta ll m y Plug a nd Play printe r se lectio n an d the n click Ne xt .
Step 2 Installing the Driver & Software For USB Interface Cable Users (For Windows® 98/98SE/Me/2000 Professional/XP) Q Hig hli gh t the mod el yo u a re in sta lli ng fro m the l ist o f ma chi ne s a nd click Nex t. M ake sure you selec t a U SB printer. R U Wh en th is scree n a pp ea rs, cli ck Finish. V Wh en th e Wi nd ows Lo go te sting scr ee n ap pe ar s, click Cont inue Anyw a y. The m od el you a re in sta llin g will be l iste d in the w ind ow.
Setting Up the Machine For Parallel Interface Cable Users (For Windows® 95/98/98SE/Me/2000 Professional/XP) Make sure that you have completed the instructions from Step 1 “Setting U p the Machine” on pages 4 - 11. Swi tch o ff an d u np lu g th e MFC fro m th e AC ou tl et an d d iscon ne ct it fr om yo ur comp ute r, if yo u al rea dy con ne cted a n inte rface ca ble . 5 Click MFL-P ro Suite in Ma in A pp lica ti on . Tur n on yo ur co mp uter .
Step 2 Installing the Driver & Software For Parallel Interface Cable Users (For Windows® 95/98/98SE/Me/2000 Professional/XP) 26 7 Wh en the Pa pe rP ort ® 8 .0 SE S etup win do w is di sp la yed , click Ne xt . A Wh en the S ca nS oft ® Re gistra ti on scre en i s di spla yed , ma ke yo ur se lectio n an d fol low the o n- scr ee n in str uction s. 8 A fte r rea di ng a nd accep ting th e S can So ft ® Li cen se Ag re eme nt, en te r you r use r in fo rma tion an d click Nex t .
Setting Up the Machine Wh en the Br othe r S oftw are Lice nse Ag re eme nt win do w a pp ea rs, click Ye s . Se lect Lo ca l Int erfa ce, an d th en click Nex t. F Se lect St anda rd, a nd th en cl ick N ex t. The a pp lica tion fil es will b e cop ie d to you r comp ute r.
Step 2 Installing the Driver & Software For Parallel Interface Cable Users (For Windows® 95/98/98SE/Me/2000 Professional/XP) For Windows ® 95/98/98SE/Me Users Only Make sure that you followed the instructions in 1 to F on pages 25 - 27. G Wh en th is scree n a pp ea rs, co nn ect th e pa ra lle l in te rface cab le to yo ur P C, a nd th en con ne ct i t to the M FC. Tur n o n the MF C b y plu gg ing in the po wer cor d. Turn th e p owe r switch o n. I The REA DME .WRI fi le wil l be d ispl aye d.
Setting Up the Machine For Windows ® 2000 Professional Users Only J Click Finis h to resta rt yo ur co mp uter . K After th e comp ute r re sta rts, the insta llatio n of th e B ro th er d rive rs will a uto matica lly start. Foll ow the i nstru cti on s o n the scr ee n. L If the D igita l S ignat ure Not Found di alo g bo xes ap pe ar, click Ye s to in sta ll the d rive r. M Click Y es to h ave th e Co ntr ol Ce nte r lo ad ed ea ch time Wi nd ows ® is sta rted .
Step 2 Installing the Driver & Software For Parallel Interface Cable Users (For Windows® 95/98/98SE/Me/2000 Professional/XP) P S ele ct BMFC (B rot her MFL Port) fro m th e pu ll d own w ind ow for th e P rin te r Po rt S ele cti on a nd th en click Nex t. Q Click o n Hav e Dis k. R B rowse th e CD- RO M an d hig hl igh t yo ur la ng ua ge fo lde r an d click O pen . Hig hli gh t the W 2K fol de r an d click O pen. High lig ht the A ddprt fo ld er a nd cli ck O pen. S Click O pen .
Setting Up the Machine X Se lect Ye s a nd N ex t to pri nt a test pa ge . U Hig hlig ht the m od el you ar e insta llin g fro m th e li st of ma chin es a nd cli ck Ne xt. Y Whe n thi s scr ee n ap pe ar s, click Finish. Z If the Dig ita l S ign atu re No t Fou nd dia log bo x ap pe ars, click Ye s . [ If the te st p ag e pr inte d, cl ick OK . M ake sure you do not s elect a USB printer. W The mo de l yo u ar e instal lin g will be liste d in th e win do w.
Step 2 Installing the Driver & Software For Parallel Interface Cable Users (For Windows® 95/98/98SE/Me/2000 Professional/XP) For Windows ® XP Users Only Make sure that you followed the instructions in 1 to F on pages 25 - 27. G Wh en th is scree n a pp ea rs, co nn ect th e pa ra lle l in te rface cab le to yo ur P C, a nd th en con ne ct i t to the M FC. Tur n o n the MF C b y plu gg ing in the po wer cor d. Turn th e p owe r switch o n. H The REA DME .WRI fi le wil l be d ispl aye d.
Setting Up the Machine Brothe r Na tive driv er Insta lla tion L N Br owse th e CD-R OM a nd h ig hli gh t yo ur lan gu ag e fol de r an d click Op en. High lig ht th e WX P fo lde r an d click O pen . Hig hli gh t th e Addprt fo lde r an d click O pen . O Click O pen. P Make sure X:\E NG \W XP \Addprt is disp laye d in th e win do w a nd click O K (X:\ is th e d rive l etter o f you r CD- ROM ).
Step 2 Installing the Driver & Software For Parallel Interface Cable Users (For Windows® 95/98/98SE/Me/2000 Professional/XP) Q Hig hli gh t the mod el yo u a re in sta lli ng fro m the l ist o f ma chi ne s a nd click Nex t. M ake sure you do not s elect a USB printer. R U Wh en th is scree n a pp ea rs, cli ck Finish. V Wh en th e Wi nd ows Lo go te sting scr ee n ap pe ar s, click Cont inue Anyw a y. The m od el you a re in sta llin g will be l iste d in the w ind ow.
Setting Up the Machine For Windows NT® Workstation Version 4.0 Users Make sure that you followed the instructions from Step 1 “Setting Up the Machine” on pages 4 - 11. Con ne ct the pa ral lel in terfa ce cab le to you r comp ute r, a nd th en con ne ct it to th e MFC . M FL-Pro Suite includes Printer D river, ® ® Sc anner D river, Sc anSoft PaperPor t , ® ® Sc anSoft , T ext Bridg e , PC-F AX s oftware, R emote Setup and True Ty pe fonts .
Step 2 Installing the Driver & Software For Windows NT® Workstation Version 4.0 Users 36 8 Wh en the Pa pe rP ort ® 8 .0 SE S etup win do w is di sp la yed , click Ne xt . B Wh en the S ca nS oft ® Re gistra ti on scre en i s di spla yed , ma ke yo ur se lectio n an d fol low the o n- scr ee n in str uction s. 9 A fte r rea di ng a nd accep ting th e S can So ft ® Li cen se Ag re eme nt, en te r you r use r in fo rma tion an d click Nex t . C Click Finish to com ple te in sta lla ti on .
Setting Up the Machine Se lect Lo ca l Int erfa ce, an d th en click Nex t. G Wh en the Se tup Typ e win do w ap pe ar s, sele ct S ta ndard, an d the n click Nex t . If you want to ins tall the PS driv er, selec t C usto m and then follow the on-s creen ins truc tions . W hen the Select Co m po nen ts s creen appears, c heck PS Printer D river, and then continue following the on-sc reen ins truc tions . The R EA DME .W RI fil e will b e d ispla yed .
Step 2 Installing the Driver & Software For Network Interface Cable Users (For Windows® 95/98/98SE/Me/NT/2000 Professional/XP) Make sure that you have completed the instructions from Step 1 “Setting Up the Machine” on pages 4 - 11. 1 Make sur e that the NC-910 0h (Ne twork Print/ Fax Se rve r) is installed into the MFC (MFC882 0DN has th e NC-910 0h instal led as stan dard) . (See "Optional accessor ies" in Chapter 23 of the Use r's Gui de.
Setting Up the Machine After r ea din g a nd a ccep ti ng th e Sca nS oft ® Lice nse A g ree me nt, e nte r you r use r info rma ti on a nd click Nex t. 0 Se lect Typic al an d click Ne xt . A Click Insta ll a nd P ap er Po rt® w ill start insta llin g on you r comp ute r. Whe n the S can So ft ® Reg istratio n scre en is disp laye d, ma ke you r sele ction an d follo w th e o n- scre en instru cti on s. C Click Finis h to comp le te instal latio n.
Step 2 Installing the Driver & Software For Network Interface Cable Users (For Windows® 95/98/98SE/Me/NT/2000 Professional/XP) E Wh en th e B roth er S oftwar e Li cen se A gre em en t win do w ap pe ar s, click Y es . If you see the follow ing s creen, c lick OK. I F Sele ct Ne twork Interface, and then click Next. If th e M FC is u n-co nfigu red for you r ne twork: Se lect the A PIPA or un -co nfigu red device from the list a nd the n cli ck Nex t.
Setting Up the Machine P Win do ws ® 9 5/9 8/98 SE /Me/NT/2 00 0 User s fo llo w ste p Q . S ee the For Ad m in istrat or sec tion of th is gu ide or th e N C -9 10 0 h U se r's Gu id e loca te d o n th e C D R OM f or m ore n et w ork co nfig ura tion info rm atio n. W indow s® 9 8/98 S E/Me /2 00 0/X P Us ers ➝ G o to M W indow s® 9 5/NT Us ers ➝ G o to P T he N etw ork Scanning feature is not s upported in W indows® 95 or N T.
Step 2 Installing the Driver & Software For USB Interface Cable Users For Mac OS ® 8.6 to 9.2 Make sure that you have completed the instructions from Step 1 “Setting Up the Machine” on pages 4 - 11. 1 S witch o ff an d un plu g th e MFC fr om the AC ou tlet an d d iscon ne ct i t fro m you r Ma cinto sh if yo u a lre ad y co nn ected a n in terfa ce cab le. 8 Co nn ect th e US B in terfa ce cab le to yo ur Ma cinto sh ® , an d th en con ne ct i t to the MFC.
Setting Up the Machine To in sta ll P resto ! ® Pa ge Ma na ge r® , cli ck Ins ta ll ne xt to th e P resto! P ag eMa na ge r icon an d follo w on th e S cree n in structio ns. You can easily s can, s hare and organize photos and doc uments using Presto!® ® PageM anager . Pre st o!® P a geMa nage r ® ha s be en insta lle d and the ins ta lla tion is n ow com plet e. For Administrators B USB The Brothe r PC- FAX S end, Printe r a nd Sc anne r driv ers ha ve bee n ins talled.
Step 2 Installing the Driver & Software For USB Interface Cable Users For Mac OS ® X 10.1/10.2.1 or greater Make sure that you have completed the instructions from Step 1 “Setting Up the Machine” on pages 4 - 11. 1 2 3 4 5 6 44 S witch o ff an d un plu g th e MFC fr om the AC ou tlet an d d iscon ne ct i t fro m you r Ma cinto sh if yo u a lre ad y co nn ected a n in terfa ce cab le. 7 Con ne ct th e USB i nterface cab le to yo ur Macin to sh® , a nd the n co nn ect it to the MFC.
Setting Up the Machine The Brothe r Printe r drive r, S ca nner driv er, Brothe r P C-FAX Se nd and Rem ot e Se tup P rog ra m ha ve bee n insta lle d and the ins ta lla tion is n ow com plet e. F C Se lect US B. D Se lect you r ma chin e, an d the n click Add . To in sta ll P resto ! ® Pa ge Ma na ge r® , cli ck Ins ta ll ne xt to th e Pr esto! P ag eMa na ge r icon an d follo w on th e S cree n in str uctio ns.
Step 2 Installing the Driver & Software For Network Interface Cable Users For Mac OS ® 8.6 to 9.2 Make sure that you have completed the instructions from Step 1 “Setting Up the Machine” on pages 4 - 11. 1 Ma ke sur e tha t the NC-9 10 0h ( Netwo rk P rin t/Fa x S er ver) i s in stall ed i nto the M FC (MF C-88 20 DN ha s th e NC- 91 00 h in sta lle d as stan da rd ). ( Se e "Op ti on al a cce ssor ies" in Ch ap te r 23 of th e Use r's Gu ide .
Setting Up the Machine Op en th e Choos er from th e Apple me nu . B Click the Brothe r Las er (A T) ico n, an d th en sele ct BR N_x xx xx x_ P1. Click Se tup . xx xx xx are the las t six digits of the Ethernet address . Click O K, a nd th en cl ose the Choose r. The s etup is now com plet e. For Administrators Network Ne twor k User's G ui de Cha pte r 7 o n th e CD -RO M.
Step 2 Installing the Driver & Software For Network Interface Cable Users For Mac OS ® X 10.1/10.2.1 or greater Make sure that you have completed the instructions from Step 1 “Setting Up the Machine” on pages 4 - 11. 1 Ma ke sur e tha t the NC-9 10 0h ( Netwo rk P rin t/Fa x S er ver) i s in stall ed i nto the M FC (MF C-88 20 DN ha s th e NC- 91 00 h in sta lle d as stan da rd ). ( Se e "Op ti on al a cce ssor ies" in Ch ap te r 23 of th e Use r's Gu ide .
Setting Up the Machine A Open the Utilities folder. B Open the Print Center icon. E Select BRN_xxxxxx_P1, and then click the Add button. xxxxxx are the last six digits of the Ethernet address. F C Select Quit Printer Center from the Printer Center menu. Click the Add Printer... button. Installing the Driver & Software Network User's Guide Chapter 7 on the CD-ROM. The setup is now complete. Select AppleTalk. Macintosh® Network For users of Mac® OS 10.2.
■ For Administrators This section is for using the printer on a network. An administrator should set up the printer using the following steps.
Setting Up the Machine Installing the BRAdmin Professional Configuration Utility (Windows ® Users Only) In ser t the sup plie d CD- RO M fo r Win do ws ® into yo ur CD -RO M dr ive. The o pe ni ng scree n wil l ap pe ar a utom atical ly. Foll ow the o n- scree n in structio ns. 2 Click the Inst all Sof tw are icon on the me nu scree n. 3 Click Netwo rk Ap pli cation s fo r Op tion al NC91 00 h. 4 Click BRAdm in Profe ss ional an d foll ow th e o n-scr ee n in str uction s.
Setting your IP Address, Subnet Mask and Gateway using BRAdmin Professional (Windows ® Users Only) 1 2 52 S ta rt BRA dm in P rofe ssion al, an d se lect TCP /IP . 3 Do ub le- cl ick th e ne w de vice. 4 E nter th e IP Addres s , S ubnet Ma sk an d G ate w ay , a nd th en cli ck th e OK b utton . 5 The ad dr ess in form atio n wil l be save d to th e pr inte r. S ele ct S ea rch Ac tive De vic es fro m the De vice s me nu . B RAd min w ill sea rch fo r ne w de vi ces au toma ticall y.
Setting Up the Machine Options The MFC has the following optional accessories. You can expand the capabilities of the MFC by adding these items. Low e r Tra y Unit DIMM Me m ory NC-9 10 0h Fo r m ore det ails, see “M emo ry Boa rd” in Ch apter 21 (U ser’s Guide). Th e opt ion al Ne twork Prin t/F AX Server (N C-9100 h) tra nsforms your MF C in to a Net work Multi F unction Cen ter, offering Net work Print ing / N etw ork PC -F AX a nd Net work Scanning capab ility. Windows NT® 4.
Trademarks The Brother logo is a registered trademark of Brother In dustries , Ltd. Brother is a regis tered tradem ark of Bro ther Indus tries, Ltd. Multi-Func tion Link is a registered trademark of Brother International C orporation. © Copy right 2003 Brother Industries, Ltd. All rights reserv ed. Window s, M icrosoft and Windows N T are regis tered tradem arks of M icros oft in the U.S. and other c ountries .