
All in One Printer - All-in-One Printer User Manual
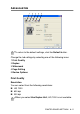
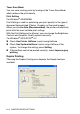
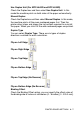
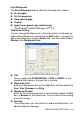
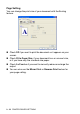
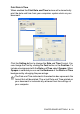
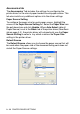
Table Of Contents
- SOFTWARE USER’S GUIDE
- Table of contents
- 1 Using the machine as a printer
- 2 Printer driver settings (Windows® Only)
- 3 How to scan using Windows®
- Scanning a document (For Windows® XP only)
- Scanning a document
- Using the scan key (For USB or Parallel interface cable users)
- Using ScanSoft® PaperPort® 9.0SE and OmniPage® OCR
- 4 Using ControlCenter2.0 (For Windows®)
- 5 Using MFC Remote Setup (For Windows®) (For MFC-8440 and MFC-8840D only)
- 6 Using Brother PC-FAX software (For Windows®) (For MFC-8440 and MFC-8840D only)
- PC-FAX sending
- Speed-Dial setup
- Brother Address Book
- Setting up a Member in the Address Book
- Setting up a Group for Broadcasting
- Editing Member information
- Deleting a Member or Group
- Exporting the Address Book
- Importing to the Address Book
- Setting up a Cover Page
- Entering Cover Page Information
- Sending a file as a PC-FAX using the Facsimile style user interface
- Sending a file as a PC-FAX using the Simple style user interface
- Setting up PC-FAX receiving
- 7 Using your machine with a Macintosh®
- Setting up your USB-equipped Apple® Macintosh®
- Using the Brother printer driver with your Apple® Macintosh® (Mac OS® 8.6 - 9.2)
- Using the Brother Printer Driver with Your Apple® Macintosh® (Mac OS® X)
- Using the PS driver with your Apple® Macintosh®
- Sending a fax from your Macintosh® application (For MFC-8440 and MFC-8840D only)
- Using the Brother TWAIN scanner driver with your Macintosh®
- Using Presto!® PageManager®
- Using ControlCenter2.0 (For Mac OS® X 10.2.1 or greater)
- MFC Remote Setup (Mac OS® X) (For MFC-8440 and MFC-8840D only)
- 8 Network Scanning (Windows® 98/98SE/Me/2000 Professional and XP only)
- 9 Brother Network PC-FAX software (For MFC-8440 and MFC-8840D only)
- Index
- brother UK/IRE/SAF/PAN NORDIC

PRINTER DRIVER SETTINGS 2 - 11
Device Options
Lets you set the following Printer Functions:
Secure Print
Secure documents are documents that are password protected
when they are sent to the machine. Only the people who know the
password will be able to print them. Since the documents are
secured at the machine, you must use the control panel of the
machine (with the password) to print them.
To send a secured document:
1
Select Secure Print from Printer Function and check Secure
Print.
2
Enter your password, user name and job name and click OK.
3
You must print the secured documents from the control panel of
the machine. (See
Secure key
on page 1-17.)
To delete a secured document:
1
You need to use the control panel of the machine to delete a
secured document. (See
Secure key
on page 1-17.)
You can store up to 8 MB of secured data in the machine's
memory.