
Network User's Guide

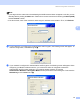
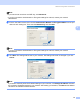
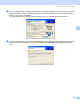
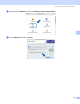
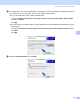
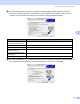
Table Of Contents
- NETWORK USER'S GUIDE
- Table of Contents
- 1 Introduction
- 2 Configuring your machine for a network with an Ethernet cable connection
- 3 Configuring your machine for a wireless network
- Overview
- Confirm your network environment
- Wireless network terms and concepts
- Configuring your machine for a wireless network
- Changing the print server settings
- Using the BRAdmin Professional utility to change the wireless settings (for Windows®)
- Using the control panel to change the print server settings
- Using other methods to configure your machine for a wireless network
- Using the Remote Setup to change the print server settings (Not available for DCP models)
- 4 Wireless Configuration for Windows®
- 5 Wireless Configuration for Macintosh®
- 6 Control panel setup
- LAN menu
- Printing the Network Configuration List
- Restoring the network settings to factory default
- 7 Driver Deployment Wizard (Windows® only)
- 8 Network printing from Windows® basic TCP/IP Peer-to-Peer printing
- 9 Network printing from a Macintosh®
- 10 Troubleshooting
- Appendix A
- Appendix B
- Index

Wireless Configuration for Windows
®
53
4
l The following list appears. If the list is blank, check if the machine is powered on, and then click Refresh.
Choose the machine you wish to configure, and click Next.
Note
The Default Node name of the NC-xxxx (where “xxxx” is your model name) is “BRWxxxxxxxxxxxx” (where
“xxxxxxxxxxxx” is your Ethernet address).
m The wizard will search for wireless networks available from your machine. Choose the Ad-hoc network
you wish to associate the machine with, and then click Next.
If no Ad-hoc wireless networks are available, you need to create a new wireless network. Go to p.