Web Connect Guide Version A ENG
Applicable models This User’s Guide applies to the following models. DCP-8250DN/MFC-8950DW(T) Definitions of notes We use the following icon throughout this user’s guide: Note Notes tell you how you should respond to a situation that may arise or give tips about how the operation works with other features. Trademarks The Brother logo is a registered trademark of Brother Industries, Ltd. Android and Google Drive are trademarks of Google, Inc. Use of these trademarks are subject to Google Permissions.
Table of Contents 1 Introduction 1 Brother Web Connect Feature...................................................................................................................1 Accessible services ...................................................................................................................................1 Conditions for using Brother Web Connect ...............................................................................................2 Service account .......................
1 Introduction 1 1 Brother Web Connect Feature 1 Certain web sites provide services that allow users to upload and view images and files on the web site. Your Brother machine can scan images and upload them to these services. 1 Scanning Web service 1 Photos and documents Accessible services 1 The following services can be accessed from your Brother machine. GOOGLE DRIVE™ GOOGLE DRIVE™ is an online document editing and sharing service. URL: http://drive.google.
Introduction For details about any of these services, refer to the respective service’s web site. The following table describes which types of files can be used with each Brother Web Connect feature. Accessible services Upload scanned images 1 GOOGLE DRIVE™/ Dropbox/SkyDrive®/Box EVERNOTE® JPEG, PDF JPEG 1, PDF 1 1 You can upload images to a service by sending E-mail messages to the E-mail address provided by the respective service.
Introduction Proxy server settings using a Web Browser 1 1 If the network uses a proxy server, the following proxy server information must be configured on the machine. You can configure the following settings by using Web Based Management (web browser) or BRAdmin Professional 3. Proxy server address Port number User name Password How to configure the Proxy server settings using Web Based Management 1 Note We recommend Windows® Internet Explorer® 7.0/8.0 or Firefox® 3.
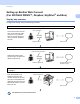
Introduction Setting up Brother Web Connect (For GOOGLE DRIVE™, Dropbox, SkyDrive® and Box) Step by step overview 1 1 Configure the settings using the following procedure. Step 1: Create an account with the desired service. (uu page 5) User registration Access the service’s web site using a computer and create an account. (If you already have an account, there is no need to create an additional account.) Obtain account Web service Step 2: Apply for Brother Web Connect access.
Introduction Create an account for each of the desired services 1 1 In order to use Brother Web Connect to access an online service, you need to have an account with that online service. If you do not have an account, use a computer to access the web site of the service and create an account. If you already have an account, there is no need to create an additional account. Before you use Brother Web Connect, you must log in to your account and use the provided services.
Introduction c Choose your desired service. 1 d Follow the on-screen instructions and apply for access. When finished, your temporary ID will be displayed. This temporary ID is needed when registering accounts to the machine, so make a note of the ID. The temporary ID is valid for 24 hours. e Close the web browser. Go to the next procedure.
Introduction Registering and deleting accounts on the machine 1 1 Enter the account information and configure the machine so that it can access the service. Register an account 1 a Before you begin to register an account please confirm the correct time zone, date and time are set on the control panel of the machine. Please see the Quick Setup Guide included with your machine for instructions on setting the correct time zone, date and time. b Press Web on your machine’s LCD.
Introduction l You will be asked if you want to register the account information you entered. Press Yes to register. 1 Press No to enter the information again. Go back to step h. Note An error message is displayed if the information you entered does not match the temporary ID you received when you applied for access, or if the temporary ID has expired. Either enter the temporary ID correctly, or apply for access again and receive a new temporary ID.
Introduction Setting up Brother Web Connect (For EVERNOTE®) 1 1 Step by step overview 1 Configure the settings using the following procedure. Step 1: Create an account with EVERNOTE®. (uu page 10) User registration Access the service’s web site using a computer and create an account. (If you already have an account, there is no need to create an additional account.) Obtain account Web service Step 2: Register, on the machine, the account information that is needed to access EVERNOTE®.
Introduction Create an account with EVERNOTE® 1 1 In order to use Brother Web Connect to access an online service, you need to have an account with that online service. If you do not already have an EVERNOTE® account, use a computer to access the EVERNOTE® web site and create an account. After creating an account, log in and use the account once with a computer before using the Brother Web Connect feature, otherwise you may not be able to access the service using Brother Web Connect.
Introduction g A message is displayed prompting you to enter a name for the account as you want it to be displayed on the LCD. Press OK. h Enter the name by using the buttons on the LCD. Press OK. i Do one of the following: 1 If you want to set a PIN code for the account, press Yes. Then enter a four-digit number and press OK. (The PIN code prevents unauthorized access to the account.) If you do not want to set a PIN code, press No.
Introduction h Account deletion is complete. Press OK. i Press Stop/Exit. 1 Edit the destination E-mail address a 1 Press Web on your machine’s LCD. If information regarding Internet connection is displayed, press OK. You will be asked if you want to display this information again in the future. Press Yes or No. Note If there are announcements about new features, and so on, the latest information will be displayed. Read the information and press OK. b c d e Choose EVERNOTE(R).
2 Upload 2 Scanning and uploading documents 2 2 Scanned photos and images can be uploaded directly to a service without using a computer. For information about services and supported features: Accessible services uu page 1. Note If you are a restricted user for Web Connect with the Secure Function Lock feature, you cannot upload the scanned data. For more details on Secure Function Lock uu Advanced User's Guide and Network User's Guide.
Upload h Press Start. If you placed the document in the ADF, the machine scans the document and starts uploading. If you are using the scanner glass, go to step i. i When Next Page? is displayed, do one of the following: 2 If there are no more pages to scan, press No. The machine starts uploading the image. To scan more pages, press Yes and go to step j. j Place the next page on the scanner glass. Press Start. The machine starts scanning the page. (Repeat steps i and j for each additional page.
Upload For EVERNOTE® a b 2 Load your document. Press Web on your machine’s LCD. If information regarding Internet connection is displayed, press OK. You will be asked if you want to display this information again in the future. Press Yes or No. 2 Note If there are announcements about new features, and so on, the latest information will be displayed. Read the information and press OK. c d e f Choose EVERNOTE(R). Press a or b to display your account name, and press it.
Upload j When Next Page? is displayed, do one of the following: If there are no more pages to scan, press No. The machine starts uploading the image. To scan more pages, press Yes and go to step k. k Place the next page on the scanner glass. Press Start. The machine starts scanning the page. (Repeat steps j and k for each additional page.) l Press Stop/Exit. 2 Note For information regarding restrictions such as the size or number of images that can be uploaded, refer to the EVERNOTE® web site.
Upload File Size a b c 2 Press File Size on the scan settings screen. Press Small, Medium or Large. 2 If you do not want to change additional settings, press OK. Note The file size option is available when you choose color and gray for the scan quality. Duplex Scan a b c 2 Press Duplex Scan on the scan settings screen. Press LongEdge, Short Edge or Off. If you do not want to change additional settings, press OK. Note Duplex Scan is available when you scan from the ADF only.
A Troubleshooting A Error messages A As with any sophisticated office product, errors may occur. If an error occurs, your machine will display an error message. The most common error messages are shown below. You can correct most errors yourself. If you need more help, the Brother Solutions Center offers the latest FAQs and troubleshooting tips. Visit us at http://solutions.brother.com/. Error Message Cause Action Network connection failed. Verify that the network connection is good.
Troubleshooting Error Message Cause Action Service temporarily unavailable. Try again later. There is a problem with the service and it cannot be used now. Wait and try again. Try accessing the service from a computer to confirm whether it is available or not. Incorrect PIN code. Enter PIN correctly. The PIN code registered to the machine is incorrect. The PIN code is the four-digit number that was entered when registering the account to the machine. Enter the correct PIN code.