
User`s guide
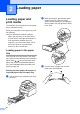

Table Of Contents
- Basic User’s Guide MFC-9130CW/MFC-9330CDW/MFC-9340CDW
- Brother numbers
- Ordering accessories and supplies
- Notice - Disclaimer of Warranties (USA and Canada)
- Compilation and Publication Notice
- User’s Guides and where do I find them?
- Table of Contents
- 1 General information
- Using the documentation
- Accessing Brother Utilities (Windows® 8)
- Accessing the Advanced User’s Guide, Software User’s Guide and Network User’s Guide
- How to access Guides for Advanced Features
- Accessing Brother Support (Windows®)
- Accessing Brother Support (Macintosh)
- Control panel overview
- Shortcut Settings
- 2 Loading paper
- 3 Loading documents
- 4 Sending a fax
- 5 Receiving a fax
- 6 Using PC-FAX
- 7 Telephone services and external devices
- 8 Dialing and storing numbers
- 9 Making copies
- 10 Printing data from a USB Flash memory drive or digital camera supporting mass storage (For MFC-9330CDW and MFC-9340CDW)
- 11 How to print from a computer
- 12 How to scan to a computer
- A Routine maintenance
- B Troubleshooting
- C Settings and features tables
- D Specifications
- Index

General information
19
1
Changing Shortcuts 1
You can change the settings in a Shortcut.
NOTE
(Web Connect Shortcuts) You cannot
change a Web Connect Shortcut. If you
want to change the Shortcut, you must
delete it, and then add a new Shortcut.
(For more information, see Deleting
Shortcuts on page 19 and Adding Web
Connect Shortcuts on page 18.)
a Press the Shortcut you want. The
settings for the Shortcut that you chose
are displayed.
b Change the settings for the Shortcut you
chose in step a (for more information,
see Shortcut Settings on page 15).
c When you have finished changing
settings, press Save as Shortcut.
d Press OK to confirm.
e Do one of the following:
To overwrite the Shortcut, press
Yes. Go to step g.
If you do not want to overwrite the
Shortcut, press No to enter a new
Shortcut name. Go to step f.
f To create a new Shortcut, hold down
to delete the current name, and then
enter a new name using the keyboard
on the Touchscreen. (To help you enter
letters, see Entering text on page 194.)
Press OK.
g Press OK to confirm.
Editing Shortcut Names 1
You can edit a Shortcut name.
a Press and hold the Shortcut until the
dialog box appears.
NOTE
You can also press , All Settings
and Shortcut Settings.
b Press Edit Shortcut Name.
c To edit the name, hold down to
delete the current name, and then enter
a new name using the keyboard on the
Touchscreen. (To help you enter letters,
see Entering text on page 194.)
Press OK.
Deleting Shortcuts 1
You can delete a Shortcut.
a Press and hold the Shortcut until the
dialog box appears.
NOTE
You can also press , All Settings
and Shortcut Settings.
b Press Delete to delete the Shortcut
that you chose in step a.
c Press Yes to confirm.
Recalling Shortcuts 1
The Shortcut settings are displayed on the
Shortcut screen. To recall a Shortcut, simply
press the Shortcut name.