
User`s guide
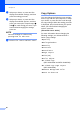

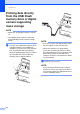

Table Of Contents
- Basic User’s Guide MFC-9130CW/MFC-9330CDW/MFC-9340CDW
- Brother numbers
- Ordering accessories and supplies
- Notice - Disclaimer of Warranties (USA and Canada)
- Compilation and Publication Notice
- User’s Guides and where do I find them?
- Table of Contents
- 1 General information
- Using the documentation
- Accessing Brother Utilities (Windows® 8)
- Accessing the Advanced User’s Guide, Software User’s Guide and Network User’s Guide
- How to access Guides for Advanced Features
- Accessing Brother Support (Windows®)
- Accessing Brother Support (Macintosh)
- Control panel overview
- Shortcut Settings
- 2 Loading paper
- 3 Loading documents
- 4 Sending a fax
- 5 Receiving a fax
- 6 Using PC-FAX
- 7 Telephone services and external devices
- 8 Dialing and storing numbers
- 9 Making copies
- 10 Printing data from a USB Flash memory drive or digital camera supporting mass storage (For MFC-9330CDW and MFC-9340CDW)
- 11 How to print from a computer
- 12 How to scan to a computer
- A Routine maintenance
- B Troubleshooting
- C Settings and features tables
- D Specifications
- Index

Chapter 10
62
Printing data directly
from the USB Flash
memory drive or digital
camera supporting
mass storage
10
NOTE
• Make sure your digital camera is turned
on.
• Your digital camera must be switched
from PictBridge mode to mass storage
mode.
a Connect your USB Flash memory drive
or digital camera to the USB direct
interface (1) on the front of the machine.
The Touchscreen will automatically
show the USB memory menu to confirm
the intended use of the USB Flash
memory drive or digital camera.
NOTE
• If an error occurs, the USB memory menu
will not appear on the Touchscreen.
• When the machine is in Deep Sleep
mode, the Touchscreen does not show
any information even if you connect a USB
flash memory drive to the USB direct
interface. Press the Touchscreen to wake
up the machine.
b Press Direct Print.
NOTE
If your machine has been set to Secure
Function Lock On, you may not be able to
access Direct Print (see Advanced User's
Guide: Switching Users).
1
1