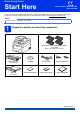
Quick Setup Guide Start Here MFC-9140CDN / MFC-9330CDW MFC-9340CDW Please read the Product Safety Guide first, then read this Quick Setup Guide for the correct setup and installation procedure. To view the Quick Setup Guide in other languages, please visit http://solutions.brother.com/. NOTE Not all models are available in all countries. 1 Unpack the machine and check the components Drum Unit and Toner Cartridge Assemblies (pre-installed) (Black, Cyan, Magenta and Yellow) (For U.K.
WARNING WARNING indicates a potentially hazardous situation which, if not avoided, could result in death or serious injuries. CAUTION CAUTION indicates a potentially hazardous situation which, if not avoided, may result in minor or moderate injuries. WARNING • Plastic bags are used in the packing of your machine. To avoid danger of suffocation, keep these plastic bags away from babies and children. Plastic bags are not toys. • This machine is heavy and weighs more than 20.0 kg.
2 Remove the packing material from the machine d Take out all four drum and toner cartridge assemblies. CAUTION CAUTION DO NOT eat the silica gel pack, please throw it away. If ingested, seek medical attention immediately. IMPORTANT DO NOT connect the AC power cord yet. a b Remove the packing tape from the outside of the machine, the silica gel pack on the support flap and the film covering the scanner glass. Fully open the top cover by lifting the handle up a.
f Remove the orange packing piece from each drum and toner cartridge assembly. a g Pull the paper tray completely out of the machine. Using both hands, hold each drum and toner cartridge assembly level, and gently shake it from side to side several times to distribute the toner evenly inside the assembly. b h 3 Load paper in the paper tray While pressing the green paper-guide release lever a, slide the paper guides to fit the paper size you are loading in the tray.
d Load paper in the tray and make sure: The paper is below the maximum paper mark (bbb) a. Overfilling the paper tray will cause paper jams. The side to be printed on is face down. The paper guides touch the sides of the paper so it will feed correctly. 4 IMPORTANT DO NOT connect the interface cable yet. a b e f Connect the power cord and telephone line Connect the AC power cord to the machine and then plug it into an electrical socket. Press on the control panel.
5 WARNING The machine must be grounded using an earthed plug. Since the machine is grounded through the electrical socket, you can protect yourself from potentially hazardous electrical conditions on the telephone network by keeping the power cord connected to your machine when you connect it to a telephone line. Similarly, you can protect yourself when you want to move your machine by disconnecting the telephone line first and then disconnecting the power cord.
f g Press . For more details: uu Basic User's Guide: Receiving a fax. 6 Set the date and time The Touchscreen displays the date and time. You can also add the current date and time to each fax you send by setting your Station ID (see step 7). a b c d 7 Press your preferred receive mode. Press . Press (Date & Time). Press Date. Enter the last two digits of the year using the numbers on the Touchscreen, and then press OK.
Fax Transmission Report Your Brother machine is equipped with a Transmission Verification Report that can be used as confirmation that you sent a fax. This report lists the name or fax number of the receiving party, the date, time and duration of the transmission, the number of pages transmitted, and whether or not the transmission was successful. If you want to use the Fax Transmission Report feature: uu Advanced User's Guide: Printing reports.
11 Set the telephone line type If you are connecting the machine to a line that features a PABX (PBX) or ISDN to send and receive faxes, it is also necessary to change the phone line type accordingly by completing the following steps. a b c d e Press . Press All Settings. Swipe up or down, or press a or b to display Initial Setup. Press Initial Setup. Swipe up or down, or press a or b to display Phone Line Set. Press Phone Line Set. Press Normal, ISDN or PBX.
13 Set the Time Zone You can set the time zone on the machine for your location. a b c d e 10 Press . Press (Date & Time). Press Time Zone. Enter your time zone. Press OK. Press .
14 Choose your connection type These installation instructions are for Windows® XP Home/Windows® XP Professional, Windows® XP Professional x64 Edition, Windows Vista®, Windows® 7, Windows® 8, and Mac OS X v10.6.8, 10.7.x and 10.8.x. NOTE • For Windows Server® 2003/2003 x64 Edition/2008/2008 R2/2012 and Linux®, visit your model page at http://solutions.brother.com/. • You can visit us at http://solutions.brother.
USB Windows® For Windows® USB Interface Users (Windows® XP/XP Professional x64 Edition/Windows Vista®/ Windows® 7/Windows® 8) 15 Before you install IMPORTANT 16 a • If there are any programs running, close them. • The screens may differ depending on your operating system. NOTE The CD-ROM includes Nuance™ PaperPort™ 12SE. This software supports Windows® XP (SP3 or greater), XP Professional x64 Edition (SP2 or greater), Windows Vista® (SP2 or greater), Windows® 7 and Windows® 8.
USB d Follow the on-screen instructions until the Plug in the USB cable screen appears. Windows® 17 a Finish and restart Click Finish to restart your computer. After restarting the computer, you must log on with Administrator rights. NOTE e Connect the USB cable to the USB port marked with the symbol on your machine, and then connect the cable to your computer.
USB Macintosh For Macintosh USB Interface Users (Mac OS X v10.6.8, 10.7.x, 10.8.x) 15 Before you install IMPORTANT For Mac OS X v10.6.7 or lower users: upgrade to Mac OS X v10.6.8, 10.7.x, 10.8.x. (For the latest drivers and information for the Mac OS X you are using, visit http://solutions.brother.com/.) a b 16 a b Install MFL-Pro Suite Put the CD-ROM into your CD-ROM drive, and then double-click the BROTHER icon on your desktop. Double-click the Start Here OSX icon.
USB 17 Macintosh Download and install Presto! PageManager When Presto! PageManager is installed, OCR capability is added to Brother ControlCenter2. You can easily scan, share and organize photos and documents using Presto! PageManager. a On the Brother Support screen, click Presto! PageManager and follow the on-screen instructions. Macintosh 15 Windows® The installation is now complete.
Wired Network Windows® For Windows® Wired Network Interface Users (Windows® XP/XP Professional x64 Edition/Windows Vista®/ Windows® 7/Windows® 8) 15 Before you install c Connect the network interface cable to the Ethernet port on your machine, and then connect it to a free port on your hub. IMPORTANT • If there are any programs running, close them. • The screens may differ depending on your operating system. NOTE • The CD-ROM includes Nuance™ PaperPort™ 12SE.
Wired Network c Choose Wired Network Connection (Ethernet), and then click Next. Windows® f When the On-Line Registration screen appears, make your selection and follow the on-screen instructions. Once you have completed the registration process, click Next. NOTE To install the PS driver (BR-Script3 printer driver), choose Custom Install, and then follow the on-screen instructions.
Wired Network 18 Install MFL-Pro Suite on additional computers (if needed) If you want to use your machine with multiple computers on the network, install MFL-Pro Suite on each computer. Go to step 15 on page 16. NOTE Network license (Windows®) This product includes a PC license for up to five users. This license supports the installation of the MFL-Pro Suite including Nuance™ PaperPort™ 12SE on up to five PCs on the network.
Wired Network Macintosh For Macintosh Wired Network Interface Users (Mac OS X v10.6.8, 10.7.x, 10.8.x) 15 Before you install a IMPORTANT For Mac OS X v10.6.7 or lower users: upgrade to Mac OS X v10.6.8, 10.7.x, 10.8.x. (For the latest drivers and information for the Mac OS X you are using, visit http://solutions.brother.com/.) a b 16 b Install MFL-Pro Suite Put the CD-ROM into your CD-ROM drive, and then double-click the BROTHER icon on your desktop. Double-click the Start Here OSX icon.
Wired Network NOTE • If there is more than one of the same model connected on your network, the IP Address will be displayed to help you identify the machine. Macintosh 17 Download and install Presto! PageManager • You can find your machine’s IP Address by printing out the Network Configuration Report (see Print the Network Configuration Report uu page 39). When Presto! PageManager is installed, OCR capability is added to Brother ControlCenter2.
For Wireless Network Users For Wireless Network Interface Users (MFC-9330CDW / MFC-9340CDW) 15 Before you begin First you must configure the wireless network settings of your machine to communicate with your wireless access point/router. After the machine is configured to communicate with your wireless access point/router, the computers and mobile devices on your network will have access to the machine. To use the machine from a computer, you must install the drivers and software.
For Wireless Network Users 16 Choose your wireless setup method The following instructions will offer three methods for setting up your Brother machine on a wireless network. Choose the method you prefer for your environment. For methods b and c, start your wireless setup by pressing the the Touchscreen. a button on Setup using the CD-ROM and temporarily using a USB cable (Windows® and Macintosh) We recommend using a computer wirelessly connected to your network for this method.
For Wireless Network Users b Manual setup from the control panel using the Setup Wizard (Windows®, Macintosh and mobile devices) If your wireless access point/router does not support WPS (Wi-Fi Protected Setup™) or AOSS™, write down the wireless network settings of your wireless access point/router in the area below. IMPORTANT If you need assistance during setup and want to contact Brother Customer Service, make sure you have your SSID (Network Name) and Network Key ready.
For Wireless Network Users Setup using the CD-ROM and temporarily using a USB cable (Windows® and Macintosh) 17 Set up the wireless settings b (Windows®) Click Install MFL-Pro Suite, and click Yes in the next two windows if you accept the license agreements. IMPORTANT • You need to temporarily use a USB cable during configuration (cable not included).
For Wireless Network Users d When the Firewall/AntiVirus detected screen appears, choose Change the Firewall port settings to enable network connection and continue with the installation. (Recommended) and click Next. h i e If you are not using the Windows® Firewall, see the user’s guide for your software for information on how to add the following network ports: For network scanning, add UDP port 54925. For network PC-Fax receiving, add UDP port 54926.
For Wireless Network Users k Confirm the wireless network settings, and then click Next. The settings will be sent to your machine. NOTE • The settings will remain unchanged if you click Cancel. • To manually enter the IP address settings of your machine, click Change IP Address and enter the necessary IP address settings for your network. • If the wireless setup failure screen appears, click Retry. l Disconnect the USB cable between the computer and the machine, and then click Next.
For Wireless Network Users Manual setup from the control panel using the Setup Wizard (Windows®, Macintosh and mobile devices) 17 Set up the wireless settings e IMPORTANT You must have the wireless settings you wrote down for your network in step 16-b on page 23 before you proceed. NOTE If you use your machine in an IEEE 802.1x supported wireless network: uu Network User's Guide: Using IEEE 802.1x authentication. a b c On your machine, press Press Setup Wizard. .
For Wireless Network Users To install the MFL-Pro Suite, continue to step 18. For Windows® Users: Now go to page 34 For Macintosh Users: Now go to page 37 NOTE For mobile device users, see the Advanced Network User's Guides for details on how to use your machine with your mobile device(s). To download the User’s Guide for the application you are using, visit the Brother Solutions Center at http://solutions.brother.com/ and click Manuals on your model's page.
For Wireless Network Users One-push setup using WPS (Wi-Fi Protected Setup) or AOSS™ (Windows®, Macintosh and mobile devices) 17 a b c d e Configure the wireless settings Confirm that your wireless access point/router has the WPS or AOSS™ symbol as shown below. Place the Brother machine within range of your WPS or AOSS™ access point/router. The range may differ depending on your environment (see the instructions provided with your wireless access point/router). On your machine, press Press WPS/AOSS.
For Wireless Network Users Troubleshooting IMPORTANT If you need assistance during setup and want to contact Brother Customer Service, make sure you have your SSID (Network Name) and Network Key ready. We cannot assist you in locating this information. To find the wireless settings (SSID (Network Name) and Network Key)* 1. Check the documentation provided with your wireless access point/router. 2. The default SSID could be the access point/router manufacturer's name or the model name. 3.
For Wireless Network Users Error Code Recommended Solutions The wireless network and security setting you entered may be incorrect. TS-03 Confirm that the wireless network settings are correct (see To find the wireless settings (SSID (Network Name) and Network Key)* uu page 30). * Check if the entered or selected SSID/authentication method/encryption method/Network Key are correct. The Authentication/Encryption methods used by the selected wireless access point/router are not supported by your machine.
For Wireless Network Users Error Code Recommended Solutions The machine cannot detect a wireless access point/router that has WPS or AOSS™ enabled. To configure your wireless settings using WPS or AOSS™, you must operate both your machine and the wireless access point/router. Confirm your wireless access point/router supports WPS or AOSS™ and try starting again.
For Wireless Network Users Entering Text When you are setting certain menu selections, you may need to enter text into the machine. Press repeatedly to choose between letters, numbers and special characters. Press to change between upper case and lower case. Inserting spaces To enter a space, press Space. Making corrections If you entered a character incorrectly and want to change it, press d or c to move the cursor under the incorrect character, and then press . Enter the correct character.
Wireless Network Windows® Install the Drivers and Software (Windows® XP/XP Professional x64 Edition/Windows Vista®/ Windows® 7/Windows® 8) (MFC-9330CDW / MFC-9340CDW) 18 Before you install b Click Install MFL-Pro Suite, and click Yes in the next two windows if you accept the license agreements. IMPORTANT • If there are any programs running, close them. • The screens may differ depending on your operating system. NOTE • The CD-ROM includes Nuance™ PaperPort™ 12SE.
Wireless Network e Choose the machine from the list, and then click Next. Windows® 20 a Finish and restart Click Finish to restart your computer. After restarting the computer, you must log on with Administrator rights. NOTE NOTE • If your wireless settings fail, click the Wireless Setup button and follow the on-screen instructions to complete the wireless configuration.
Wireless Network Finish The installation is now complete. NOTE • For Windows® 8 users: if the Brother manuals included on the CD-ROM are in PDF format, use Adobe® Reader® to open them. If Adobe® Reader® is installed on your computer but cannot open the files in Adobe ® Reader®, change the file association for PDF (see How to open a PDF file in Adobe® Reader® (Windows® 8) uu page 40).
Wireless Network Macintosh Install the Drivers and Software (Mac OS X v10.6.8, 10.7.x, 10.8.x) (MFC-9330CDW / MFC-9340CDW) 18 Before you install d Choose your machine from the list, and then click Next. IMPORTANT For Mac OS X v10.6.7 or lower users: upgrade to Mac OS X v10.6.8, 10.7.x, 10.8.x. (For the latest drivers and information for the Mac OS X you are using, visit http://solutions.brother.com/.) a Make sure your machine is connected to an AC power source and your Macintosh is ON.
Wireless Network f When the Add Printer screen appears, click Add Printer. g Choose your machine from the list, click Add, and then click Next. (OS X v10.8.x) Select MFC-XXXX CUPS driver from the Use pop-up menu (where XXXX is your model name). NOTE To add the PS driver (BR-Script3 printer driver), select it from the Print Using (Use) pop-up menu. Macintosh 20 Download and install Presto! PageManager When Presto! PageManager is installed, OCR capability is added to Brother ControlCenter2.
For Network Users Web Based Management (web browser) Print the Network Configuration Report The Brother print server is equipped with a web server that allows you to monitor its status or change some of its configuration settings using HTTP (Hypertext Transfer Protocol). You can print the Network Configuration Report to confirm the current network settings. NOTE We recommend Windows® Internet Explorer® 8.0/9.0 for Windows® and Safari 5.0 for Macintosh.
Other Information Colour Correction The output density and print position of each colour may vary depending on the machine's environment. Factors like temperature and humidity can affect colour. Colour calibration and colour registration help you to improve the colour density and the print position of each colour. How to open a PDF file in Adobe® Reader® (Windows® 8) a b Colour Calibration Calibration helps you to improve the colour density.
Consumables Consumables When the time comes to replace consumable items such as toner or drums, an error message will appear on your machine's Touchscreen. For more information about the consumables for your machine, visit us at http://www.brother.com/original/ or contact your local Brother reseller. NOTE The drum unit and toner cartridge are two separate parts.
Trademarks The Brother logo is a registered trademark of Brother Industries, Ltd. Brother is a trademark of Brother Industries, Ltd. Microsoft, Windows, Windows Vista, Windows Server and Internet Explorer are either registered trademarks or trademarks of Microsoft Corporation in the United States and/or other countries. Apple, Macintosh, Safari and Mac OS are trademarks of Apple Inc., registered in the U.S. and other countries. Linux is the registered trademark of Linus Torvalds in the U.S.