
User Manual

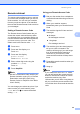

Table Of Contents
- ADVANCED USER’S GUIDE MFC-9970CDW
- User's Guides and where do I find it?
- Table of Contents
- 1 General Setup
- 2 Security features
- 3 Sending a fax
- Additional sending options
- Additional sending operations
- Sending a fax manually
- Dual access (black & white only)
- Broadcasting (black & white only)
- Real Time Transmission
- Overseas Mode
- Delayed Fax (black & white only)
- Delayed batch transmission (black & white only)
- Checking and cancelling waiting jobs
- Setting your changes as the new default
- Restoring all fax settings to the factory settings
- Electronic cover page (black & white only)
- Polling overview
- 4 Receiving a fax
- 5 Dialling and storing numbers
- 6 Printing reports
- 7 Making copies
- Copy settings
- Stop copying
- Improving copy quality
- Enlarging or reducing the image copied
- Duplex (2-sided) Copying
- Tray selection
- Adjusting Brightness and Contrast
- Sorting copies using the ADF
- Making N in 1 copies (page layout)
- 2 in 1 ID Copy
- Adjusting Colour (Saturation)
- Setting your changes as the new default
- Restoring all copy settings to the factory settings
- Setting your favourites
- Copy settings
- A Routine maintenance
- B Options
- C Glossary
- Index
- brother UK/IRE

25
4
4
Remote Fax Options
(black & white only)
4
Remote Fax Options are NOT available for
colour faxes.
Remote Fax Options let you receive faxes
while you are away from the machine.
You can use only one Remote Fax Option at
a time.
Out of Paper Reception 4
As soon as the paper tray becomes empty
during fax reception, the LCD shows
No Paper. Put some paper in the paper tray.
(See Loading paper and print media in
Chapter 2 of the Basic User's Guide.)
The machine will carry on receiving the fax,
with the remaining pages being stored in
memory, if enough memory is available.
Incoming faxes will continue to be stored in
the memory until the memory becomes full or
paper is loaded in the paper tray. When the
memory is full the machine will stop
automatically answering calls. To print the
faxes, put fresh paper in the tray.
Fax Forwarding 4
The Fax Forwarding feature lets you
automatically forward your received faxes to
another machine. If you choose Backup Print
On, the machine will also print the fax.
a Press MENU.
b Press a or b to display Fax.
Press Fax.
c Press a or b to display
Setup Receive.
Press Setup Receive.
d Press a or b to display
Forward/Store.
Press Forward/Store.
e Press Fax Forward.
f Do one of the followings:
Press Manual to enter the
forwarding fax number (up to 20
characters) or E-mail address (up to
60 characters) using the buttons on
the Touchscreen. (See Entering text
in Appendix C of the Basic User's
Guide.)
Press OK.
Press Address Book.
Press a or b to scroll until you find the
fax number or E-mail address you
want your faxes to be forward to.
Press the fax number or E-mail
address you want to use.
Receiving a fax 4