
User Manual
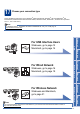
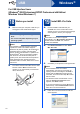
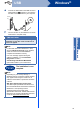
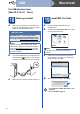
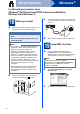
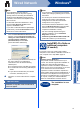

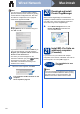
Table Of Contents
- Quick Setup Guide MFC-9970CDW
- Start Here
- 1 Unpack the machine and check the components
- 2 Remove the packing material from the machine
- 3 Load paper in the paper tray
- 4 Attach the control panel cover (if needed)
- 5 Connect the power cord and telephone line
- 6 Set your country
- 7 Choose a Receive Mode
- 8 Set the LCD brightness (if needed)
- 9 Set the date and time
- 10 Enter personal information (Station ID)
- 11 Fax Transmission Report
- 12 Set tone or pulse dialling mode
- 13 Set the telephone line compatibility
- 14 Set the telephone line type
- 15 Automatic Daylight Savings Time
- 16 Set the Time Zone
- 17 Choose your connection type
- For USB Interface Users (Windows® 2000 Professional/XP/XP Professional x64 Edition/Windows Vista®/Windows® 7)
- For USB Interface Users (Mac OS X 10.4.11 - 10.6.x)
- For Wired Network Interface Users (Windows® 2000 Professional/XP/XP Professional x64 Edition/Windows Vista®/Windows® 7)
- For Wired Network Interface Users (Mac OS X 10.4.11 - 10.6.x)
- For Wireless Network Interface Users
- 18 Before you begin
- 19 Confirm your network environment (Infrastructure Mode)
- Connecting the Brother machine to the wireless network
- Troubleshooting
- Entering Text for Wireless Settings
- Install the Drivers & Software (Windows® 2000 Professional/XP/XP Professional x64 Edition/Windows Vista®/Windows® 7)
- Install the Drivers & Software (Mac OS X 10.4.11 - 10.6.x)
- For Network Users
- Other Information
- Options and Consumables
- brother SAF/GLF
- Start Here

17
Windows
®
Wired Network
Windows
®
Macintosh
Wired Network
d When the Firewall/AntiVirus detected screen
appears, choose Change the Firewall port
settings to enable network connection and
continue with the installation.
(Recommended) and click Next.
(Not for Windows
®
2000 users)
If you are not using the Windows
®
Firewall, see
the user’s guide for your software for
information on how to add the following
network ports.
For network scanning, add UDP port 54925.
For network PC-Fax receiving, add UDP port
54926.
If you still have trouble with your network
connection, add UDP port 137.
e Follow the on-screen instructions to complete
setup.
20
Install MFL-Pro Suite on
additional computers
(if needed)
If you want to use your machine with multiple
computers on the network, install MFL-Pro Suite on
each computer. Go to step 19 on page 16.
Note
• If the installation does not continue
automatically, open the top menu again by
ejecting and then reinserting the CD-ROM or
double-click the start.exe program from the
root folder, and continue from step b to install
MFL-Pro Suite.
• For Windows Vista
®
and Windows
®
7 users,
when the User Account Control screen
appears, click Allow or Yes.
• If you want to install the PS driver (BR-Script3
printer driver), choose Custom Install and then
follow the on-screen instructions.
IMPORTANT
DO NOT cancel any of the screens during the
installation. It may take a few seconds for all
screens to appear.
Note
• If your machine is not found over the network,
confirm your settings by following the on-screen
instructions.
• You can find your machine’s IP address and the
node name by printing out the Network
Configuration List. See Print the Network
Configuration List on page 33.
• For Windows Vista
®
and Windows
®
7 users,
when the Windows Security screen appears,
select the check box and click Install to
complete the installation correctly.
• If an error message appears during the
software installation, run the Installation
Diagnostics located in
start/All Programs/Brother/MFC-XXXX LAN
(where MFC-XXXX is your model name).
Note
Network license (Windows
®
)
This product includes a PC license for up to
5 users. This license supports the installation of
the MFL-Pro Suite including ScanSoft™
PaperPort™ 12SE or ScanSoft™ PaperPort™
11SE on up to 5 PCs on the network. If you want
to use more than 5 PCs with ScanSoft™
PaperPort™ 12SE or ScanSoft™ PaperPort™
11SE installed, please purchase the Brother NL-5
pack which is a multiple PC license agreement
pack for up to 5 additional users. To purchase the
NL-5 pack, contact your authorized Brother
dealer or contact Brother customer service.
Finish
The installation is now
complete.