
User Manual
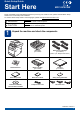
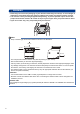
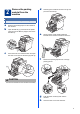
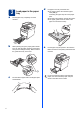
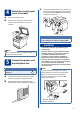
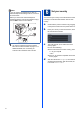
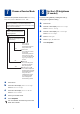
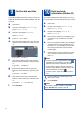
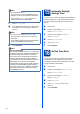
Table Of Contents
- Quick Setup Guide MFC-9970CDW
- Start Here
- 1 Unpack the machine and check the components
- 2 Remove the packing material from the machine
- 3 Load paper in the paper tray
- 4 Attach the control panel cover (if needed)
- 5 Connect the power cord and telephone line
- 6 Set your country
- 7 Choose a Receive Mode
- 8 Set the LCD brightness (if needed)
- 9 Set the date and time
- 10 Enter personal information (Station ID)
- 11 Fax Transmission Report
- 12 Set tone or pulse dialling mode
- 13 Set the telephone line compatibility
- 14 Set the telephone line type
- 15 Automatic Daylight Savings Time
- 16 Set the Time Zone
- 17 Choose your connection type
- For USB Interface Users (Windows® 2000 Professional/XP/XP Professional x64 Edition/Windows Vista®/Windows® 7)
- For USB Interface Users (Mac OS X 10.4.11 - 10.6.x)
- For Wired Network Interface Users (Windows® 2000 Professional/XP/XP Professional x64 Edition/Windows Vista®/Windows® 7)
- For Wired Network Interface Users (Mac OS X 10.4.11 - 10.6.x)
- For Wireless Network Interface Users
- 18 Before you begin
- 19 Confirm your network environment (Infrastructure Mode)
- Connecting the Brother machine to the wireless network
- Troubleshooting
- Entering Text for Wireless Settings
- Install the Drivers & Software (Windows® 2000 Professional/XP/XP Professional x64 Edition/Windows Vista®/Windows® 7)
- Install the Drivers & Software (Mac OS X 10.4.11 - 10.6.x)
- For Network Users
- Other Information
- Options and Consumables
- brother SAF/GLF
- Start Here

8
9
Set the date and time
The machine displays the time, and if you set up the
station ID the date and time will be added to each fax
you send.
a Press MENU.
b Press a or b to display Initial Setup.
Press Initial Setup.
c Press a or b to display Date&Time.
Press Date&Time.
d Press Date&Time again.
e Enter the last two digits of the year using the
buttons on the Touchscreen, and then press
OK.
(e.g. Enter 1, 1 for 2011.)
f Enter the two digits for the month using the
buttons on the Touchscreen, and then press
OK.
(e.g. Enter 0, 3 for March.)
g Enter the two digits for the day using the
buttons on the Touchscreen, and then press
OK.
(e.g. Enter 2, 5 for 25th.)
h Enter the time in 24-hour format using the
buttons on the Touchscreen, and then press
OK.
(e.g. Enter 1, 5, 2, 5 for 3:25 P.M.)
i Press Stop/Exit.
10
Enter personal
information (Station ID)
The machine displays the date and time, and if you
set up the Station ID, it will add it to each fax you send.
a Press MENU.
b Press a or b to display Initial Setup.
Press Initial Setup.
c Press a or b to display Station ID.
Press Station ID.
d Enter your fax number (up to 20 digits) using
the buttons on the Touchscreen, and then
press OK.
e Enter your telephone number (up to 20 digits)
using the buttons on the Touchscreen, and
then press OK. If your telephone number and
fax number are the same, enter the same
number again.
f Use the buttons on the Touchscreen to enter
your name (up to 20 characters), and then
press OK.
g Press Stop/Exit.
Note
• To enter numbers or special letters, press
repeatedly until the character you want to enter
appears, then press the character you want.
• If you entered a letter incorrectly and want to
change it, press d or c to move the cursor to the
incorrect character, and press .
• To enter a space, press the space key button
or c.
For more details, see Entering text in the
Basic User's Guide.
Note
If you make a mistake and want to start again,
press Stop/Exit and go back to step a.