
User Manual
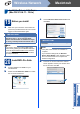
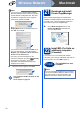

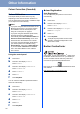

Table Of Contents
- Quick Setup Guide MFC-9970CDW
- Start Here
- 1 Unpack the machine and check the components
- 2 Remove the packing material from the machine
- 3 Load paper in the paper tray
- 4 Connect the power cord and telephone line
- 5 Choose a Receive Mode
- 6 Set the LCD brightness (if needed)
- 7 Set the date and time
- 8 Enter personal information (Station ID)
- 9 Fax Transmission Report
- 10 Set tone or pulse dialling mode
- 11 Set the telephone line compatibility
- 12 Set the telephone line type
- 13 Automatic Daylight Savings Time
- 14 Set the Time Zone
- 15 Choose your connection type
- For USB Interface Users (Windows® 2000 Professional/XP/XP Professional x64 Edition/Windows Vista®/Windows® 7)
- For USB Interface Users (Mac OS X 10.4.11 - 10.6.x)
- For Wired Network Interface Users (Windows® 2000 Professional/XP/XP Professional x64 Edition/Windows Vista®/Windows® 7)
- For Wired Network Interface Users (Mac OS X 10.4.11 - 10.6.x)
- For Wireless Network Interface Users
- 16 Before you begin
- 17 Confirm your network environment (Infrastructure Mode)
- Connecting the Brother machine to the wireless network
- Troubleshooting
- Entering Text for Wireless Settings
- Install the Drivers & Software (Windows® 2000 Professional/XP/XP Professional x64 Edition/Windows Vista®/Windows® 7)
- Install the Drivers & Software (Mac OS X 10.4.11 - 10.6.x)
- For Network Users
- Other Information
- Options and Consumables
- brother UK/IRE
- Start Here

Other Information
34
Colour Correction (if needed)
Colour Calibration
The output density for each colour may vary
depending on the environment the machine is in,
such as temperature and humidity. Calibration helps
you to improve the colour density.
Using the control panel
a Press MENU.
b Press a or b to display Printer.
Press Printer.
c Press a or b to display Calibration.
Press Calibration.
d Press Calibrate.
e Press Yes.
f Press Stop/Exit.
You can reset the calibration parameters back to
those set at the factory.
a Press MENU.
b Press a or b to display Printer.
Press Printer.
c Press a or b to display Calibration.
Press Calibration.
d Press Reset.
e Press Yes.
f Press Stop/Exit.
Colour Registration
Auto Registration
You can adjust the print position of each colour
automatically.
a Press MENU.
b Press a or b to display Printer.
Press Printer.
c Press a or b to display Auto Regist..
Press Auto Regist..
d Press Yes.
e Press Stop/Exit.
Brother CreativeCenter
Get inspired. If you're using Windows
®
, double-click
the Brother CreativeCenter icon on your desktop to
access our FREE web site with many ideas and
resources for personal and professional use.
Mac users can access Brother CreativeCenter at this
web address:
http://www.brother.com/creativecenter/
Note
• If you print using the Direct Print feature or the
BR-Script printer driver, you need to perform
the calibration from the control panel. See
Using the control panel on page 34.
• If you print using the Windows
®
printer driver,
the driver will get the calibration data
automatically if both Use Calibration Data and
Get Device Data Automatically are on. See
Advanced tab in the Software User's Guide.
• If you print using the Macintosh printer driver,
you need to perform the calibration using
Status Monitor. After turning Status Monitor
on, choose Color Calibration from Control
menu. See Status Monitor in the Software
User's Guide.
To adjust the print position of each colour
manually, see Manual Registration in the
Basic User's Guide.