
User Manual

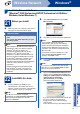
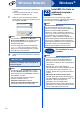
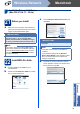
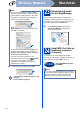
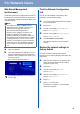

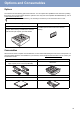
Table Of Contents
- Quick Setup Guide MFC-9970CDW
- Start Here
- 1 Unpack the machine and check the components
- 2 Remove the packing material from the machine
- 3 Load paper in the paper tray
- 4 Connect the power cord and telephone line
- 5 Choose your language (if needed)
- 6 Choose the correct Receive Mode
- 7 Set the LCD brightness (if needed)
- 8 Set the date and time
- 9 Set your Station ID
- 10 Fax Transmission Report
- 11 Set tone or pulse dialing mode (Canada only)
- 12 Set the telephone line compatibility
- 13 Dial Prefix
- 14 Automatic Daylight Savings Time
- 15 Set the Time Zone
- 16 Send in the Product Registration and Test Sheet (USA only)
- 17 Choose your connection type
- For USB Interface Users (Windows® 2000 Professional/XP/XP Professional x64 Edition/Windows Vista®/Windows® 7)
- For USB Interface Users (Mac OS X 10.4.11 - 10.6.x)
- For Wired Network Interface Users (Windows® 2000 Professional/XP/XP Professional x64 Edition/Windows Vista®/Windows® 7)
- For Wired Network Interface Users (Mac OS X 10.4.11 - 10.6.x)
- For Wireless Network Interface Users
- 18 Before you begin
- 19 Confirm your network environment (Infrastructure Mode)
- Connecting the Brother machine to the wireless network
- Troubleshooting
- Entering Text for Wireless Settings
- Install the Drivers & Software (Windows® 2000 Professional/XP/XP Professional x64 Edition/Windows Vista®/Windows® 7)
- Install the Drivers & Software (Mac OS X 10.4.11 - 10.6.x)
- For Network Users
- Other Information
- Options and Consumables
- brother USA/CAN
- Start Here

35
For Network Users
Web Based Management
(web browser)
The Brother print server is equipped with a web server
that allows you to monitor its status or change some
of its configuration settings, using HTTP (Hyper Text
Transfer Protocol).
a Open your browser.
b Type “http://machine’s IP address/” into your
browser’s address bar (where “machine’s IP
address” is the IP address of the printer or the
print server name).
For example: http://192.168.1.2/
Print the Network Configuration
List
You can print the Network Configuration List to
confirm the current network settings.
a Turn on the machine and wait until the machine
is in the Ready state.
b Press MENU.
c Press a or b to display Print Reports.
Press Print Reports.
d Press a or b to display Network Config.
Press Network Config.
e Press Black Start or Color Start.
The machine will print the current network
settings.
Restore the network settings to
factory default
To restore all network settings of the internal
Print/Scan server to factory default, please follow the
steps below.
a Make sure the machine is not operating, then
disconnect all the cables from the machine
(except the power cord).
b Press MENU.
c Press a or b to display Network.
Press Network.
d Press a or b to display Network Reset.
Press Network Reset.
e Press Yes.
f Press Yes for 2 seconds.
The machine will restart, re-connect cables
once this is complete.
Note
• The default User Name is ‘admin’ and the
default password is ‘access’. You can use a
web browser to change this password.
• We recommend Microsoft
®
Internet
Explorer
®
6.0 (or greater) or Firefox 3.0 (or
greater) for Windows
®
and Safari 3.0 (or
greater) for Macintosh. Please also make sure
that JavaScript and cookies are always enabled
in whichever browser you use. To use a web
browser, you will need to know the IP address
of the print server. The IP address of the print
server is listed on the Network Configuration
List.
See Web Based Management in the Network
User's Guide.