
User Manual
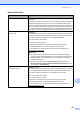
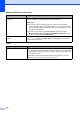
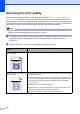
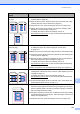
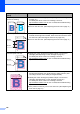
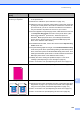
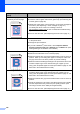
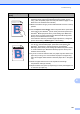
Table Of Contents
- BASIC USER’S GUIDE MFC-9970CDW
- User's Guides and where do I find it?
- Table of Contents
- 1 General information
- 2 Loading paper
- 3 Loading documents
- 4 Sending a fax
- 5 Receiving a fax
- 6 Telephone and external devices
- Telephone line services
- Telephone Service for Australia
- Telephone Service for New Zealand
- Telephone Service for Some Countries
- Connecting an external TAD
- External and extension telephones
- 7 Dialling and storing numbers
- 8 Making copies
- 9 Printing data from a USB Flash memory drive or digital camera supporting mass storage
- 10 How to print from a computer
- 11 How to scan to a computer
- A Routine maintenance
- B Troubleshooting
- C Menu and features
- D Specifications
- Index
- brother ARL/ASA/NZ

150
Uneven density appears
periodically across the page
Perform the calibration. (See Calibration on page 112.)
Clean the scanner glass and scanner glass strip. (See Cleaning the
scanner glass on page 96.)
Identify the colour that is uneven and put in a new toner cartridge for
that colour. (See Replacing a Toner cartridge on page 70.)
To identify the colour of the toner cartridge, visit us at
http://solutions.brother.com/
to view our FAQs and troubleshooting
tips.
Put in a new drum unit. (See Replacing the drum unit on page 77.)
Thin lines do not print Make sure Toner Save mode is off in the control panel of the machine
or the printer driver.
Change the print resolution.
If you use a Windows
®
printer driver, choose Improve Pattern
Printing or Improve Thin Line in Settings from the Basic tab. (See
Settings Dialog in the Software User's Guide.)
Wrinkle
Change to the recommended type of paper.
Make sure that the back cover is closed properly.
Make sure that the two grey levers inside the back cover are in the up
position. When you are using thick paper or envelopes, make sure
the grey levers are in the down position to prevent wrinkling.
Make sure that the media type settings in the printer driver and in the
machine’s Paper Type menu matches the type of paper you are
using. (See Acceptable paper and other print media on page 21 and
Basic tab in the Software User's Guide.)
Offset image
Make sure that the media type settings in the printer driver and in the
machine's Paper Type menu matches the type of paper you are
using. (See Acceptable paper and other print media on page 21 and
Basic tab in the Software User's Guide.)
Make sure that the two grey levers inside the back cover are in the up
position.
Check the machine’s environment. Conditions such as low humidity
and low temperatures may cause this print quality problem. (See
Choosing a location in the Safety and Legal Booklet.)
Put in a new drum unit. (See Replacing the drum unit on page 77.)
Examples of poor print
quality
Recommendation
ABCDEFGHIJKLMNOPQRSTUVWXYZ. 0123456789. abcdefghijklmnopqrstuvwxyz.
ABCDEFGHIJKLMNOPQRSTUVWXYZ. 0123456789. abcdefghijklmnopqrstuvwxyz.
ABCDEFGHIJKLMNOPQRSTUVWXYZ. 0123456789. abcdefghijklmnopqrstuvwxyz.
ABCDEFGHIJKLMNOPQRSTUVWXYZ. 0123456789. abcdefghijklmnopqrstuvwxyz.
ABCDEFGHIJKLMNOPQRSTUVWXYZ. 0123456789. abcdefghijklmnopqrstuvwxyz.
ABCDEFGHIJKLMNOPQRSTUVWXYZ. 0123456789. abcdefghijklmnopqrstuvwxyz.
ABCDEFGHIJKLMNOPQRSTUVWXYZ. 0123456789. abcdefghijklmnopqrstuvwxyz.
ABCDEFGHIJKLMNOPQRSTUVWXYZ. 0123456789. abcdefghijklmnopqrstuvwxyz.
ABCDEFGHIJKLMNOPQRSTUVWXYZ. 0123456789. abcdefghijklmnopqrstuvwxyz.
ABCDEFGHIJKLMNOPQRSTUVWXYZ. 0123456789. abcdefghijklmnopqrstuvwxyz.
ABCDEFGHIJKLMNOPQRSTUVWXYZ. 0123456789. abcdefghijklmnopqrstuvwxyz.
ABCDEFGHIJKLMNOPQRSTUVWXYZ. 0123456789. abcdefghijklmnopqrstuvwxyz.
ABCDEFGHIJKLMNOPQRSTUVWXYZ. 0123456789. abcdefghijklmnopqrstuvwxyz.
ABCDEFGHIJKLMNOPQRSTUVWXYZ. 0123456789. abcdefghijklmnopqrstuvwxyz.
ABCDEFGHIJKLMNOPQRSTUVWXYZ. 0123456789. abcdefghijklmnopqrstuvwxyz.
ABCDEFGHIJKLMNOPQRSTUVWXYZ. 0123456789. abcdefghijklmnopqrstuvwxyz.