
User Manual
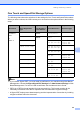
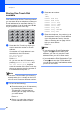
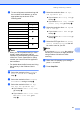
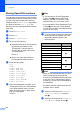


Table Of Contents
- BASIC USER’S GUIDE MFC-9970CDW
- User's Guides and where do I find it?
- Table of Contents
- 1 General information
- 2 Loading paper
- 3 Loading documents
- 4 Sending a fax
- 5 Receiving a fax
- 6 Telephone and external devices
- 7 Dialling and storing numbers
- 8 Making copies
- 9 Printing data from a USB Flash memory drive or digital camera supporting mass storage
- 10 How to print from a computer
- 11 How to scan to a computer
- A Routine maintenance
- B Troubleshooting
- C Menu and features
- D Specifications
- Index
- brother SAF/GLF

Dialling and storing numbers
47
7
e To save a fax/scan resolution along with
the number/E-mail address, go to the
appropriate step as shown in the
following table.
Note
• When you do a broadcast and you have
saved a scan profile along with the
number or E-mail address, the scan profile
of the One Touch, Speed Dial or Group
number you chose first will be applied to
the broadcast.
• For details about the file format, see Using
the Scan key in the Software User's
Guide.
f Select the resolution from Standard,
Fine, S.Fine or Photo and go to
step l.
g Select the resolution from Standard,
Fine or Photo and go to step l.
h Select the resolution from 100 dpi,
200 dpi, 300 dpi or 600 dpi.
If you chose E-Mail Color PDF,
go to step k.
If you chose E-Mail Color JPEG
or E-Mail Color XPS, go to
step l.
i Select the resolution from 100 dpi,
200 dpi or 300 dpi.
If you chose E-Mail Gray PDF, go
to step k.
If you chose E-Mail Gray JPEG or
E-Mail Gray XPS, go to step l.
j Select the resolution from 200 dpi or
200 x 100 dpi.
If you chose E-Mail B&W PDF, go
to step k.
If you chose E-Mail B&W TIFF, go
to step l.
k Select the PDF type from PDF, PDF/A,
Secure PDF or Signed PDF that will
be used to send to your PC.
Note
If you choose Secure PDF, the machine
will ask you to enter a fou-digit password
using numbers 0-9 before it starts
scanning.
l When the LCD displays your settings,
press OK to confirm.
m Press Stop/Exit.
Option selected in step c Go to step
Fax f
IFAX g
E-Mail Color PDF
hE-Mail Color JPEG
E-Mail Color XPS
E-Mail Gray PDF
iE-Mail Gray JPEG
E-Mail Gray XPS
E-Mail B&W PDF
j
E-Mail B&W TIFF