
User Manual
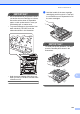
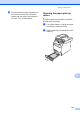
Table Of Contents
- BASIC USER’S GUIDE MFC-9970CDW
- User's Guides and where do I find it?
- Table of Contents
- 1 General information
- 2 Loading paper
- 3 Loading documents
- 4 Sending a fax
- 5 Receiving a fax
- 6 Telephone and external devices
- 7 Dialling and storing numbers
- 8 Making copies
- 9 Printing data from a USB Flash memory drive or digital camera supporting mass storage
- 10 How to print from a computer
- 11 How to scan to a computer
- A Routine maintenance
- B Troubleshooting
- C Menu and features
- D Specifications
- Index
- brother UK/IRE

110
Manual Registration A
If colour still appears incorrectly after auto-
registration, you will need to perform manual
registration.
a Press MENU.
b Press a or b to display Printer.
Press Printer.
c Press a or b to display
Manual Regist..
Press Manual Regist..
d Press Print Chart.
e Press Mono Start or Colour Start.
f When the machine has finished printing
the registration chart, press
Set Regist. to correct the colour
manually.
g Starting at 1 Magenta Left on the chart,
check which coloured bar has the most
uniform print density. Press
1 Magenta Left and choose the
number on the Touchscreen, using
d or c to display more numbers if
necessary.
Repeat for 2 Cyan Left,
3 Yellow Left, 4, 5, 6 to 9.
h Press OK if you finished entering the
numbers.
i Press Stop/Exit.
Frequency
(Colour Correction) A
You can set how often the colour correction
(Colour Calibration and Auto Registration)
occurs. The default setting is Normal. The
colour correction process consumes some
amount of the toner.
a Press MENU.
b Press a or b to display Printer.
Press Printer.
c Press a or b to display Frequency.
Press Frequency.
d Press Normal, Low or Off.
e Press Stop/Exit.