
Software User's Guide
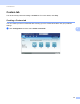
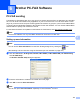
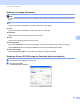
Table Of Contents
- SOFTWARE USER’S GUIDE
- Table of Contents
- Section I: Machine operation keys
- Section II: Windows®
- 2 Printing
- Using the Brother printer driver
- Printing a document
- Duplex printing
- Simultaneous scanning, printing and faxing
- Printer driver settings
- Accessing the printer driver settings
- Features in the Windows® printer driver
- Basic tab
- Advanced tab
- Accessories tab
- Support
- Features in the BR-Script 3 printer driver (PostScript® 3™ language emulation)
- Status Monitor
- 3 Scanning
- Scanning a document using the TWAIN driver
- Scanning a document using the WIA driver (Windows® XP/Windows Vista®/Windows® 7)
- Scanning a document using the WIA driver (Windows Photo Gallery and Windows Fax and Scan)
- Using ScanSoft™ PaperPort™ 12SE with OCR by NUANCE™
- 4 ControlCenter4
- 5 Remote Setup
- 6 Brother PC-FAX Software
- 7 Firewall settings (For Network users)
- 2 Printing
- Section III: Apple Macintosh
- 8 Printing and Faxing
- 9 Scanning
- 10 ControlCenter2
- 11 Remote Setup
- Section IV: Using The Scan key
- 12 Scanning (For USB cable users)
- 13 Network Scanning
- Before using Network Scanning
- Using the Scan key on your network
- Scan to E-mail
- Scan to E-mail (E-mail Server, For MFC-9460CDN, MFC-9560CDW and MFC-9970CDW)
- Scan to Image
- Scan to OCR
- Scan to File
- Scan to FTP
- Scan to Network
- How to set a new default for Scan to E-mail (E-mail Server, For MFC-9970CDW)
- How to set a new default for the file size (For Scan to FTP and Network) (For MFC-9460CDN and MFC-9560CDW)
- Index
- brother USA

Brother PC-FAX Software
101
6
Sending setup 6
From the Brother PC-FAX Setup dialog box, click the Sending tab to display the screen below.
Outside line access
Enter a number to access an outside line here. This is sometimes required by local PBX telephone
systems (for example, dialling 9 to get an outside line in your office). For PC-Fax send, this number will be
applied and Dial Prefix set in the function menu will be ignored.
Include header
To add the header information you entered in the User Information tab to the top of your sent faxes, check
the Include header box. (See Setting up user information on page 100.)