
Software User's Guide
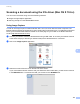
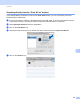
Table Of Contents
- SOFTWARE USER’S GUIDE
- Table of Contents
- Section I: Machine operation keys
- Section II: Windows®
- 2 Printing
- Using the Brother printer driver
- Printing a document
- Duplex printing
- Simultaneous scanning, printing and faxing
- Printer driver settings
- Accessing the printer driver settings
- Features in the Windows® printer driver
- Basic tab
- Advanced tab
- Accessories tab
- Support
- Features in the BR-Script 3 printer driver (PostScript® 3™ language emulation)
- Status Monitor
- 3 Scanning
- Scanning a document using the TWAIN driver
- Scanning a document using the WIA driver (Windows® XP/Windows Vista®/Windows® 7)
- Scanning a document using the WIA driver (Windows Photo Gallery and Windows Fax and Scan)
- Using ScanSoft™ PaperPort™ 12SE with OCR by NUANCE™
- 4 ControlCenter4
- 5 Remote Setup
- 6 Brother PC-FAX Software
- 7 Firewall settings (For Network users)
- 2 Printing
- Section III: Apple Macintosh
- 8 Printing and Faxing
- 9 Scanning
- 10 ControlCenter2
- 11 Remote Setup
- Section IV: Using The Scan key
- 12 Scanning (For USB cable users)
- 13 Network Scanning
- Before using Network Scanning
- Using the Scan key on your network
- Scan to E-mail
- Scan to E-mail (E-mail Server, For MFC-9460CDN, MFC-9560CDW and MFC-9970CDW)
- Scan to Image
- Scan to OCR
- Scan to File
- Scan to FTP
- Scan to Network
- How to set a new default for Scan to E-mail (E-mail Server, For MFC-9970CDW)
- How to set a new default for the file size (For Scan to FTP and Network) (For MFC-9460CDN and MFC-9560CDW)
- Index
- brother USA

Scanning
168
9
Scanning directly from the “Print & Fax” section 9
If you already added your Brother machine in the Print & Fax section, you can scan directly from there.
Please follow the steps below:
a Connect your Brother machine to the Macintosh using a USB cable. Or connect your Brother machine
to the same LAN (if you are using a network model) where the Macintosh is connected.
b Select System Preferences from the Apple Menu.
c Click on the Print & Fax icon.
d Select the machine from the list on the left side of the screen and click on Open Print Queue.
e Click on the Scanner icon.