
Software User's Guide

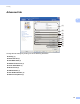
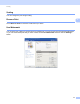
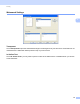
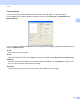
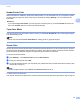
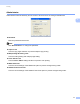
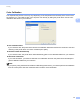
Table Of Contents
- SOFTWARE USER’S GUIDE
- Table of Contents
- Section I: Machine operation keys
- Section II: Windows®
- 2 Printing
- Using the Brother printer driver
- Printing a document
- Duplex printing
- Simultaneous scanning, printing and faxing
- Printer driver settings
- Accessing the printer driver settings
- Features in the Windows® printer driver
- Basic tab
- Advanced tab
- Accessories tab
- Support
- Features in the BR-Script 3 printer driver (PostScript® 3™ language emulation)
- Status Monitor
- 3 Scanning
- Scanning a document using the TWAIN driver
- Scanning a document using the WIA driver (Windows® XP/Windows Vista®/Windows® 7)
- Scanning a document using the WIA driver (Windows Photo Gallery and Windows Fax and Scan)
- Using ScanSoft™ PaperPort™ 12SE with OCR by NUANCE™
- 4 ControlCenter4
- 5 Remote Setup
- 6 Brother PC-FAX Software
- 7 Firewall settings (For Network users)
- 2 Printing
- Section III: Apple Macintosh
- 8 Printing and Faxing
- 9 Scanning
- 10 ControlCenter2
- 11 Remote Setup
- Section IV: Using The Scan key
- 12 Scanning (For USB cable users)
- 13 Network Scanning
- Before using Network Scanning
- Using the Scan key on your network
- Scan to E-mail
- Scan to E-mail (E-mail Server, For MFC-9460CDN, MFC-9560CDW and MFC-9970CDW)
- Scan to Image
- Scan to OCR
- Scan to File
- Scan to FTP
- Scan to Network
- How to set a new default for Scan to E-mail (E-mail Server, For MFC-9970CDW)
- How to set a new default for the file size (For Scan to FTP and Network) (For MFC-9460CDN and MFC-9560CDW)
- Index
- brother USA

Printing
30
2
Header-Footer Print 2
When this feature is enabled, it will print the date and time on your document from your computer’s system
clock and the PC login user name or the text you entered. By clicking Settings, you can customize the
information.
ID Print
If you select Login User Name, your PC login user name will print. If you select Custom and enter the
text in the Custom edit box, the text you entered will print.
Toner Save Mode 2
You can conserve toner use with this feature. When you set Toner Save Mode to On, prints appears lighter.
The default setting is Off.
Note
We do not recommend Toner Save Mode for printing photo or grayscale images.
Secure Print 2
Secure documents are documents that are password protected when they are sent to the machine. Only the
people who know the password will be able to print them. Since the documents are secured at the machine,
you must enter the password using the control panel of the machine to print them.
To send a secured document:
a Click Settings... of the Secure Print and check Secure Print.
b Enter your password and click OK.
c To print secured documents, you must enter your password from the control panel of the machine. (See
Secure Key on page 2.)
Note
Printing multiple copies is not available when Secure Print is set to on.
To delete a secured document:
You need to use the control panel of the machine to delete a secured document. (See Secure Key on page 2.)