
Software User's Guide
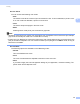
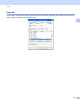
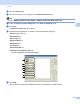
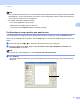
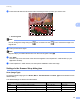
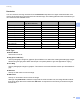
Table Of Contents
- SOFTWARE USER’S GUIDE
- Table of Contents
- Section I: Machine operation keys
- Section II: Windows®
- 2 Printing
- Using the Brother printer driver
- Printing a document
- Duplex printing
- Simultaneous scanning, printing and faxing
- Printer driver settings
- Accessing the printer driver settings
- Features in the Windows® printer driver
- Basic tab
- Advanced tab
- Accessories tab
- Support
- Features in the BR-Script 3 printer driver (PostScript® 3™ language emulation)
- Status Monitor
- 3 Scanning
- Scanning a document using the TWAIN driver
- Scanning a document using the WIA driver (Windows® XP/Windows Vista®/Windows® 7)
- Scanning a document using the WIA driver (Windows Photo Gallery and Windows Fax and Scan)
- Using ScanSoft™ PaperPort™ 12SE with OCR by NUANCE™
- 4 ControlCenter4
- 5 Remote Setup
- 6 Brother PC-FAX Software
- 7 Firewall settings (For Network users)
- 2 Printing
- Section III: Apple Macintosh
- 8 Printing and Faxing
- 9 Scanning
- 10 ControlCenter2
- 11 Remote Setup
- Section IV: Using The Scan key
- 12 Scanning (For USB cable users)
- 13 Network Scanning
- Before using Network Scanning
- Using the Scan key on your network
- Scan to E-mail
- Scan to E-mail (E-mail Server, For MFC-9460CDN, MFC-9560CDW and MFC-9970CDW)
- Scan to Image
- Scan to OCR
- Scan to File
- Scan to FTP
- Scan to Network
- How to set a new default for Scan to E-mail (E-mail Server, For MFC-9970CDW)
- How to set a new default for the file size (For Scan to FTP and Network) (For MFC-9460CDN and MFC-9560CDW)
- Index
- brother USA

Scanning
52
3
d Press and hold down the left mouse button and drag it over the portion you want to scan.
1 Scanning area
Note
You can enlarge the image using the icon, and then use the icon to restore the image to its
original size.
e Load your document again.
Note
Skip this step if you loaded the document on the scanner glass in step a.
f Click Start.
This time only the chosen area of the document appears in the PaperPort™ 12SE window (or your
application window).
g In the PaperPort™ 12SE window, use the options available to refine the image.
Settings in the Scanner Setup dialog box 3
Scan (Image Type) 3
Choose the output image type from Photo, Web or Text. Resolution and Scan Type will be altered for each
default setting.
The default settings are listed in the table below:
Scan (Image Type) Resolution Scan Type
Photo Use for scanning photo images. 300 x 300 dpi 24bit Color
Web Use for attaching the scanned image to web pages. 100 x 100 dpi 24bit Color
Text Use for scanning text documents. 200 x 200 dpi Black & White
1