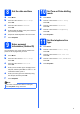
Quick Setup Guide Start Here MFC-J220 MFC-J410 Before you can use the machine, please read this Quick Setup Guide for the correct setup and installation. WARNING WARNING indicates a potentially hazardous situation which, if not avoided, could result in death or serious injuries. CAUTION CAUTION indicates a potentially hazardous situation which, if not avoided, may result in minor or moderate injuries.
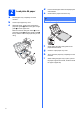
a b c 2 Load plain A4 paper d e Pull the paper tray completely out of the machine. Fan the stack of paper well to avoid paper jams and misfeeds. Check that the paper is flat in the tray. IMPORTANT DO NOT push the paper in too far. Lift the output paper tray cover. With both hands, gently press and slide the paper side guides a and then the paper length guide b to fit the paper size.
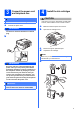
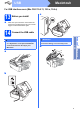
4 Connect the power cord and telephone line CAUTION IMPORTANT DO NOT connect the USB cable yet. a Connect the power cord. WARNING b The machine must be fitted with an earthed plug. Install the ink cartridges If ink gets in your eyes, wash them out with water at once, and if irritation occurs consult a doctor. a b c d Make sure that the power is turned on. Open the ink cartridge cover. Remove the green protective part. Unpack the ink cartridge.
f g h a 7 Take care to match the colour of the lever with the cartridge colour. Install each ink cartridge in the direction of the arrow on the label. Gently push the ink cartridge until it clicks. After all the ink cartridges are installed close the ink cartridge cover. 5 Check the print quality When the preparation process has finished, the LCD shows Set Paper and Press Start. There are four possible receive modes: Fax Only, Fax/Tel, Manual and External TAD.
a b c 8 Set the date and time Press Menu. Press a or b to choose Initial Setup. Press OK. Press a or b to choose Date&Time. Press OK. d e f Enter the last two digits of the year on the dial pad, and then press OK. Repeat for month/day/time in 24-hour format. Press Stop/Exit. 9 Enter personal information (Station ID) You should store your name and fax number to be printed on all fax pages that you send. a b c d e f Press Menu. Press a or b to choose Initial Setup. Press OK.
12 Set the phone line compatibility If you are connecting the machine to a VoIP service (over the Internet) you need to change the compatibility setting. Note If you are using an analogue telephone line you can skip this step. a b c d e Press Menu. Press a or b to choose Initial Setup. Press OK. Press a or b to choose Compatibility. Press OK. Press a or b to choose Basic(for VoIP). Press OK. Press Stop/Exit.
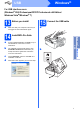
USB Windows® For USB interface users (Windows® 2000 Professional/XP/XP Professional x64 Edition/ Windows Vista®/Windows® 7) 13 a Make sure that your computer is ON and you are logged on with Administrator rights. b c d 15 Connect the USB cable a Install MFL-Pro Suite Put the supplied installation CD-ROM into your CD-ROM drive. Follow the on-screen instructions. The CD-ROM Top Menu will appear. Click Install MFL-Pro Suite and click Yes if you accept the license agreements.
USB Windows® c 16 a b Finish and restart Click Finish to restart your computer. After restarting the computer, you must be logged on with Administrator rights. In the Check for Firmware Updates screen, choose the firmware update setting you want and click OK. Note Internet access is required for the firmware update. IMPORTANT Make sure that the cable does not restrict the cover from closing, or an error may occur. d Finish The installation is now complete.
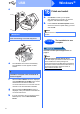
USB Macintosh For USB interface users (Mac OS X 10.4.11, 10.5.x, 10.6.x) 13 a Before you install c Make sure your machine is connected to the power and your Macintosh is ON. You must be logged on with Administrator rights. 14 Connect the USB cable • DO NOT connect the machine to a USB port on a keyboard or a non-powered USB hub. • Connect the machine directly to your Macintosh. Make sure that the cable does not restrict the cover from closing, or an error may occur.
USB 15 a b c d e f Install MFL-Pro Suite Put the supplied installation CD-ROM into your CD-ROM drive. Double-click the Start Here OSX icon to install. Please wait, it will take a few seconds for the software to install. After the installation, the Brother software will search for the Brother device. Choose the machine from the list, and then click OK. When this screen appears, click Next. When the Brother Support screen appears, click Close. Finish 10 The installation is now complete.
Install Optional Applications 1 Install FaceFilter Studio/BookScan & Whiteboard Suite supported by Reallusion, Inc IMPORTANT • The machine must be ON and connected to the computer. • The computer must be connected to the Internet. • Make sure you are logged on with Administrator rights. • This application is not available for Windows Server® 2003/2008 series. a b c d Open the top menu again by ejecting and then reinserting the installation CD-ROM or by double-clicking the start.
Trademarks The Brother logo is a registered trademark of Brother Industries, Ltd. Brother is a registered trademark of Brother Industries, Ltd. Windows Vista is either a registered trademark or a trademark of Microsoft Corporation in the United States and other countries. Microsoft, Windows, Windows Server and Internet Explorer are registered trademarks of Microsoft Corporation in the United States and/or other countries. Apple, Macintosh and Mac OS are trademarks of Apple Inc.