
User Manual
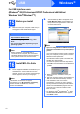
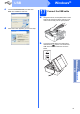

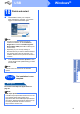
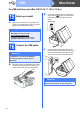
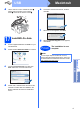
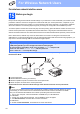
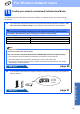
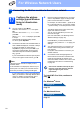
Table Of Contents
- Quick Setup Guide MFC-J265W
- Start Here
- 1 Unpack the machine and check the components
- 2 Load plain A4 paper
- 3 Connect the power cord and telephone line
- 4 Install the ink cartridges
- 5 Check the print quality
- 6 Choose your language (if needed)
- 7 Choose a Receive Mode
- 8 Set the LCD contrast (if needed)
- 9 Set the date and time
- 10 Enter personal information (Station ID)
- 11 Fax Transmission Report
- 12 Set Tone or Pulse dialling mode
- 13 Set the phone line compatibility
- 14 Choose your connection type
- For USB interface users (Windows® 2000 Professional/XP/XP Professional x64 Edition/ Windows Vista®/Windows® 7)
- For USB interface users (Mac OS X 10.4.11, 10.5.x, 10.6.x)
- For wireless network interface users
- 15 Before you begin
- 16 Confirm your network environment (Infrastructure Mode)
- Connecting the Brother machine to the wireless network
- Troubleshooting
- Install the drivers & software (Windows® 2000 Professional/XP/XP Professional x64 Edition/ Windows Vista®/Windows® 7)
- Install the drivers & software (Mac OS X 10.4.11, 10.5.x, 10.6.x)
- Install Optional Applications
- For Network Users
- Consumables
- brother CHN-ENG
- Start Here

12
Windows
®
USB
For USB interface users
(Windows
®
2000 Professional/XP/XP Professional x64 Edition/
Windows Vista
®
/Windows
®
7)
15
Before you install
a Make sure that your computer is ON and you
are logged on with Administrator rights.
16
Install MFL-Pro Suite
a Put the supplied installation CD-ROM into your
CD-ROM drive. If the model name screen
appears, choose your machine. If the language
screen appears, choose your language.
b The CD-ROM Top Menu will appear. Click
Install MFL-Pro Suite and click Yes if you
accept the license agreements. Follow the
on-screen instructions.
IMPORTANT
• For the latest drivers and information, visit
http://solutions.brother.com/
• If there are any programs running, close
them.
• The screens may differ depending on your
operating system.
Note
• Before installation, if the USB cable is
connected to the computer, the "Found New
Hardware Wizard" dialog box will automatically
show, please cancel it to close the screen.
Note
If the Brother screen does not appear
automatically, go to My Computer (Computer),
double-click the CD-ROM icon, and then
double-click start.exe.
Note
•I
f you are using Windows
®
2000 Professional
and have not installed service pack 3 (SP3) or
greater:
To access the PhotoCapture Center™ features
from your computer you may have to install a
Windows
®
2000 update first.
The Windows
®
2000 update is included with
the MFL-Pro Suite installer.
To install the update, follow the steps below:
1 Click OK to start installation of the Windows
®
updates.
2 When instructed, click OK to restart your
computer.
3 After the computer restarts, the installation of
MFL-Pro Suite will automatically continue.
• If the installation does not continue
automatically, open the top menu again by
ejecting and then reinserting the CD-ROM or
double-click the start.exe program from the
root folder, and continue from b to install
MFL-Pro Suite.
• For Windows Vista
®
and Windows
®
7, when
the User Account Control screen appears,
click Allow or Yes.